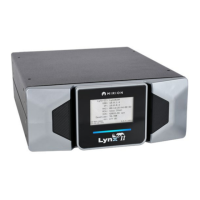
Appendix B Communications Setup
154 Lynx II DSA User's Manual - 7096089
Quick IP Setup Summary
Out of the box, the Lynx II is configured for Ethernet access using static IP addressing to
http://10.0.0.3. Two temporary connection methods are suggested here to allow
you to change the Lynx II's defaults to be compatible with your network, a “crossover”
cable or a standard “straight-through” cable can be used for all connections.
The Lynx II is shipped with a “Straight-through” Ethernet network CAT5 cable (color
may vary) that is typically used to connect a PC to a device through a network.
Preferred Setup - Wired IP Network
Whether your IP network employs DHCP for dynamic address assignments or provides a
specific IP address for fixed address assignments, follow these steps to change the factory
values to the IP settings your network requires.
Due to the nature of configuring Network parameters on a Windows PC,
there is no 'undo' for some steps as they will first remove your existing
network settings. It is suggested that you first write your existing settings
down before deleting or changing settings in your efforts to connect with the
Lynx II.
Direct Setup: Connect to Lynx II with your PC
This direct-connection method also may be used permanently for a Lynx II application in
a non-networked site, such as a 'PC-to-Lynx II stand-alone system'.
This procedure allows you to connect to and operate the Lynx II using your PC and a
browser, without other network equipment.
Use this method if you do not yet have an IP Network connection (either a static address
or DHCP) configured for your new Lynx II system, and you choose to set up the Lynx II
before that network connection is available. Later – once your network connection is
available – you will make a few changes to the network settings to finally connect the
Lynx II to your network.
Note that under Windows typically there is no 'Undo'. Please record any existing IP
address settings on your PC before you change them, in the event, you must return this PC
to its original settings.
Connections
To begin, perform the following connections:
1. Place the Lynx II near your PC. Connect the ac power adapter to the Lynx II, and
plug it in. It will take approximately 30 to 60 seconds for Lynx II to fully initialize.
The Lynx II is ready for communication when its POWER Led stops blinking.
2. Disconnect your PC's network adapter from the existing connections.
3. Connect the Ethernet cable (provided with Lynx II) from your desktop PC to the
Network jack (10/100/1000 T) on the Lynx II.
 Loading...