Home
Toshiba
All in One Printer
e-STUDIO3510c
Toshiba e-STUDIO3510c User Manual
4
of 1
of 1 rating
394 pages
Give review
Manual
Specs
To Next Page
To Next Page
To Previous Page
To Previous Page
Loading...
10
WHEN THIS MESSAGE APPEARS
344 “Examine stapler”
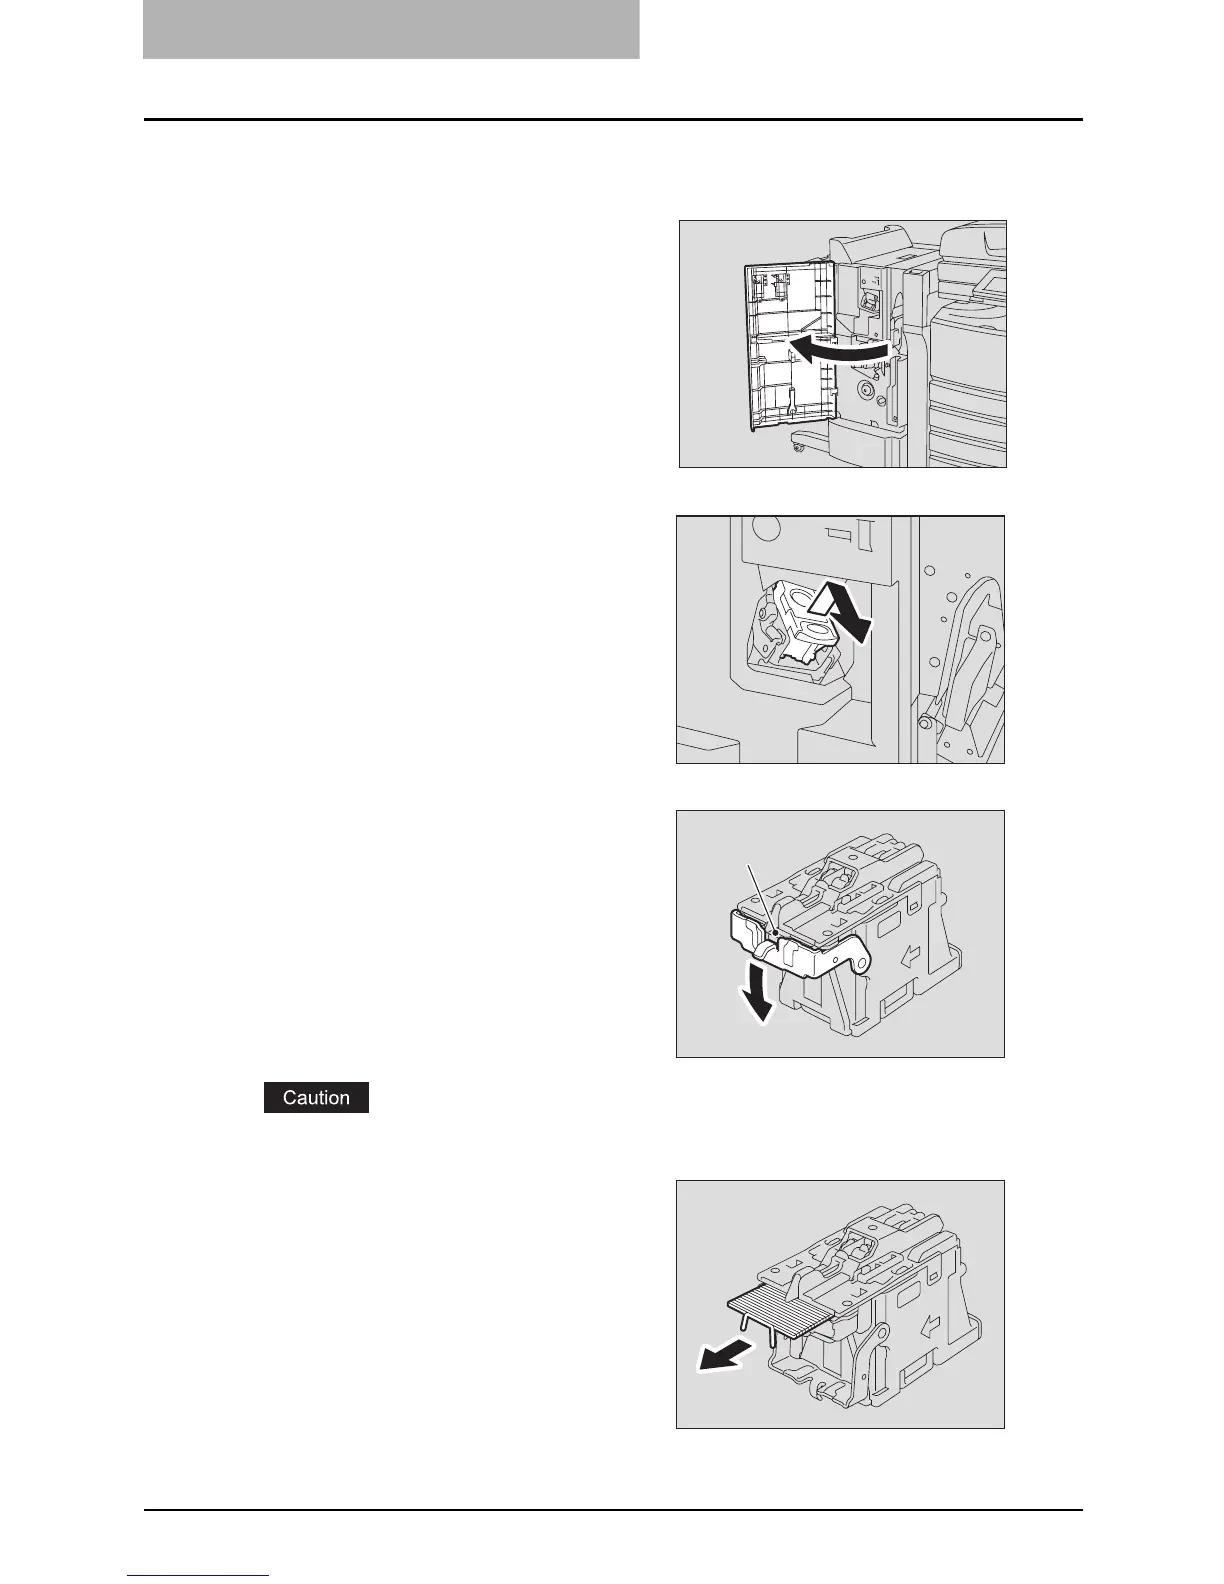
Finisher (optional: MJ-1030)
1
Open the front cover of the fin-
isher
.
2
T
ake off the st
aple cartridge.
3
Lower the guide while holding
the knob.
A: S
tapling area
Do not touch the stapling area. The stapler could injure you.
4
Remove any jammed st
aples.
A
345
347
Table of Contents
Default Chapter
3
Notice to Users
3
Lineup of Our Manuals
5
Before Reading this Manual
7
Table of Contents
9
Toshiba Quality Is Second to None
17
Features of the E-Studio2500C/3500C/3510C
19
General Precautions
21
When Using the Multifunctional Digital Color Systems
23
During Maintenance or Inspection
26
When Handling Supplies
26
Disclaimer Notice
27
Forgery Prevention Function/Storage of Color Copies
28
Chapter 1 BEFORE USING EQUIPMENT
30
Description of each Component
30
Front / Right Side
30
Left Side / Inner Side
32
Configuration of Options
34
Control Panel
36
Adjustment of the Angle of the Control Panel
38
Touch Panel
40
Adjusting the Contrast of the Touch Panel
42
Clearing Functions Selected
42
Setting Letters
43
Preparation 1- Turning Power On/Off
44
Turning Power on
44
When Department or User Management Is Used
45
User Management
46
Turning Power off (Shutdown)
49
Energy Saving Mode
51
Preparation 2- Setting Copy Paper
53
Acceptable Copy Paper
53
Recommended Paper
54
Handling and Storing Paper
54
Setting Copy Paper (Size Change)
55
Changing the Setting of Paper Size
60
Drawer for Special Uses
61
Clearing the Drawer for Special Uses
63
Placing Paper in the Large Capacity Feeder (Optional)
64
Chapter 2 HOW to MAKE COPIES
66
Setting Originals
66
Acceptable Originals
66
Placing Originals on the Glass
68
Sheet Originals
68
Book-Type Originals
69
Using the Reversing Automatic Document Feeder (Optional)
70
Continuous Feed Mode
71
Single Feed Mode
72
Original Width
72
Making Copies
74
Initial (Default) Settings
74
Copying Procedure
75
Stopping the Copying Operation
79
Scanning the Next Originals During Copying (Auto Job Start)
80
Confirming and Canceling Auto Job
81
Interrupt Copying in Progress and Make Other Copies (Interrupt Copying)
82
Bypass Copying
83
Bypass Copying on Standard Size Paper
84
Bypass Copying on Non-Standard Size Paper
90
Registering Non-Standard Size in the Memory
93
Proof Copy
94
Chapter 3 SETTING of BASIC COPY MODES
98
Paper Selection
98
Automatic Paper Selection (APS)
98
Basic Menu
99
Manual Paper Selection
100
Copying Mixed-Sized Originals in One Operation (Mixed Original Size)
101
Switching Color Mode
103
Enlargement and Reduction Copying
104
Automatic Magnification Selection (AMS)
104
Specifying both Original Size and Copy Size Separately
106
Using the Zoom Buttons or the One-Touch Zoom Buttons
108
Copying Photo Originals in the Best Reproduction Ratio for Copy Paper Size
110
Selecting Finishing Modes
114
Type of Finishing Mode
114
Name of each Part in the Finisher (Optional)
115
Sort/Group Copying
116
Rotate Sort Mode
118
Staple Sort Mode
119
Magazine Sort & Saddle Stitch Mode (Booklet Mode)
121
Hole Punch Mode (Optional)
124
Manual Stapling (MJ-1101 Only)
126
Duplex Copying
128
1-Sided Original -> 1-Sided Copy (Default Setting at Installation)
129
1-Sided Original -> 2-Sided Copy
130
2-Sided Original -> 2-Sided Copy
131
2-Sided Original -> 1-Sided Copy
132
Book-Type Original -> 2-Sided Copy
133
Original Mode
137
Copy Density Adjustment
139
Automatic Copy Density Mode
139
Manual Copy Density Mode
140
Chapter 4 IMAGE ADJUSTMENT
142
Color Balance (YMCK Adjustment)
142
RGB Adjustment
144
One-Touch Adjustment
145
Background Adjustment
146
Sharpness
147
Twin Color (2-Color) Copy
148
Twin Color Copy
148
Twin Color Selectable
148
Red & Black
151
Monocolor Copying
154
Hue
155
Saturation
156
Chapter 5 USING the EDITING FUNCTIONS
159
Image Shift
159
Creating a Right or Left Margin
159
Creating a Top or Bottom Margin
161
Creating a Bookbinding Margin
163
Edge Erase
165
Book Center Erase
167
Dual Page
169
Start Button
170
2In1 / 4In1
171
Magazine Sort
174
Editing
176
Trimming / Masking
176
Mirror Image
179
Negative/Positive Reversal
180
Xy Zoom
181
Cover Sheet
183
Sheet Insertion
186
Time Stamp
189
Page Number
190
Job Build
192
Image Direction
196
Book - Tablet
198
Adf / Sadf
199
Continuous Feed Mode
199
Single Feed Mode
200
Full Image
202
Image Repeat
204
Chapter 6 E-FILING
208
E-Filing
208
Public Box
208
Creating User Boxes
210
Changing Data of User Boxes
213
Deleting User Boxes
216
Storing Documents in E-Filing
218
Printing Stored Documents
223
Printing the Whole Document
223
Test Printing
225
Printing the Stored Document after Changing the Settings
226
Deleting Folders or Documents
228
Chapter 7 TEMPLATE
232
Template
232
Template in "Useful Template
232
Registering User Groups and Templates
234
Registering a Template in the Public Template Group
234
Registering the New User Group
240
Registering a Template in the User Group
243
Changing Data of User Groups and Templates
248
Changing the Data of a User Group
248
Changing the Data of a Template
251
Recalling Templates
256
When Recalling a Template in a Public Group
256
When Recalling a Template in a User Group
258
Deleting User Groups or Templates
261
Deleting a User Group
261
Deleting a Template
262
Chapter 8 JOB STATUS
268
Job Status
268
Confirming Print Job Status
269
Print Jobs
269
Deleting Print Jobs
270
When Using Department Codes
271
Displaying Invalid Queues
271
Keying in Correct Department Code to Print
272
Deleting Invalid Print Jobs
273
Confirming Scan Job Status
274
Log List
275
Confirming Job History in Log List
276
Print Log
276
Send Log
277
Receive Log
278
Scan Log
279
Registering into Address Book from Log Lists
280
Printing Journals (Send/Receive Log List)
282
Print Status Display
283
Releasing Print Job Errors
283
Error Code
286
Chapter 9 BLINKING GRAPHIC SYMBOLS
296
Blinking Graphic Symbols
296
Drawer Display on the Touch Panel
297
Replace Toner Cartridge Symbol
298
Recommendation for Original Toner
299
Replacing the Toner Cartridge
300
Cleaning the Slit Glasses
301
Cleaning the Chargers
303
Replace Toner Bag Symbol
305
Jam Symbols
307
Misfeed in the Reversing Automatic Document Feeder (Optional)
307
Misfeed in Drawer Feeding Area
310
Misfeed in the Large Capacity Feeder (Optional)
311
Misfeed in the Paper Feed Pedestal (Optional)
312
Misfeed on the Bypass Tray
312
Misfeed in the Automatic Duplexing Unit
313
Misfeed in the Jam Releasing Cover
313
Misfeed in the Fuser Unit
314
Misfeed in the Bridge Unit (Optional)
317
Misfeed in the Finisher and the Hole Punch Unit (Optional: MJ-1101, MJ-6101)
318
Misfeed in the Saddle Stitch Finisher and the Hole Punch Unit (Optional: MJ-1030, MJ-6004)
323
Misfeed in the Saddle Stitch Unit (Optional)
325
Call Service Symbol
328
Chapter 10 When this Message Appears
329
Toner Near Empty
331
Time for Slit Glass and Main Charger Cleaning
334
Cleaning the Slit Glass
334
Cleaning the Chargers
337
Check Staple Cartridge
338
Finisher (Optional: MJ-1101)
338
Finisher (Optional: MJ-1030)
340
Check Staple Cartridge in the Saddle Stitch Unit
342
Examine Stapler
344
Finisher (Optional: MJ-1101)
344
Finisher (Optional: MJ-1030)
346
Ready (Check Stapler)
348
Examine Stapler in the Saddle Stitch Unit
349
Close the Front Cover of the Finisher
351
Ready (Check Saddle Stitch Stapler)
352
Ready (Hole Punch Dust bin Is Full)
353
Hole Punch Unit (Optional: MJ-6101, MJ-6004)
353
Power Failure
354
Time for Periodic Maintenance
355
Check Paper Size Setting on Control Panel for Drawer N
356
During Copying (Using a Drawer)
357
During Copying (Using the Bypass Tray)
360
During Printing from the FAX or Printer (Using a Drawer)
361
During Printing from the Printer (Using the Bypass Tray)
363
Cannot Print this Paper Size Select the Other Drawer
365
Cannot Print this Paper Type Set the Other Paper Type
366
Reboot the Machine
367
Chapter 11 MAINTENANCE
370
Daily Inspection
370
Simple Troubleshooting
371
Equipment Does Not Start
371
Paper Jamming Occurs Frequently
371
Display Does Not Change When Buttons or Icons Are Pressed
371
Functions Cannot be Set
372
Image Density Is too Low
372
Image Density Is too High
372
Image Trouble
372
Chapter 12 SPECIFICATIONS & OPTIONS
376
E-Studio2500C/3500C/3510C Specifications
376
Continuous Copying Speed
377
Specifications of Options
379
Reversing Automatic Document Feeder
379
Additional Drawer Module
379
Upper Tray
380
Lower Tray
380
Bridge Unit
382
Packing List
383
Copying Function Combination Matrix
384
Combination Matrix 1/2
384
Combination Matrix 2/2
385
Image Quality Adjustment Combination Matrix
386
Combination Matrix 1/2
386
Combination Matrix 2/2
387
Index
389
4
Based on 1 rating
Ask a question
Give review
Questions and Answers:
Need help?
Do you have a question about the Toshiba e-STUDIO3510c and is the answer not in the manual?
Ask a question
Toshiba e-STUDIO3510c Specifications
General
Brand
Toshiba
Model
e-STUDIO3510c
Category
All in One Printer
Language
English
Related product manuals
Toshiba e-STUDIO3511
313 pages
Toshiba e-STUDIO3515AC
108 pages
Toshiba e-STUDIO350
764 pages
Toshiba e-STUDIO352
126 pages
Toshiba e-STUDIO355
672 pages
Toshiba e-STUDIO357
238 pages
Toshiba e-STUDIO353
362 pages
Toshiba E-studio356se
90 pages
Toshiba E-studio3555c
84 pages
Toshiba E-STUDIO3508A
124 pages
Toshiba E-STUDIO3505AC
124 pages
Toshiba e-Studio3508LP
124 pages