Part II: Settings and Measurements
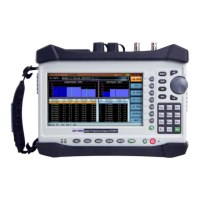
24-4 Fiber Scope
A crucial part of optical fiber maintenance is ensuring that the fiber endface is free of contamination.
When particles of dirt or debris become caught in the endface, signal transmission performance suffers. The
DS2831’s fiber inspection scope allows you to examine connector endfaces in real-time, identifying issues
with automatic pass/fail testing.
Fiber Optical Inspection Scope
Procedure:
1.
Connect the fiber inspection scope USB connector to the USB port in the DS2831’s top panel. Then
connect the optical fiber for testing to this connector.
2.
In the
Home
menu’s optical application page, use the rotary knob to launch the fiber inspection
scope application.
3.
The scope’s image will appear on the DS2831 screen. Using the focus knob on the scope, adjust the
image until it is clear.
4.
The entry fields on the right allow you to control the scope’s brightness, contrast, and sharpness. Use
the rotary knob and arrow keys to tune these values, creating a clearly visible image (as above).
5.
Press
Diagnosis
(F1). The DS2831 will attempt to highlight contamination. If it cannot produce a result,
re-adjust the focus and image parameters and try again. If contamination is detected, it will appear in
red on the screen with a FAIL notification. Otherwise, the instrument will show PASS.
6.
When finished, press
Esc
to quit the inspection scope function and return to the menu.