Do you have a question about the Fagor CNC 8070 and is the answer not in the manual?
Details on features dependent on installed software options for -BL- and -OL- models.
Guidelines to prevent damage to the CNC unit and associated equipment.
Conditions and clauses for warranty coverage on repairs performed by FAGOR.
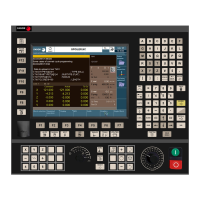
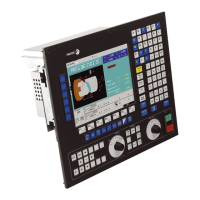
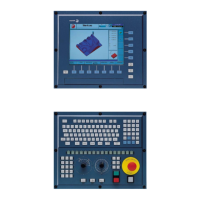
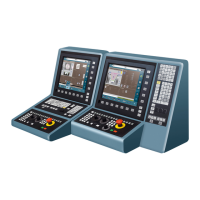
Detailed description of the display and function keys.
Overview of the LCD-10K monitor interface and key functions.
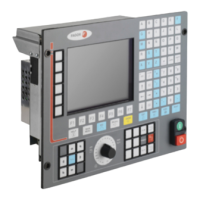
Explanation of keyboard layout and mouse functionality.
Description of the vertical keyboard layout and mouse operations.
Details of the operator panel controls and spindle speed settings.
Comprehensive list of keyboard shortcuts for various operations.
Procedures for powering the CNC system on and off, including startup options.
Explanation of different operating modes and disk protection levels.
Information on Ethernet connectivity and its features.
Details on USB support for devices like pendrives and keyboards.
Overview of the main CNC interface elements, including status bar and menus.
Explanation of the components and information displayed on the CNC status bar.
Description of how the horizontal softkey menu operates in standard and pop-up modes.
Explanation of the different operating modes and how to access them.
Details on using the task window to access operating modes and hotkeys.
Information on how warnings and errors are displayed and managed.
Guide to selecting files, creating new ones, and navigating windows.
Explanation of the calculator functionality, including operations and history.
How to interact with dialog boxes using keyboard and mouse.
Overview of the automatic mode interface, including data and graphic screens.
How to view program blocks and subroutine status information.
Steps for simulating and executing programs, including selecting blocks and starting execution.
How to execute individual program blocks and their impact on M/G functions.
Procedure for performing tool inspection after program interruption, including axis repositioning.
Methods for recovering program history and resuming execution from a specific block.
How to display and control the HSC dynamic override bar.
Overview of the manual (jog) mode interface, showing axis positions and functions.
Detailed guide on manual axis operations like home search and jogging.
Manual control of spindle operations, including speed and direction.
Procedure for changing tools manually in the spindle.
How to adjust feedrate and spindle speed settings in jog mode.
Procedures for managing zero and fixture offsets in jog mode.
Steps for calibrating tools manually without using a probe.
Procedure for semi-automatic tool calibration using a probe.
Steps for automatic tool calibration using a probe and canned cycles.
Guide to defining data for part centering, including manual entry and teach-in.
Explanation of parameters for probe data, movement, and geometry.
Step-by-step guide on performing the part centering operation.
Overview of the EDISIMU mode interface, including windows and status indicators.
Procedures for editing programs and available editing modes.
Detailed description of the editing window, its components, and functionalities.
Guide to operations within the editing window, including file management and block operations.
How the graphic window aids in program editing and visualization.
Description of the graphics window for simulating programs.
Details of the program window for selecting simulation parameters.
How to set execution blocks, find text, and manage the program window.
Information on estimating program execution times and tool machining times.
Overview of the profile editor interface, including graphic and data areas.
Methods for creating, modifying, and importing profiles.
How to modify profile elements, insert corners, and define chamfers/roundings.
Options for adjusting the display area and zoom within the profile editor.
How to set and define the work plane for profile editing.
Procedures for ending the profile editing session and saving the work.
Practical examples illustrating profile definition for milling and lathe operations.
Overview of the graphic environment for visualizing tool paths and part geometry.
Explanation of different graphic types like 3D lines, sections, and combined views.
Functionality for enlarging or reducing the graphic display area.
How to define the size of the graphic representation using coordinates.
Selecting and configuring the point of view for 3D graphics.
Tools for measuring distances between points on the graphic display.
How to clear the graphic display.
Customizing colors for tool paths and part representation.
Setting graphic window appearance and functions like print and activate.
Displaying the actual tool path during program execution.
Visualizing the real path with exaggerated error for analysis.
Adjusting the speed of program simulation.
Overview of the HD graphic environment for enhanced visualization.
Manipulating the graphic display by moving, rotating, and zooming.
Choosing different views and saving custom user views.
Customizing graphic environment, including windows, colors, and properties.
Performing actions like moving sections and printing the graphic.
Deleting the graphic representation.
Defining parts for display and their dimensions.
Measuring distances between points on the graphic.
Adjusting the simulation speed.
Overview of the graphic environment for lathe operations.
Description of vertical and horizontal softkey menus for graphic interaction.
Available graphic types for lathe environments (line and solid).
Functionality for enlarging or reducing the graphic display.
Defining graphic representation size using diameters and coordinates.
Measuring distances between points on the graphic.
Clearing the graphic display.
Customizing colors for tool paths and solid parts.
Setting graphic window appearance and functions like print setup.
Displaying the actual tool path during execution.
Visualizing the real path with exaggerated error for analysis.
Adjusting the simulation speed.
Overview of the HD graphic environment for lathe operations.
Vertical and horizontal softkey menus for interacting with graphics.
Manipulating the graphic display by moving, rotating, and zooming.
Choosing different views and saving custom user views.
Customizing graphic environment, including windows, colors, and properties.
Performing actions like moving sections and printing the graphic.
Deleting the graphic representation.
Defining parts for display and their dimensions.
Measuring distances between points on the graphic.
Adjusting the simulation speed.
Overview of the MDI/MDA mode interface, including standard and full-screen views.
Horizontal softkey menu options for the MDI/MDA mode.
Procedures for editing and executing single program blocks, including error handling.
Managing executed blocks in history and saving them as programs.
Introduction to various user tables like zero offset, clamp, and parameter tables.
Vertical softkey menu options for managing user tables.
Details on absolute, incremental, and PLC zero offsets.
Storing and managing clamp offsets for axes.
Information on common, global, and local arithmetic parameter tables.
Procedures for editing table data, using the calculator, and saving/recalling tables.
Overview of tool and magazine tables, including tool, active-tools, and status tables.
Vertical softkey menu options for tool and magazine table management.
How to search for text or values within tables.
Procedures for saving and loading table data for backup and restoration.
Details on the tool table, including full and simple modes, and about tools.
Defining tools, data display configuration, and tool magazine information.
Using the simple mode of the tool table for basic data display and editing.
Advanced operations for editing the tool table in full mode.
Viewing and managing active tools per channel and changing the spindle tool.
Monitoring the status of ongoing tool change operations.
Information on magazine distribution, tool positions, and magazine status.
Procedures for loading, unloading, and managing tools in magazines and tool changers.
Overview of the utilities mode interface, including folder tree and file lists.
Customizing the display of the program list, including sorting and updating.
Managing files and folders, including selection, deletion, and creation.
Functionality for searching files based on criteria like text and location.
Setting up and managing passwords for CNC functions and modes.
Procedures for backing up and restoring CNC configuration and user data.
Protecting files by encrypting them using OEM passwords.
Overview of the PLC mode interface, including service and data windows.
Managing PLC projects and their associated files, including compilation.
Detailed guide to editing PLC programs in different languages and editors.
Procedures for editing programs written in C or mnemonic languages.
Editing PLC programs using contact (ladder) language with softkey menus.
Real-time monitoring of PLC program execution status and variables.
Debugging PLC program execution using commands for cycles and modules.
Viewing results of PLC program compilation and file analysis.
Analyzing PLC logic signals over time using traces and trigger conditions.
Analyzing the status of PLC variables and resources through tables.
Obtaining information about PLC resources and their usage within the project.
Obtaining information about PLC program execution times and file statistics.
Editing and displaying PLC messages and errors, including additional information files.
Overview of machine parameter tables and their selection.
Structure and components of machine parameter tables, including general and axis parameters.
Procedures for editing, validating, saving, and recalling table data.
Using the oscilloscope tool for adjusting CNC and drives, showing variables and trigger data.
Utilizing the Bode diagram for analyzing system response and adjusting CNC/drives.
Performing circularity tests to improve axis reversal peak and optimize adjustments.
Overview of the DDSSetup mode interface for configuring servo systems.
Displaying connected Sercos and Mechatrolink devices and managing servo configurations.
Managing access levels for Sercos drive parameters and variables.
Editing and managing parameters and variables for Sercos drives and Mechatrolink servos.
Monitoring and managing drive warnings, alarms, and errors.
Monitoring PLC variables and resources, including saving and loading configurations.
Monitoring drive status and digital I/O for Sercos and Mechatrolink devices.
Configuring and operating the internal command generator for Sercos drives.
Using the command line for consulting variables, parameters, and executing commands.
Structure and use of descriptor files for setting Mechatrolink servo parameters.
Overview of the diagnosis mode interface for system hardware and software checks.
Analyzing system, software, and hardware configurations for potential issues.
Detailed diagnosis information for Sercos bus, including drives and error management.
Saving and verifying CAN configurations for system startup.
Generating system configuration and warranty registration reports.
Accessing and reviewing the log of errors and warnings generated by the CNC.
Accessing OS utilities and OEM-preset applications from the CNC.
Configuring and using the application to send email notifications for CNC events.
Steps for setting up and activating the email sending application.
Setting up network properties for accessing remote resources.
| Control Type | CNC |
|---|---|
| Model | 8070 |
| Manufacturer | Fagor Automation |
| Control Axes | Up to 28 axes |
| Communication Interfaces | Ethernet, USB, RS-232 |
| Program Storage | Hard Disk |
| Power Supply | 24 VDC |
| PLC | Integrated |
| Operating System | Proprietary |
| Display | Color LCD |
| Programming Language | ISO |
| User Interface | Graphical |
| Resolution | 0.1 microns |