93 HD96-24-CC-TP User Manual
3. There are two lter slopes to choose from for each lter: 12dB/Oct or 24dB/Oct for the HPF and 6dB/Oct or 12dB/Oct for the LPF.
4. In the Equaliser display widget, the HPF and LPF settings will be displayed on screen. They are displayed in purple when active and atten when turned o.
The lters can be altered by touching the corresponding purple dot to change the frequency of the lter.
Note: The frequency for both lters can also be set by using the pop-up rotary by touching the FREQ control display in the Equaliser widget (in between the Filter on
and Filter slope). It can also be locked to the screen. Please refer to the Navigation section on how the pop-up rotaries function.
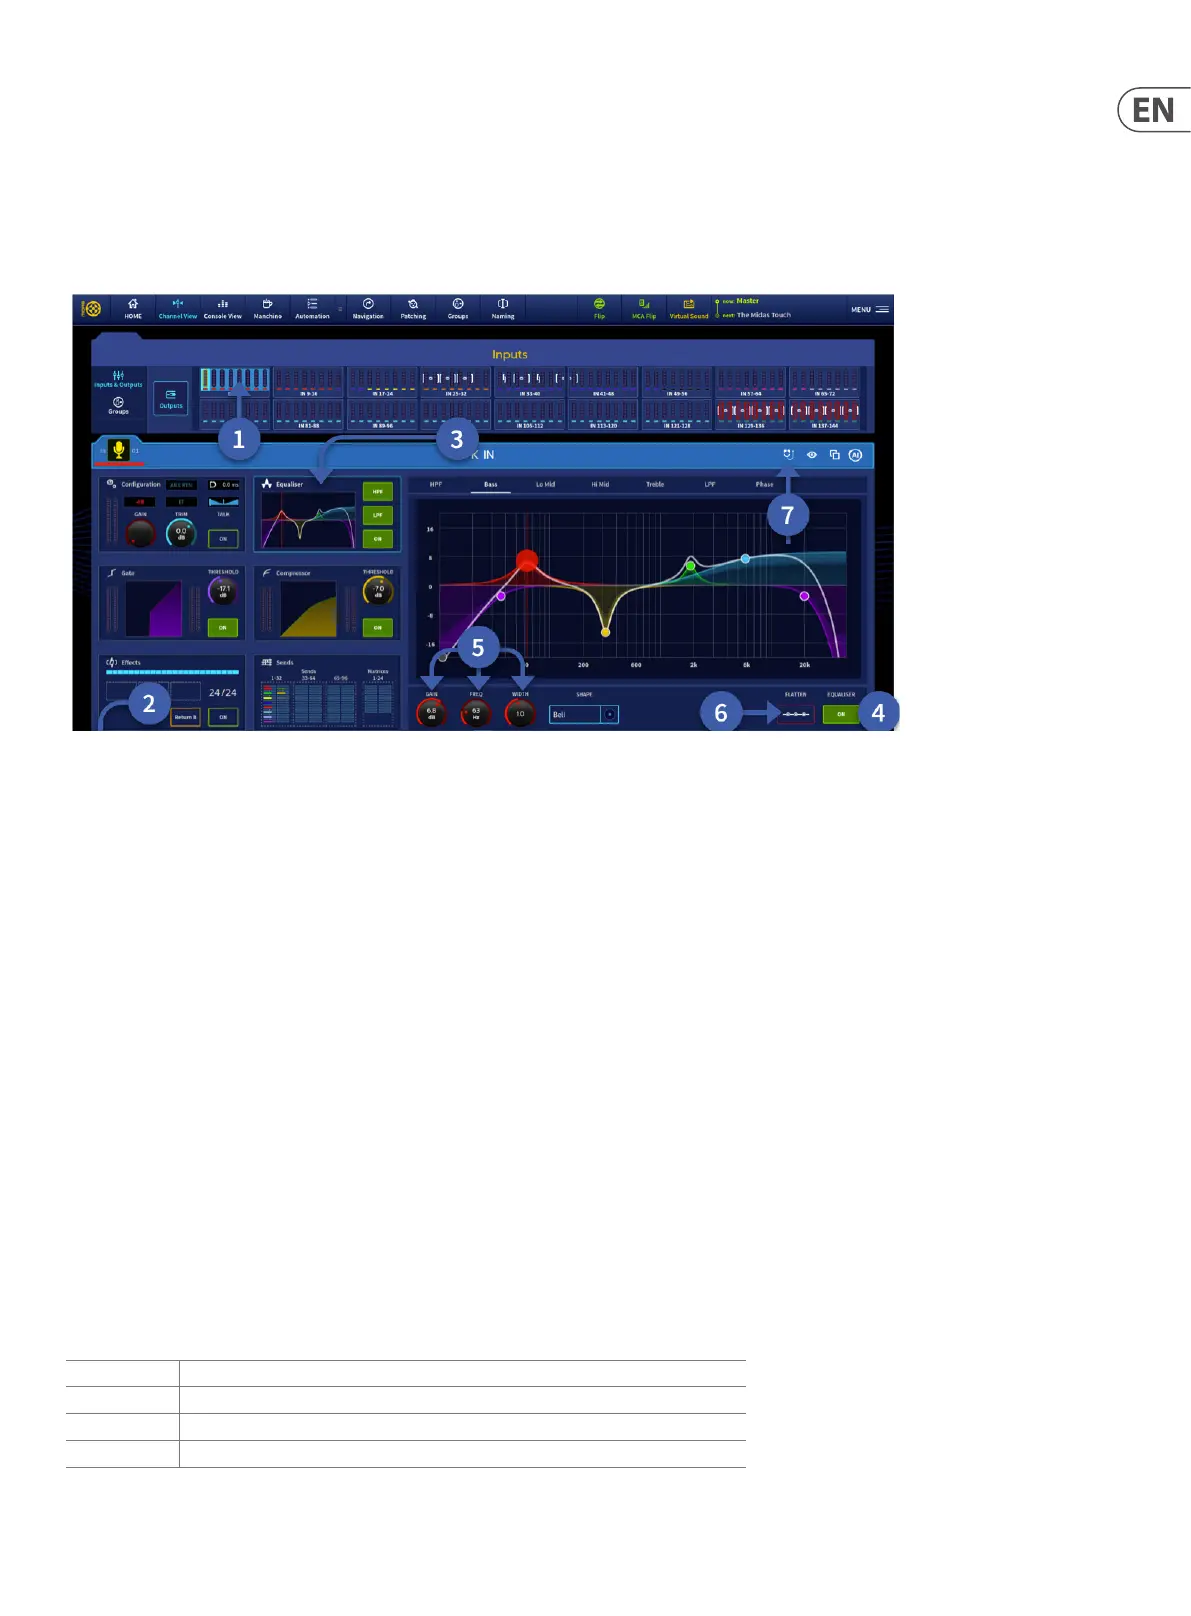
Input equalisation
To equalise the input signal, use the 4-band parametric EQ, which is situated in the Equaliser section of the channel overview or Equaliser widget. Band 1 and 4
each have a parametric lter option and three specic shelving modes. Visual feedback for EQ is either via Equaliser widget, and channel detail area. In addition, it is
possible to hear changes to EQ in the solo bus before the change is committed to the input or output with the innovative EQ audition mode.
To EQ the input signal:
1. Select the bank you wish to pick a channel to EQ.
2. Select the channel you wish to adjust via the GUI or by pressing the surface SEL button.
3. Navigate to the Equaliser widget either by touching any control in the Equaliser section on the surface or touching Equaliser in the input widget screen. There are 3
buttons to either: Turn the HPF, LPF or EQ on.
4. In the Equaliser section, press the green EQ button to activate the EQ (either on the surface or on screen). The EQ button’s LED will illuminate green when on and
show a green outline when o.
5. In the Equaliser section, adjust the Frequency, Width and Gain control knobs to change EQ parameters as required or, in the Equaliser widget, touch the EQ band
you wish to adjust. To adjust the width of the selected EQ band, use the pinch gesture to increase or decrease the width of the EQ band. A pinch gesture is a
continuous gesture that tracks the distance between the rst two ngers that touch the screen when moving left and right.
6. To Flatten the EQ curve press and hold the red Flatten button in the GUI until the line traces around the outside of the button. Once this two second press has
elapsed the EQ will be reset. All the EQ bands frequency and widths will remain in the same positions, but the gain will be reset to 0db for each band. This atten
function does not aect the HPF and LPF settings.
7. Engage True Audition mode.
Note: EQ Gain, Freq or Width in the Equaliser widget can be set by using the pop-up rotary by touching the corresponding Gain, Freq or Width display in the Equaliser
widget. They can also be locked to the screen if required. Please refer to the Navigation section on how the pop-up rotaries function.
Audition the dierent lters, including the ‘minimum harmonic disruption’ types, by scrolling through them using the Shape button in the Equaliser section or in the
Equaliser widget.
Band 1 HP 6dB, HP12dB, Bell or Shelf lters (Deep, Classic and Warm).
Band 2 Bell with Gain, Frequency and Width controls.
Band 3 Bell with Gain, Frequency and Width controls.
Band 4 LP 6dB, LP12dB, Bell or Shelf lters (Bright, Classic and Soft).
Note: The minimum harmonic disruption lters are bright and deep, which are available for treble and bass, respectively. These lters use psychoacoustic phenomena
to generate steep slopes that sound natural.
 Loading...