Sequencer
P0
P1 P2 P3 P4 P5 P6 P7 P8 P9
51
REC will record MIDI data whose channel matches their
own MIDI channel setting, regardless of the “Track Select”
(0–1e) setting.
In this case you will probably want to set “MIDI Clock”
(Global P1: 1–1a) to External, and synchronize to the exter-
nal sequencer. However, changes in tempo will not be
recorded.
Unchecked: Single track recording mode will be selected.
Recording will occur on the track selected by “Track Select.”
0–7b: Metronome Setup
Here you can make metronome settings.
Sound [Only REC, REC & Play, Off]
Only REC: The metronome will sound only during record-
ing.
REC & Play: The metronome will sound during recording
and playback.
Off: The metronome will not sound. However, the pre-count
will sound before recording begins.
This parameter is linked to “Metronome Sound” (6–1b).
BUS (Output) Select [L/R, L, R, 1, 2, 3, 4, 1/2, 3/4]
Select the output destination of the metronome sound.
L/R, L, R: Output from OUTPUT (MAIN) L/Mono and/or
R.
1, 2, 3, 4, 1/2, 3/4: Output from OUTPUT (INDIVIDUAL) 1, 2,
3, 4 respectively.
Level [000…127]
Set the volume of the metronome.
Precount [Measure] [0…2]
Specify the pre-count that will occur before recording
begins.
With a setting of 0, recording will begin the instant you press
the [START/STOP] key (after first pressing the [REC/
WRITE] key).
▼ 0–7: Page Menu Command
☞ “▼ 0–1: Page Menu Command”
Not selected “Solo Selected Track” (0–1B).
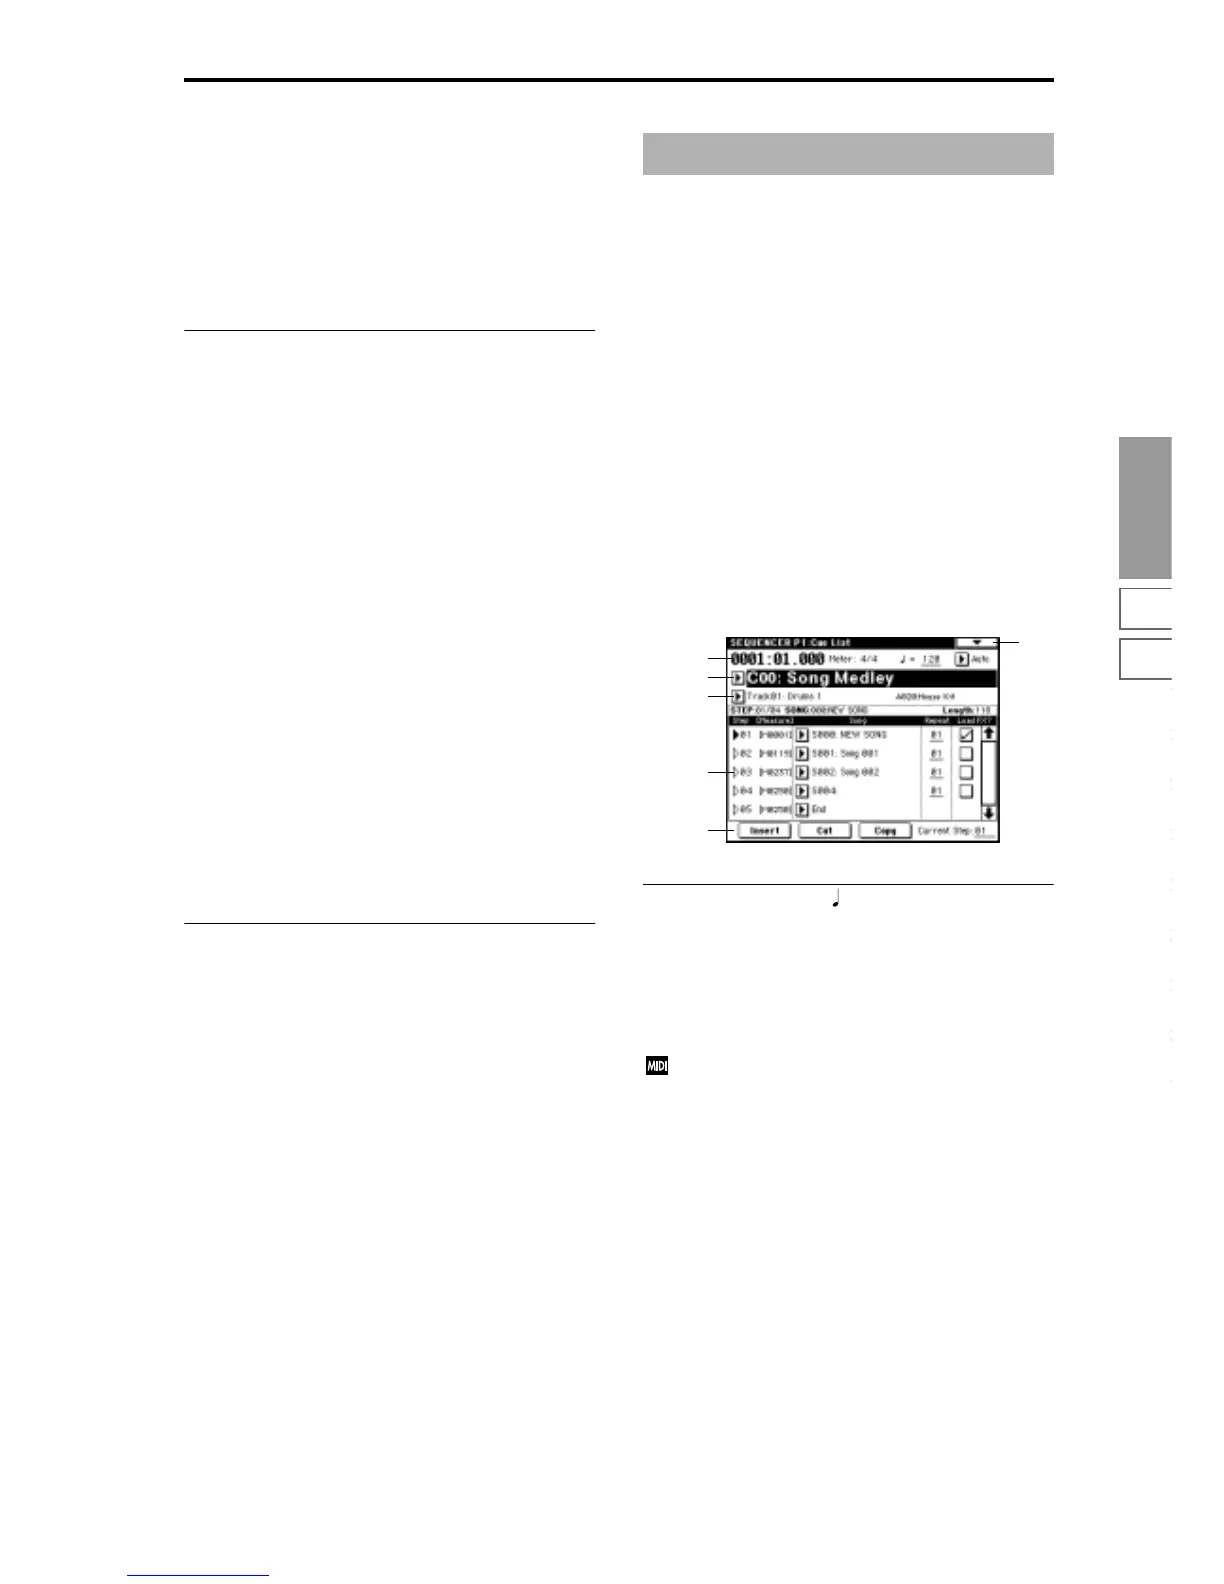
1–1: Cue List
The cue list allows you to playback multiple songs in succes-
sion. You can specify a number of repetitions for each song.
The TRITON allows you to create twenty cue lists. In a sin-
gle cue list you can freely connect up to 99 songs.
Each unit in a cue list is called a “step,” and you can specify
a song number and a repeat (number of repetitions) for each
step.
For example you could create each part of a song (intro, mel-
ody A, melody B, break, solo backing, ending etc.) as an
individual song, and use a cue list to play the intro twice,
melody A four times, melody B four times, the break twice,
melody A four times ... etc. to produce the entire song. In
cases when you wish to change the structure of the song,
this Cue List function can help you work more efficiently.
The page menu command “Convert to Song” (1–1D) lets
you convert the songs in a cue list into a single song. For
example you can use a cue list to create the backing, convert
the cue list to a song, and then add solo phrases on unused
tracks.
1–1a: Location, Meter, , Tempo Mode
Location [0001:01.000…9999:15.191]
This displays the current location within the selected cue
list. From the left, the numbers indicate the measure, beat,
and clock.
The range of the beat and clock will depend on the time sig-
nature of the corresponding song.
When “MIDI Clock” (Global P1: 1–1a) is Internal,
changing the location within a cue list will cause Song
Position Pointer messages to be transmitted. If “MIDI
Clock” is External MIDI or External PCI/F, this mes-
sage can be received from the specified source to
change the location within the cue list.
If the location exceeds the allowable data range of a
Song Position Pointer message, it will not be transmit-
ted.
Meter (Time Signature) [1/4...16/16]
This displays the time signature of the currently-playing
song.
(Tempo) [040...240]
Specify the tempo at which the song in the cue list will be
played (
☞“0–1c: Tempo”).
Sequencer P1: Cue List
1–1
1–1a
1–1b
1–1c
1–1d
1–1e