50
recording, track 1 will repeatedly play measures 1–4 and
track 2 will repeatedly play measures 1–8. While listen-
ing to these tracks playback, record the backing guitar
riffs.
In this way, you can use “Track Play Loop” to make the real-
time recording process more efficient (
☞p.67 in the Basic
Guide).
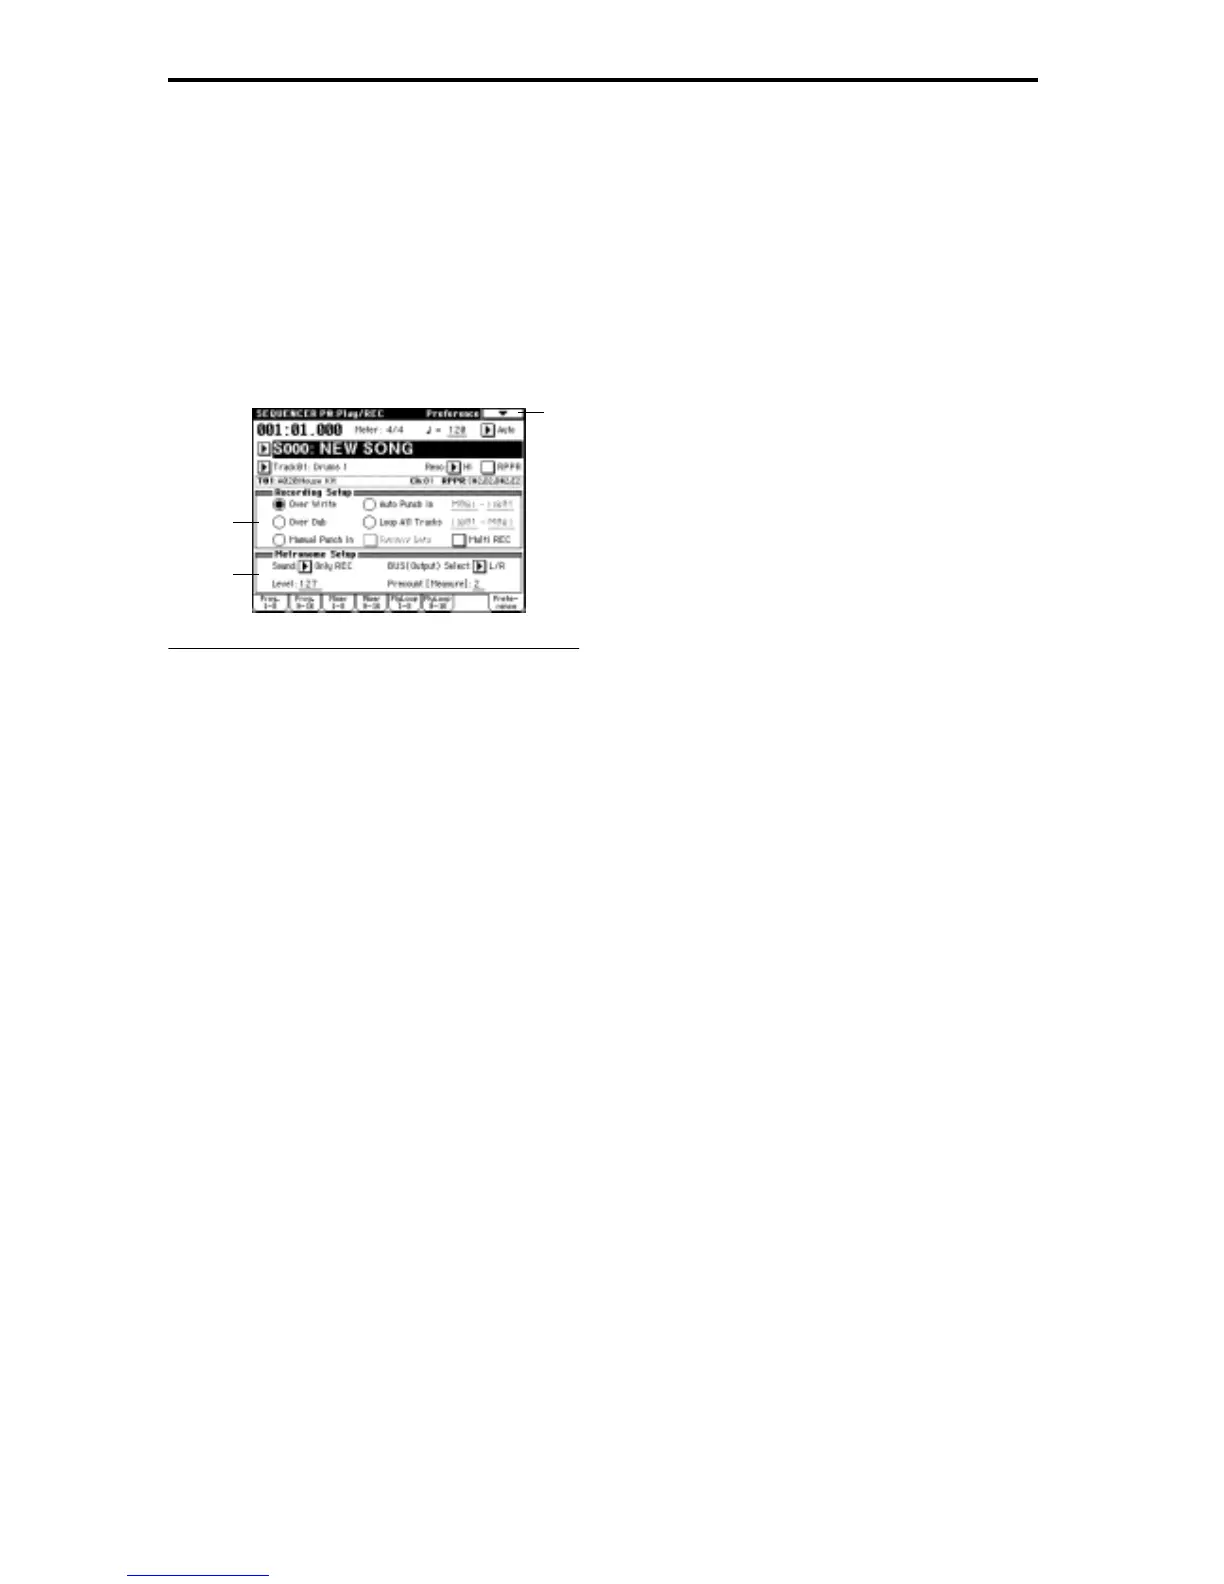
0–7: Preference
Here you can select the method of realtime recording, and
set the metronome.
0–7a: Recording Setup
Select the method of realtime recording.
Refer to p.64 in the Basic Guide for the realtime recording.
Over Write
When recording for the first time, you will normally select
this method.
To begin recording, press the [REC/WRITE] key and then
the [START/STOP] key. To stop recording, press the
[START/STOP] key once again.
Be aware that when this method of recording is used to
record on a track that already contains data, any previously
existing data will be erased from the measure at which you
begin recording and from all subsequent measures.
Over Dub
Select this when you wish to add data to a previously-
recorded track.
To begin recording, press the [REC/WRITE] key and then
the [START/STOP] key. To stop recording, press the
[START/STOP] key once again.
Previously-recorded data will remain in the track, and the
newly-recorded data will be added.
Manual Punch In
Select this method when you wish to use the [REC/WRITE]
key or a foot switch to re-record selected portions of a previ-
ously-recorded track.
Press the [START/STOP] key to playback the song. When
you reach the measure at which you wish to begin re-writ-
ing the data, press the [REC/WRITE] key or the foot switch,
and recording will begin. When you are finished recording,
press the [REC/WRITE] key or the foot switch once again,
and recording will end.
The area between the points where you pressed the [REC/
WRITE] key or the foot switch the first and second times
will be replaced by the newly recorded data.
Auto Punch In
Select this method when you wish to automatically re-
record selected portions of a previously-recorded track.
Before you begin, use the “M-M (Start Measure - End Mea-
sure)” fields at the right to specify the range of measures
that will be rewritten.
Press the [REC/WRITE] key and then the [START/STOP]
key, and playback will occur until the specified measure is
reached. Then, recording will occur only over the specified
area (“Start Measure”–“End Measure”), rewriting it with the
newly recorded data.
M–M ( Start Measure–End Measure) [001…999]
Specify the first and last measure that will be re-recorded.
Loop All Tracks
Select this method when you wish to repeatedly record a
specified area of a track, and continue adding data. This is
suitable for creating drum patterns, etc.
Before you begin, use the “M-M (Start Measure - End Mea-
sure)” fields at the right to specify the range of measures
that will be recorded.
Press the [REC/WRITE] key and then the [START/STOP]
key, and playback will occur until the specified measure is
reached. Then, recording will occur repeatedly over the
specified area (“Start Measure”–“End Measure”). Previ-
ously-recorded data will remain, and the new data will be
added. While recording, you can check “Remove Data” to
delete unwanted data.
If “Multi REC” is checked, this parameter will not be avail-
able.
M–M (Start Measure–End Measure) [001…999]
Specify the range of measures in which recording will be
repeated.
Remove Data
This is available when Loop All Tracks is chosen in
“Recording Setup.”
Checked: You can delete unwanted musical data while
recording with Loop All Tracks. During recording, press the
key (note number) that corresponds to the musical data you
wish to delete. All occurrences of that note number will be
deleted for the interval that you continue holding down the
key. Controller data can also be erased in a similar way. For
example while you move and hold the joystick in the X (hor-
izontal) direction, bender data will be erased. While you
apply pressure to the keyboard, after touch data will be
erased.
Also, you can press and hold down the [REC/WRITE] key
to delete all musical data for as long as the key is held.
Multi REC
Checked: Multi-track recording mode will be selected. This
is not available if Loop All Tracks has been selected for
“Recording Setup.” Use this mode when you wish to simul-
taneously record multiple tracks. When you check this box,
the “PLAY/MUTE/REC” (0–1j, 2j) buttons of all tracks will
simultaneously be set to REC. In this case, pressing a
“PLAY/MUTE/REC” button will cycle the setting through
REC→ PLAY → MUTE, allowing you to make the desired
setting. Select REC for the tracks that you wish to record,
and begin recording (
☞p.73 in the Basic Guide).
This mode can also be used when you wish to playback a
connected multi-track sequencer, and record all of the MIDI
data it transmits in one pass into the TRITON’s sequencer.
Multiple channels of MIDI data can be received and simulta-
neously recorded onto multiple tracks.
In this case, tracks whose “PLAY/MUTE/REC” setting is
0–7
0–7a
0–7b