79
Sampling
P0
P1 P2 P3 P4 P8
4. Sampling mode
In Sampling mode you can record 48 kHz 16 bit samples.
On the TRITON, “sampling” refers to a process in which
analog audio signals from a mic or audio device connected
to the AUDIO INPUT jack are converted into digital form
and recorded into internal memory. The sound that is con-
verted into digital form can be processed by an insert effect
is being sampled.
The TRITON comes with 16 Mbytes of sample memory
(waveform memory). This allows approximately 2 minutes
and 54 seconds of monaural sampling, or approximately 1
minute and 27 seconds of stereo sampling. By installing one
or two 72-pin SIMM boards you can expand the memory to
a maximum of 64 Mbytes (two 32 Mbyte SIMM boards). In
this case, you will be able to record up to four monaural
samples that are each 2 minutes and 54 seconds long, for a
total of 11 minutes 39 seconds (or four stereo samples that
are each approximately 1 minute and 27 seconds long, for a
total of 5 minutes 49 seconds). (For details on the 72-pin
SIMM boards that can be used and on the installation proce-
dure,
☞p.237)
In Sampling mode, samples that have been sampled or
loaded from storage media can be assigned to an index
(zone) to create a multisample. One multisample can contain
many indexes
A multisample you create can easily be converted into a pro-
gram (
☞“Convert MS To Program” 0–1G). When a multi-
sample is converted, filter, amp, and effect settings etc. will
be made, and it can be played as a program. This program
can also be used in Combination mode or Sequencer mode.
Samples can also be used as drum samples in a drum kit.
Sampling (sample recording) can be performed in any
page P0–P8 of Sampling mode by using the [REC/
WRITE] and [START/STOP] keys (For the sampling
procedure, refer to p.78 in the Basic Guide).
Recording settings such as the input level can be made
in P0: Recording, and these settings are also valid in the
other pages.
The selected multisample or sample can be played from
the keyboard in any page, allowing you to hear the
results of your editing.
When you turn off the power, all multisample and sam-
ple data in Sampling mode will be lost. Before you turn
off the power, be sure to save important data to floppy
disk or external SCSI device (
☞p.40 in the Basic Guide).
If a separately sold EXB-SCSI option is installed, data
can be saved on an external SCSI device. Immediately
after the power is turned on, memory will contain no
multisamples or samples, so you will first need to load
previously-saved data from a floppy disk or external
SCSI device before you can playback or edit it.
There is no Compare function that allows you to restore
edited data to the state before it was edited. If you wish
to preserve the unedited state of the data, use “Copy
MS” (0–1E) or “Copy Sample” (0–1B) etc. to make a
copy of the multisample or sample before you begin
editing.
In some of the page menu commands in P1 or P2, you
can uncheck the “Overwrite” item in the dialog box so
that the unedited sample data will be preserved even
after you execute the command (
☞1–1: Page Menu
Command “About Overwrite”).
When executing a sample edit operation or when you
finish recording a stereo sample, you may hear a slight
noise. This does not affect the audio data that has been
edited or sampled.
Cautions regarding sample data
• The sample data memory areas Bank 1, 2, 3, and 4 each
contain 16 MB. Of this 16 MB (8,388,608 samples),
sixteen samples (the first and last eight samples) are
used as internal work area.
• The first and last samples of each sample are used as
internal work area. These two samples are added
automatically when a sample is recorded or when an
.AIFF or .WAVE file is loaded. This means that if you
record a sample of one second, this will result in
48,000 samples of data, but four samples will be added
to this, so that sampling memory will actually contain
48,004 samples of data.
Here you can set the input level and make other basic set-
tings for sampling (sample recording), and make basic set-
tings for multisamples and samples. Normally you will
record samples in this page.
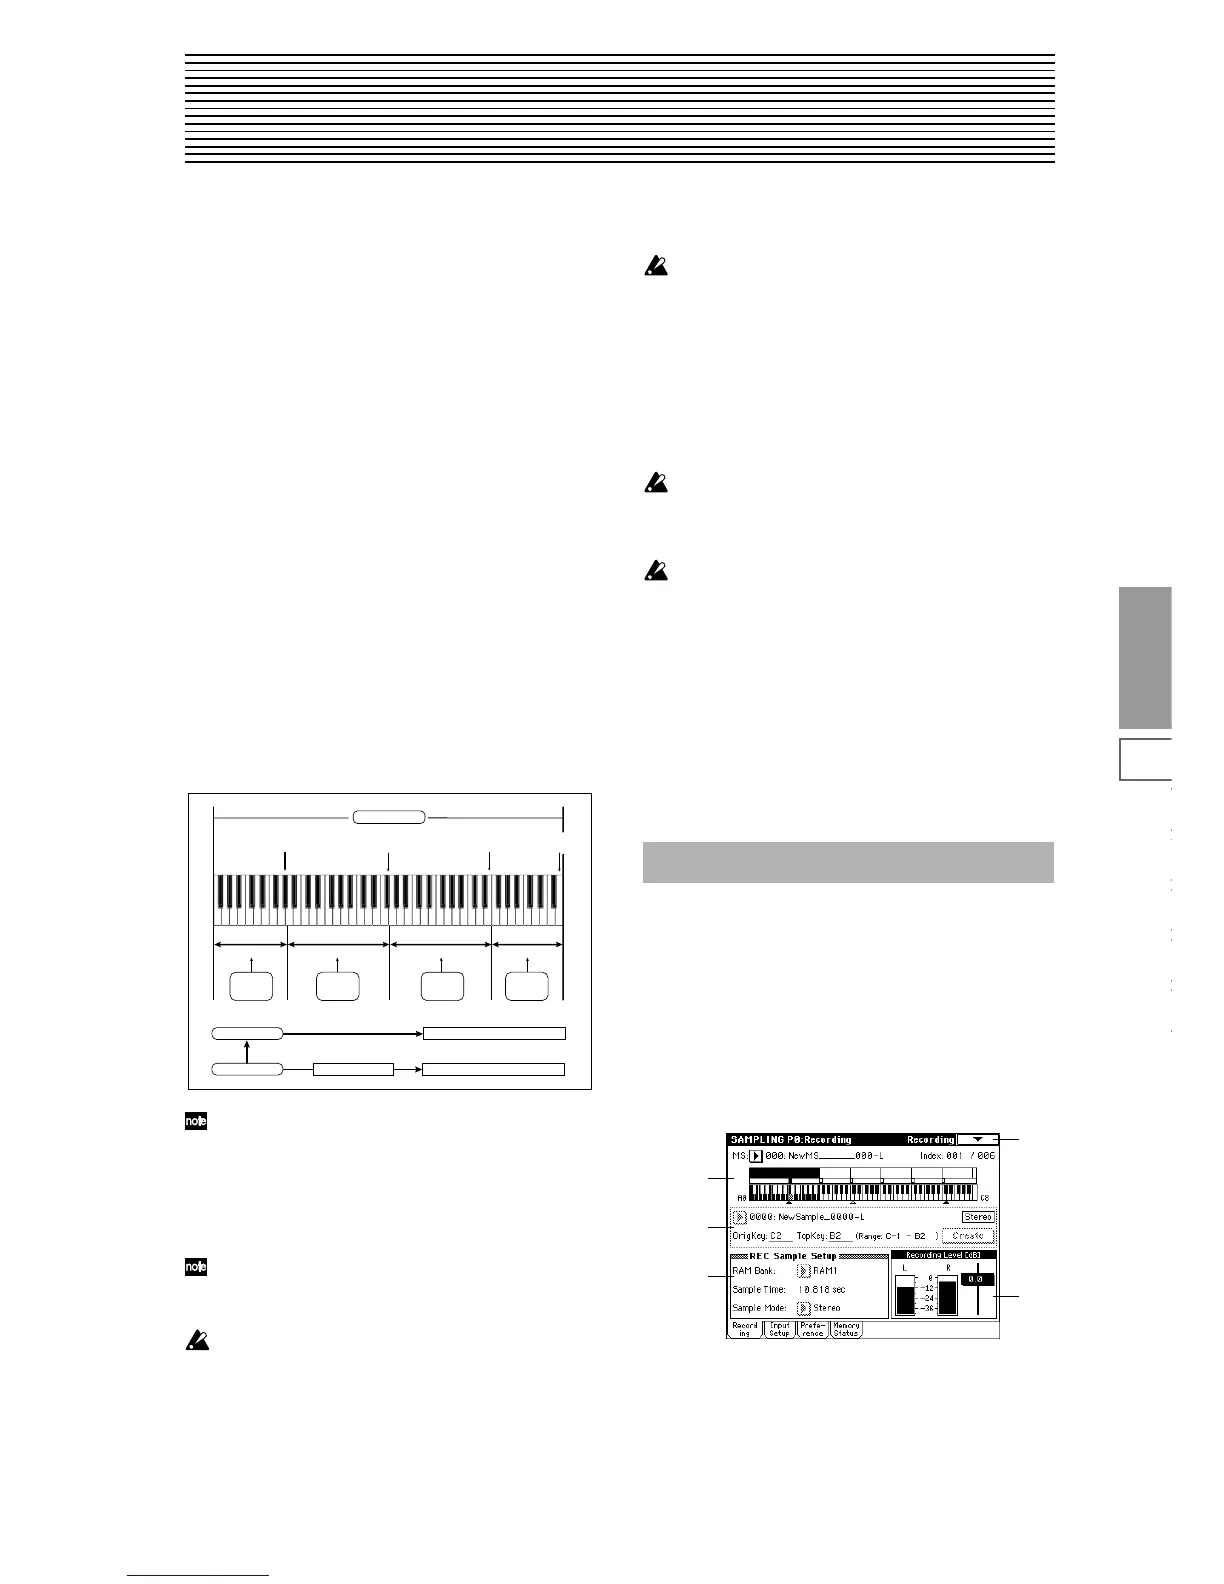
0–1: Recording
Here you can select the multisample that you wish to record,
specify the index sample, make settings, select the memory
bank, and adjust the final level of the input signal.
Multisample
Index 001
Index 002
Index 003
Index 004
Index001
Top Key
Index002
Top Key
Index003
Top Key
Index004
Top Key
0000:
Sample A
0001:
Sample B
0002:
Sample C
0003:
Sample D
Program OSC (Single/Double)
Multisample
Drum Kit
Sample
Program OSC (Drums)
Sampling P0: Recording
0–1
0–1a
0–1d
0–1b
0–1c