Sampling
P0
P1 P2 P3 P4 P8
89
(With 1X magnification, the display resolution of the LCD
will be the same as the resolution of the sample addresses.
For example if you change the sample address by one, the
vertical line in the LCD that indicates the sample address
will move in steps of one pixel.) In the vertical axis, you can
zoom-in from 1X (full range display) to 512X (or 1024X in
the case of stereo display).
Zoom-In/zoom-out will occur starting at the “Edit Range
Start” or “Edit Range End” points you specify. (If a different
parameter is selected when you zoom-in or -out, the zoom-
in/out will be based on the last-selected point. If you re-
select the “Edit Range Start” or “Edit Range End” points
when the display is zoomed in or out, the display range will
be adjusted so as to show the selected point.)
If the zoom ratio is low (1X or less), the “sample wave-
form display” may differ slightly from the displayed
waveform before and after waveform editing, but this
does not affect the playback sound. If this occurs, rais-
ing the zoom ratio will make the display accurate.
▼ 1–1: Page Menu Command
Before using the page menu commands “Truncate”–“Vol-
ume Ramp” to edit the waveform data of a sample, first use
“Edit Range Start” and “Edit Range End” to specify the area
to be edited. Then select and execute the desired page menu
command.
There is no compare function that lets you return the
edited result to the state before editing. If you wish to
preserve the unedited sample, uncheck the “Over-
write”
*1
item in the dialog box of each page menu com-
mand before you execute.
For stereo samples, the L channel and R channel sam-
ples are edited simultaneously. If you wish to edit only
the L channel or R channel, select a mono multisample,
and select either the L channel or R channel sample for
editing.
If you “Copy” a mono sample into the buffer, and then
“Insert,” “Mix,” or “Paste” it to a stereo sample, the
data will be inserted, mixed, or pasted into both the L
and R sides. (The result will be that a stereo sample will
be created.)
If you “Copy” a stereo sample into the buffer, and then
“Insert,” “Mix,” or “Paste” it to a mono sample, the L-
and R-side data in the buffer will be mixed to mono,
and then inserted, mixed, or pasted. (The result will be
that a mono sample will be created.)
You can also use these commands if you wish to mono-
mix a stereo sample and use it as a mono sample. How-
ever, be aware that once a sample has been mixed to
mono, it is no longer possible to return it to a stereo
sample.
To edit the “Start” (start address) location at which the
sample data (waveform data) will begin playing, the
“LoopS” (loop start address), or “End” (end address),
use P2: Loop Edit. If the above parameters are located
within an area of sample addresses that are deleted or
moved by your editing, they will automatically be
moved.
*1
: About “Overwrite”
When “Overwrite” is unchecked: When the command is
executed, the edited sample will be saved in a different sam-
ple number. The unedited sample will remain without
change.
When “Overwrite” is checked: When the command is exe-
cuted, the edited sample will be overwritten onto the origi-
nal sample (number). The original sample will be modified.
“Loop Start Address” and “End Address” (2–1c) must
be located at least eight addresses apart. If as a result of
executing “Truncate” (1–1A), “Cut” (1–1B), or “Rate
Convert” (1–1K), the “Loop Start Address” and “End
Address” would be separated by less than eight
addresses, the display will indicate “Sample length is
shorter than minimum.” Please set the “Edit Range
Start” and “Edit Range End” appropriately.
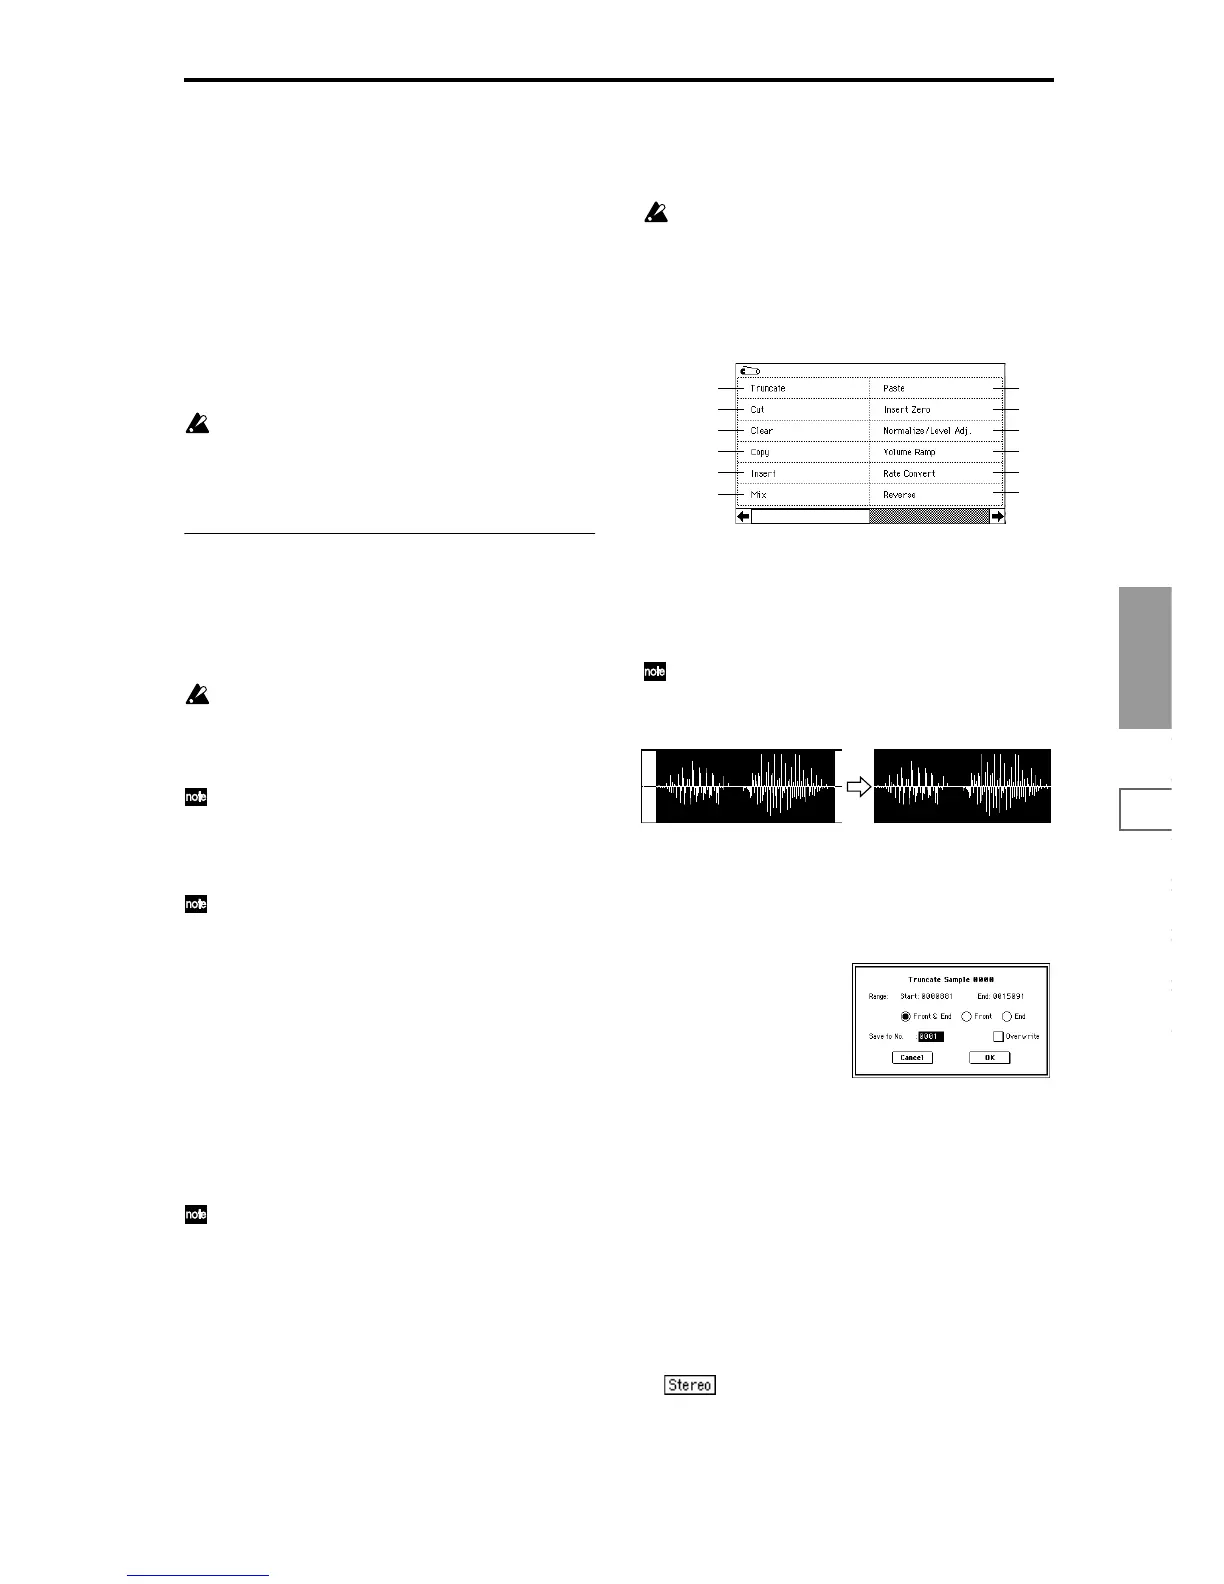
1–1A: Truncate
This command deletes unwanted data that lies beyond the
“Edit Range Start” and “Edit Range End.” Use this com-
mand when you wish to delete silence at the beginning or
end of the waveform data.
If you wish to delete unneeded (unplayed) sample data
after setting the start address, loop start address, and
end address, use the “Truncate” page menu command
found in P2: Loop Edit.
1 Use “Edit Range Start” and “Edit Range End” to specify
the editing range.
The portion that will be left by the “Truncate” command
can be auditioned by pressing the front panel [START/
STOP] key.
2 Select this command to open the following dialog box.
3 The editing range will be shown in “Range Start” and
“End.”
4 Use the radio buttons to select the portion that will be
deleted.
Front & End: The sample data that lies before the “Edit
Range Start” and after the “Edit Range End” will be
deleted.
Front: The sample data that lies before the “Edit Range
Start” will be deleted.
End: The sample data that lies after the “Edit Range End”
will be deleted.
5 In “Save to No.,” specify the save destination sample
number. By default, an unused sample number will be
selected. If you have checked “Overwrite” in
6, this can-
not be set.
For a stereo sample, “Save to No.(L)” and “(R)”
will be displayed. Specify the save destination sample
number for the L channel and R channel respectively.
1–1A
1–1B
1–1C
1–1D
1–1E
1–1G
1–1H
1–1I
1–1J
1–1F
1–1K
1–1L