Chapter 6 Installation and Initial Operation Alpha Compact 32708612
Version: 14.12.2012 page 63 of 135
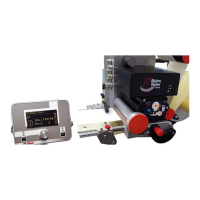
The unwinding is used to support the label roll. The label material is peeled off by a draw-
ing unit from the unwinder. To provide a constant label web tension, the unwinder axis
slows down or loosens if applicable by two brake belts that are triggered by a dancer arm.
The brake belts are preset ex-factory. This setting is suitable for most applications.
Only particular applications (e. g. with slightly/heavily labels, High-Speed applications
aso.) or by long-term operation (material fatigue of spring tension) a correction of this set-
ting may become necessary.
If the web tension is too low, the unwinder brake is not able to brake the label roll. The la-
bel roll runs after each label feed so that an exact applying is not possible. If the dancer
arm tension is too high, the stepper motor has to work permanently against the brake
power. This will lead to a motor overload or cause errors of positions of the applied labels
on the product.
The adjustment of the web tension is arranged by the adjustment to the spring tension in-
side. It is located at the unwinder arm. To get access to it, please dismantle a cover plate
at the bottom side of the unwinder arm.
Requirements
Label web is inserted.
Product feed is stopped.
Labeler is ready for operation but stopped.
Instructions
Please adjust the tension spring for dancer arm tension as follows.
The dancer arm should in resting position also be slightly tensioned. Generally it is
valid: the faster the feeding speed, the higher the spring power has to be.
Step Procedure
Caution! The tension spring may be tensioned!
1
Dismantle the cover plate below the unwinder arm. Remove therefore the 5
screws.
2
Loosen the 2 screws slightly for clamping of the tension spring inside.
3
Move the adjustment to the tension spring inside slightly forward or backward de-
pending on demand. (The clamping screws are ex-factory centered in long hole).
4
Tighten again the 2 screws for clamping.
5
Arrange several sample labelings to check the adjustment.
6
If the adjustment was successful, please mount again the cover plate. If the ad-
justment was not sufficient, please return to step 2 and correct it.