Chapter 4
4-10
There are two solo busses and each console solo button can be independently assigned to use Solo 1 or Solo 2. Output solos may use a
total of 16 inputs to each solo buss.
Therefore, if the console was being used for stage monitors, the first solo buss could feed an "in ear" monitor and the second solo buss
could feed a wedge.
To use Solo 2 there must be sufficient busses available (at least two) and if Solo 2 does not appear on the panel a new session should be
created to make these busses available.
The dedicated worksurface buttons control the relevant Monitor/Solo 1 functions and the Solo 2 level and trim may be controlled by
touching the on screen control and using the Matrix rotary control on the worksurface.
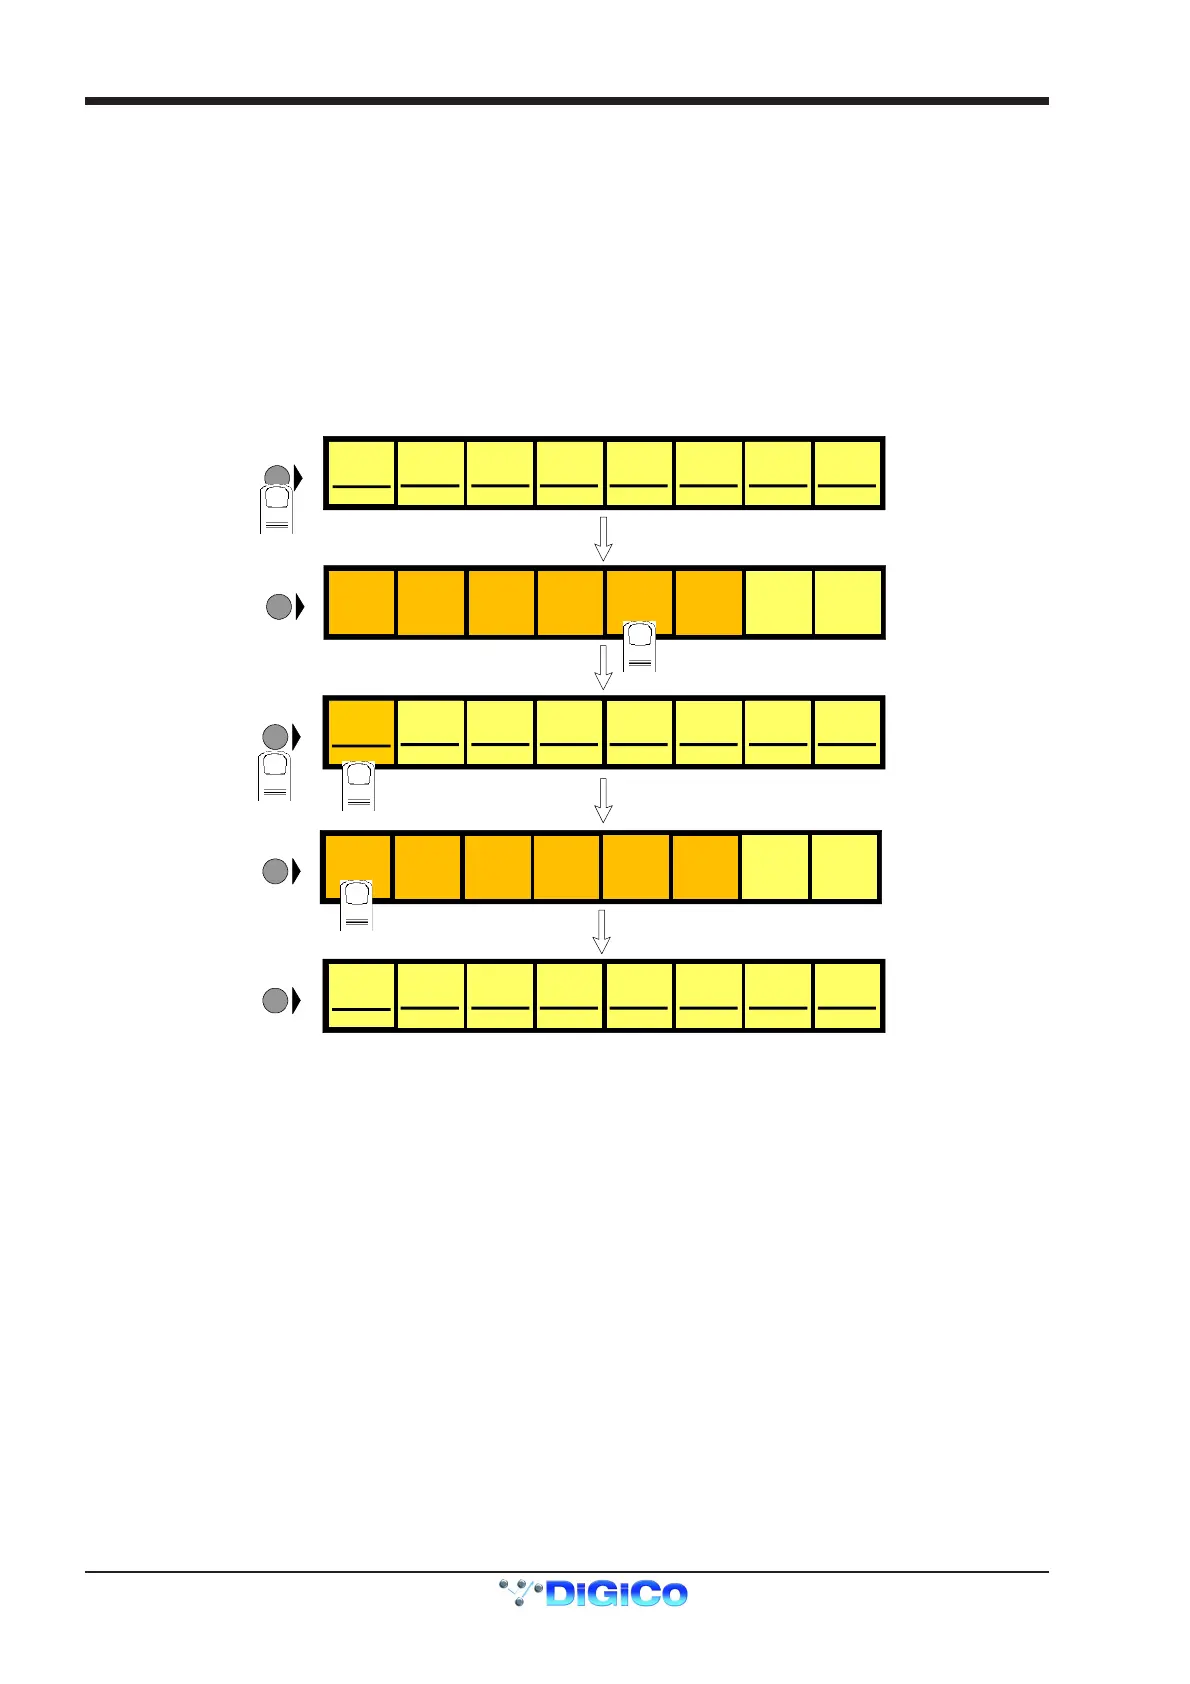
To Select Solo 1 or 2 for a Buss or Channel
1) Press the Master or Channel LCD Function button for the relevant bank or channel.
2) Press the Solo 1 OR 2 button - All Solos are set to Solo 1 by default.
3) Press the LCD button for the Buss or Channel that you wish to switch to Solo 2 (It will change colour and Solo 2 will be indicated).
4) Press the Master or Channel LCD Function button to exit Solo 1 or 2 mode.
5) Press the Solo function button to return to the standard view and you will see Solo 2 indicated on the button.
Aux 01
A01 [0]
LCD
FUNCTION
SOLO SAFE
SOLO
ASSIGNS
AUX>FAD
Aux 02
A02 [0]
Aux 03
A03 [0]
Aux 04
A04 [0]
Aux 05
A05 [0]
Aux 06
A06 [0]
Aux 07
A07 [0]
Aux 08
A08 [0]
LCD
FUNCTION
1
BUILD
BANK
2
A01 [0]
LCD
FUNCTION
A02 [0] A03 [0] A04 [0] A05 [0] A06 [0] A07 [0] A08 [0]
SOLO SAFE
SOLO
ASSIGNS
AUX>FAD
LCD
FUNCTION
BUILD
BANK
SOLO
ASSIGNS
AUX>ROT
SOLO
ASSIGNS
AUX>ROT
AFL AFL AFL AFL AFL AFL AFL AFL
ASSIGN
FADERS
UNASSIGN
FADERS
SOLO
1OR2
ASSIGN
FADERS
UNASSIGN
FADERS
SOLO
1OR2
AFL2 AFL AFL AFL AFL AFL AFL AFL
Aux 01
Aux02 Aux03 Aux04 Aux05 Aux06 Aux07 Aux08
A01 [0]
LCD
FUNCTION
A02 [0] A03 [0] A04 [0] A05 [0] A06 [0] A07 [0] A08 [0]
SO LO 1 2<
Aux 01
Aux02 Aux03 Aux04 Aux05 Aux06 Aux07 Aux08
SO LO 1<2 SOLO 1<2 SO LO 1<2 SOLO 1<2 SOLO 1<2 SOLO 1<2 SOLO 1<2
3
4
5
PFL (Default mode with nothing else selected)
Mono pre-fader listen mode which only uses one reserved buss.
AFL
Monitoring the signal at post-fader level with full stereo or surround panning which uses the same number of busses as the Master buss.
SIP (Destructive Solo In Place)
This function leaves the soloed signal routed to its current destination and mutes all non-soloed
signals. To hear the soloed signal(s), the relevant buss(es) should be monitored.
Note: This function can only be switched on by holding down the SIP button for 2 seconds.
Single
Single mode means that only one channel can be soloed at a time. If single is not selected, any number of channels can be soloed
simultaneously.
Monitor/Solo 1 and Solo 2 Outputs
This allows you to select dedicated output sockets for the Monitor/Solo 1 and/or Solo 2 signals. Touch the required Output Signal Group
button and then the first output (left) that you require from that group. The second output (right) will be automatically selected. A button at
the bottom of the panel will switch the solo to Mono.
Monitor Delay
The monitor signal can be delayed by up to 160ms using the on screen rotary control. This control may also be adjusted by touching it on
screen and using the worksurface Matrix rotary control.
Monitor Master
If this button is pressed, the master buss will be monitored when no solos are on.
Solo 2 Assign To Master Fader
If this button is pressed, Solo 2's Level and Mute controls can be adjusted using the Master Fader and Mute.