Home
Fuji Xerox
All in One Printer
ApeosPort-3 C4400
Fuji Xerox ApeosPort-3 C4400 User Manual
4
of 1
of 1 rating
341 pages
Give review
Manual
Specs
To Next Page
To Next Page
To Previous Page
To Previous Page
Loading...
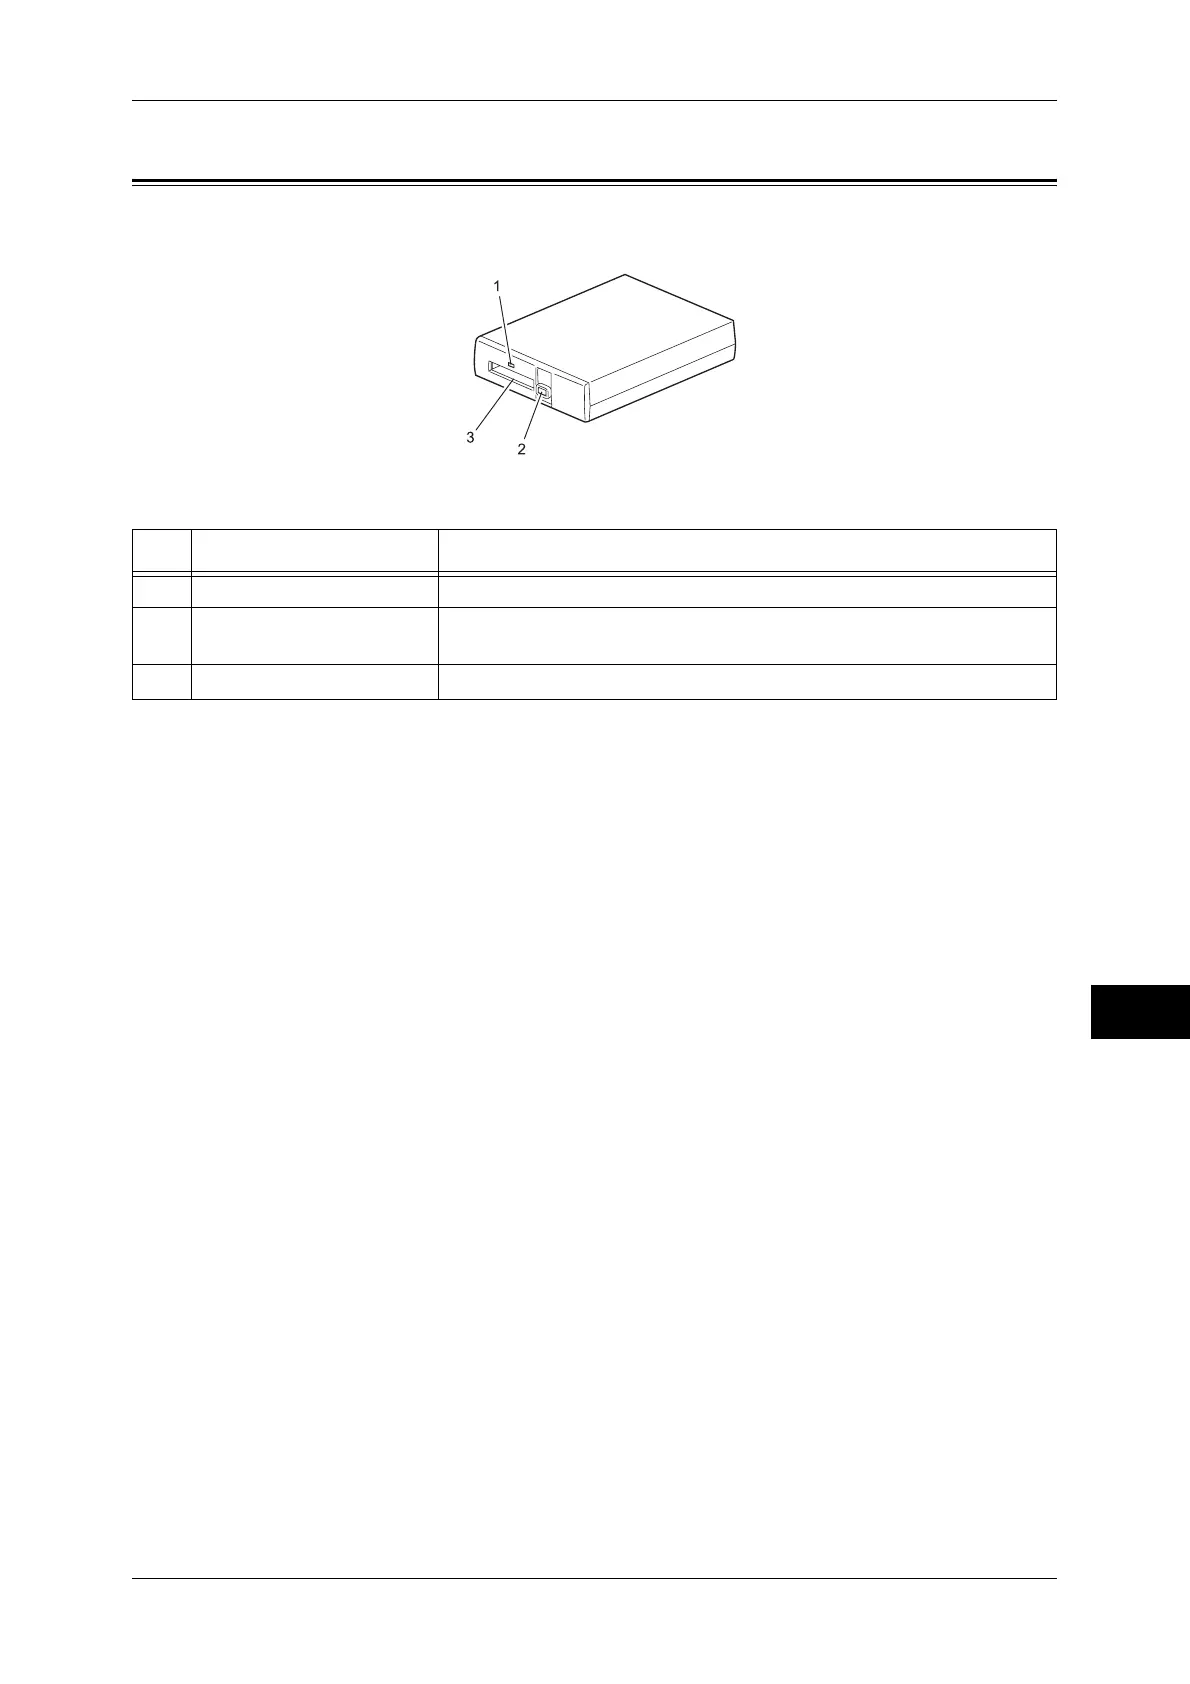
Components and their Functions
279
Media Print (Text a
nd Photos)
10
Compon
ents a
nd the
ir Func
tions
No.
Compon
ent
Function
1
<Access> indicator
Lights when the medium is acc
essed.
2
<Compac
tFlash Eject>
button
Press this button to eject a CompactFlash card. The button pops up
when a CompactFlash card is inserted.
3
CompactFlash slot
Ins
ert a CompactFlash card here.
280
282
Table of Contents
Table of Contents
3
Before Using the Machine
11
Preface
12
Types of Manuals
13
Using this Guide
14
Organization of this Guide
14
Conventions
15
Safety Notes
17
Electrical Safety
18
Machine Installation
19
Operational Safety
21
Consumable
24
Regulation
25
Radio Frequency Emissions (Class B)
25
Product Safety Certification (UL, CB)
25
Environment
26
About License
27
Rsa Bsafe
27
Heimdal
27
Lzma
27
JPEG Code
28
Libcurl
28
Freebsd
28
Openldap
29
Des
31
Aes
31
TIFF (Libtiff)
31
ICC Profile (Little Cms)
31
XPS (XML Paper Specification)
31
EDICT and COMPDIC
31
Legal Notice
33
Product Overview
35
Machine Components
36
Power on / off
43
Powering on
43
Powering off
44
Circuit Breaker
45
Energy Saver Mode
46
Entering the Energy Saver Mode
46
Exiting the Energy Saver Mode
47
Control Panel
48
Full Size Color UI (Optional)
50
Screens and Buttons Displayed
52
Entering Text
53
Copy
55
Copying Procedure
56
Step 1 Loading Documents
56
Step 2 Selecting Features
58
Step 3 Entering a Quantity
59
Step 4 Starting the Copy Job
60
Step 5 Confirming the Copy Job in Job Status
61
Operations During Copying
62
Stopping the Copy Job
62
Changing the Number of Copies
63
Interrupting the Copy Job
64
Copy
65
Reduce/Enlarge (Making Enlarged/Reduced Copies)
65
Paper Supply (Selecting the Paper for Copying)
69
Output Color (Selecting the Color for Copying)
71
Original Type (Selecting the Document Type)
74
Copy Output (Specifying Finishing Options)
75
Multiple-Up (Copying Multiple Pages Onto One Sheet)
75
Lighten/Darken (Adjusting the Copy Density)
75
Image Quality
76
Original Type (Selecting the Document Type)
76
Image Options (Adjusting Copy Density / Sharpness / Saturation of Images)
77
Image Enhancement (Erasing the Background Color of Documents / Adjusting Contrast)
78
Color Effects (Selecting an Image Quality)
79
Color Balance (Adjusting Color Balance)
80
Color Shift (Adjusting the Color Tone)
80
Layout Adjustment
81
Book Copying (Copying Facing Pages Onto Separate Sheets)
81
On the [All Services] Screen, Select [Copy]
81
Sided Book Copying (Making 2 Sided Copies of Facing
82
Original Size (Specifying the Scan Size for the Document)
84
Mixed Sized Originals (Scanning Different Size Documents Simultaneously)
85
Edge Erase (Erasing Edges and Margin Shadows of the Document)
86
Image Shift (Adjusting the Image Position)
87
Image Rotation (Changing the Orientation of Images)
89
Invert Image (Making Reversed Copies of Images)
91
Original Orientation (Specifying the Orientation of Loaded Documents)
91
Sided Copying (Making 2 Sided Copies)
92
Output Format
94
Booklet Creation (Creating a Booklet)
94
Covers (Attaching Covers to Copies)
97
Transparency Options (Inserting Blank Sheets between Transparencies)
99
Multiple-Up (Copying Multiple Pages Onto One Sheet)
100
Poster (Making Enlarged Copies Spread over Multiple Sheets)
101
Repeat Image (Making Multiple Copies on One Sheet)
102
Annotations (Adding a Comment / a Date / Page Numbers to Copies)
103
Watermark (Printing Control Numbers on the Background of Copies)
109
Secure Watermark (Managing Document Security)
111
Folding (Outputting Bi-Folded Paper)
113
Preset Repeat Image (Making Multiple Copies on a Single Sheet)
113
Sided Copying (Making 2 Sided Copies)
114
Copy Output (Specifying Finishing Options)
114
ID Card Copying (Copying both Sides of an ID Card)
115
Job Assembly
117
Build Job (Processing Documents Scanned with Different Settings as One Job)
117
On the [All Services] Screen, Select [Copy]
117
Sample Job (Checking the Finished Output of the Copy)
121
Combine Original Sets (Adding Originals)
122
Delete Outside/Delete Inside (Deleting Outside or Inside of the Selected Area)
123
Stored Programming (Calling a Stored Program for Build Job)
125
Fax
127
Fax Procedure
128
Step 1 Loading Documents
128
Step 2 Selecting Features
130
Step 3 Specifying Destinations
131
Step 4 Starting the Fax Job
132
Step 5 Confirming the Fax Job in Job Status
133
Operations During Faxing
134
Stopping the Fax Job
134
Changing the Scan Settings
135
About Internet Fax
136
Internet Fax Overview
136
Sending Internet Fax
138
Receiving Internet Fax
139
Useful Features
140
About Server Fax
143
Sending Server Fax
143
Fax/Internet Fax
145
Internet Fax/Fax (Selecting Internet Fax/Fax)
145
Add (Sending Faxes to Multiple Recipients)
146
Specifying a Destination Using the Address Book
147
Speed Dialing (Specifying a Destination Using an Address Number)
148
Specifying a Destination Using a One Touch Button
149
Specifying a Destination Using the Keyboard Screen
149
Specifying a Destination Using the Redial Feature
150
Entering Specific Symbols
150
Removing/Confirming a Recipient
151
Lighten/Darken (Adjusting Fax Density)
151
Sided Scanning (Transmitting 2-Sided Originals)
152
Original Type (Selecting the Document Type)
153
Resolution (Specifying the Scanning Resolution)
153
Layout Adjustment
155
Sided Scanning (Transmitting 2-Sided Originals)
155
Original Size (Specifying the Scan Size for the Original)
155
Select [Fax/Internet Fax] on the [All Services] Screen
155
Select a Feature on the [Fax/Internet Fax]
155
Mixed Sized Originals (Scanning Different Size Documents Simultaneously)
156
Book Faxing (Scanning Facing Pages Onto Separate Sheets)
157
Reduce/Enlarge (Specifying a Scan Ratio)
158
Fax/Internet Fax Options
159
Acknowledgement Report (Confirming Transmission Results)
159
Starting Rate (Selecting a Communication Mode)
161
Priority Send / Delay Start (Specifying Send Priority/Send Time)
162
Transmission Header Text (Adding Sender Name and Phone Number to Faxes)
163
Cover Page (Transmitting Documents with a Cover Page)
164
Internet Fax Subject (Specifying the Internet Fax Subject)
166
Internet Fax Message (Editing the Internet Fax Mail Contents)
166
Recipient Print Sets (Printing Multiple Sets at the Destination Machine)
167
Multiple-Up (Combining Multiple Pages into One Sheet)
168
Remote Mailbox (Using Remote Mailbox)
168
F Code (Using F Code Transmission)
170
Internet Fax Profile (Specifying Internet Fax Profiles)
172
Encryption (Sending Internet Fax Encrypted by S/MIME)
173
Digital Signature (Sending Ifax with a Digital Signature by S/MIME)
174
More Options
175
Remote Polling (Retrieving Documents from Remote Machines)
175
Select [Fax/Internet Fax] on the [All Services] Screen
175
Store for Polling (Allowing Remote Machines to Retrieve Documents from Your Machine)
177
On-Hook (Confirming Remote Machine Response Prior to Transmission)
178
Broadcast
180
Broadcast Send (Transmitting to Multiple Recipients)
180
Relay Broadcast (Transmitting Documents through a Relay Station)
180
Fax Signal Method
182
Remote Relay Broadcast (Performing Relay Broadcast to Remote Locations)
184
Receiving Faxes
189
Switching between Auto Receive and Manual Receive
189
Using Auto Receive
189
Using Manual Receive
190
Using Mailbox Receive
190
Facsimile Information Services
191
Using the Receiver
191
When Not Using a Receiver
192
Scan
193
Scanning Procedure
194
Step 1 Loading Documents
194
Step 2 Selecting Features
196
Step 3 Starting the Scan Job
197
Step 4 Confirming the Scan Job in Job Status
199
Step 5 Saving the Scanned Data
199
Operations During Scanning
200
Stopping the Scan Job
200
Changing Scan Settings
201
E-Mail
203
Address Book (Specifying an E-Mail Address)
203
New Recipient (Entering an Address)
206
Add Me (Adding the Sender's Address)
207
Recipient(S) (Editing a Recipient)
207
From (Setting the Sender's Address)
208
Subject (Setting the Subject)
209
Message (Entering the E-Mail Body)
209
Color Scanning (Selecting an Output Color)
209
Sided Scanning (Scanning both Sides of a Document)
209
Original Type (Selecting the Document Type)
209
File Format (Selecting a File Format for Output Data)
209
Scan to Mailbox
210
Color Scanning (Selecting an Output Color)
210
Sided Scanning (Scanning both Sides of a Document)
210
Original Type (Selecting the Document Type)
210
Network Scanning
211
Color Scanning (Selecting an Output Color)
212
Sided Scanning (Scanning both Sides of a Document)
212
Original Type (Selecting the Document Type)
212
File Format (Selecting a File Format for Output Data)
212
Scan to PC
213
Transfer Protocol
213
Address Book (Specifying a Destination PC Using the Address Book)
214
Browse
214
Specifying a Destination (Specifying a Destination PC Using the Screen Keyboard)
215
Color Scanning (Selecting an Output Color)
216
Sided Scanning (Scanning both Sides of a Document)
216
Original Type (Selecting the Document Type)
216
File Format (Selecting a File Format for Output Data)
216
General Scan Features
217
Color Scanning (Selecting an Output Color)
217
Sided Scanning (Scanning both Sides of a Document)
218
Original Type (Selecting the Document Type)
219
File Format (Selecting a File Format for Output Data)
220
Advanced Settings
227
Photographs (Scanning a Color Photograph)
227
Image Options (Adjusting Scan Density and Image Sharpness)
228
Image Enhancement (Erasing the Background Color of Documents/Adjusting Contrast)
228
Shadow Suppression (Suppressing the Document Background)
229
Color Space (Specifying Color Space)
229
Layout Adjustment
230
Resolution (Specifying a Scanning Resolution)
230
Sided Scanning (Scanning both Sides of a Document)
230
Book Scanning (Scanning Facing Pages on Separate Sheets)
231
Original Size (Specifying a Scan Size)
232
Mixed Sized Originals (Scanning Different Size Documents Simultaneously)
232
Edge Erase (Erasing Edges and Margin Shadows in the Document)
233
Reduce/Enlarge (Specifying a Scanning Ratio)
235
E-Mail Options/Filing Options
236
Quality/File Size (Specifying an Image Compression Ratio When Scanning)
236
Read Receipts (Specifying Read Receipts)
237
Split Send (Sending in Sections)
237
File Name (Specifying a Name for the File to be Sent)
238
Reply to (Specifying a Reply Address)
238
File Name Conflict (Setting the Action to be Taken for File Name Conflict)
239
Document Name (Specifying a Name for the File to be Saved)
239
Encryption (Sending E-Mail Encrypted by S/MIME)
239
Digital Signature (Sending E-Mail with a Digital Signature by S/MIME)
240
Login Name
240
Password
240
Meta Data
240
Send from Mailbox
241
Mailbox Operating Procedure
242
Step 1 Opening the [Send from Mailbox] Screen
242
Step 2 Selecting a Mailbox
242
Step 3 Checking/Selecting Mailbox Documents
243
Step 4 Operating Mailbox Documents
243
Selecting a Mailbox
244
Checking/Operating Documents in a Mailbox
245
Checking Document Details
247
Printing Documents in a Mailbox
248
Batch Print
249
Document Details
249
Configuring/Starting Job Flow
251
Job Flow Restrictions
255
Job Flow Sheets
257
Job Flow Procedure
258
Step 1 Opening the [Job Flow Sheets] Screen
258
Step 2 Selecting a Job Flow Sheet
259
Step 3 Confirming/Changing the Job Flow Sheet
259
Step 4 Starting the Job Flow Sheet
259
Selecting/Changing a Job Flow Sheet
260
Stored Programming
263
Stored Programming Overview
264
Registering/Deleting/Renaming Stored Programs
265
Registering Stored Programs
266
Registering Stored Programs for Build Job
267
Deleting Stored Programs
268
Entering/Changing a Stored Program Name
268
Assigning/Changing Icons for Stored Programs
269
Calling a Stored Program
270
Calling a Stored Program for Build Job
271
Web Applications
273
Web Applications
274
Accessing Web Applications
275
Accessing Using Buttons Registered on the All Services Screen
276
Media Print (Text and Photos)
277
Overview of Media Print
278
Supported Media and File Formats
278
Notes and Restrictions
279
Components and Their Functions
281
Inserting and Ejecting Media
282
Inserting Media
282
Ejecting Media
282
Selecting Files
283
[Select from List] Screen
284
Setting the Printing Options
285
Media Print - Photos
285
Media Print - Text
286
Index Print
287
11 Job Status
289
Job Status Overview
290
Checking Current/Pending Jobs
291
Checking Completed Jobs
292
Printing and Deleting Stored Documents
293
Secure Print
293
Sample Set
295
Delayed Print
296
Charge Print
298
Private Charge Print
300
Public Mailbox
302
Undelivered Faxes
303
Printing Pending Jobs
304
Handling Error Terminations
305
12 Computer Operations
307
Features Overview
308
Print
309
Print Features
309
Setup
310
Printing
311
E-Mail Printing
312
Setup
312
Sending E-Mail
312
Sending Fax
314
Registering Destinations
314
Importing Scanned Data
316
Importing to a TWAIN Compatible Application
316
Importing Using Mailbox Viewer 3
318
Importing Using Centreware Internet Services
320
Importing Using Easyoperator
322
Centreware Internet Services
323
Browser Settings
324
Proxy Server and Port Number
325
Starting Centreware Internet Services
325
13 Appendix
327
Glossary
328
Index
335
4
Based on 1 rating
Ask a question
Give review
Questions and Answers:
Need help?
Do you have a question about the Fuji Xerox ApeosPort-3 C4400 and is the answer not in the manual?
Ask a question
Fuji Xerox ApeosPort-3 C4400 Specifications
General
Brand
Fuji Xerox
Model
ApeosPort-3 C4400
Category
All in One Printer
Language
English
Related product manuals
Fuji Xerox ApeosPort-III C4400
44 pages
Fuji Xerox ApeosPort C2570
44 pages
Fuji Xerox ApeosPort-V 5070
459 pages
Fuji Xerox ApeosPort-V 3065
2 pages
Fuji Xerox ApeosPort-V 4070
459 pages
Fuji Xerox ApeosPort-V 6080
745 pages
Fuji Xerox apeosport-v c7785
493 pages
Fuji Xerox ApeosPort-V C6676
483 pages
Fuji Xerox ApeosPort-V C7776
483 pages
Fuji Xerox ApeosPort-V C3376
483 pages
Fuji Xerox ApeosPort-V C2276
483 pages
Fuji Xerox ApeosPort-V C3320
429 pages