Do you have a question about the LumaSense LumaSMART and is the answer not in the manual?
Provides overview of the LumaSMART User Manual for version 3.2.3.0 and above.
Details changes in software release 4.1.0.4 affecting protocols and configuration.
Explains symbols used in the manual for notes, cautions, and warnings.
Outlines LumaSense Technologies' liability and warranty policies for the instrument.
Guide for checking system components for damage and against the packing list.
Instructions for contacting Technical Support for malfunctions and service requests.
Provides instructions for shipping instruments to LumaSense for repair.
Guidelines for disposing of inoperable instruments according to local regulations.
Introduces the LumaSMART system for winding temperature measurement and cooling control.
Explains the Fluoroptic® technology based on phosphorescent decay time for temperature measurement.
Describes the sensor construction and its role in temperature measurement.
Explains the method of calculating temperature from phosphorescent decay time.
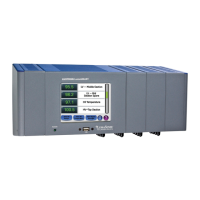
Details the main hardware components of the LumaSMART system.
Describes the LumaSMART controller's design features and mounting options.
Provides an overview of the internal components of the LumaSMART controller.
Describes the LCD VGA TFT display with touch panel for data entry and display.
Details the SBC (industrial PC) and COMM Boards for RS232 ports.
Specifies the universal input power supply capabilities (VAC and VDC).
Describes the FOT modules and their ST connectors for temperature probes.
Details the relay module with eight Form-C relays and external connectors.
Explains the board providing electrical interconnection for modules and external connections.
Describes the analog output for each temperature channel (4-20mA or 0-1mA).
Illustrates analog driver blocks converting temperature to current values.
Describes the front panel displays and components for monitoring and status.
Describes the back panel mounting method using screws and bolts.
Details connections made to the bottom of the unit, grouped by module.
Explains FOT connections on the base unit and analog output connector options.
Shows the location and pin-out of relay connections and the System Status Relay.
Details the location and pin-out for communication and system power connections.
Describes the access panel for battery replacement and flash drive access.
Explains connections for additional FOT modules and their channels.
Describes connections for the Control Module housing additional relays.
Lists the advantages and benefits of using the LumaSMART system.
Details how real-time monitoring extends transformer life through cooling control.
Describes how accurate temperature data allows for increased transformer loading.
Highlights availability of analog outputs and serial interfaces for SCADA communication.
Explains how LumaSMART unlocks additional MVA capacity by precise measurements.
Outlines key considerations before starting probe and accessory installation.
Provides general guidelines for determining FOT probe placement and installation.
Discusses FOT probe applications, placement based on transformer design, and hot spot determination.
Provides guidelines for installing FOT probes in various transformer designs.
Recommends FOT installation in hottest spots for autotransformers and GSUs.
Describes how to measure top oil temperature using FOTs.
Provides instructions and precautions for handling the fiber optic cable.
Lists specific actions to avoid when handling fiber optic cables to prevent damage.
Guides for installing temperature sensors during transformer construction or rebuilding.
Guides for installing temperature sensors during transformer construction or rebuilding.
Describes optimal placement of the probe tip in core form transformers.
Provides a procedure for installing probe tips in core form transformers using radial spacers.
Details how to construct a radial spacer using specific materials for probe mounting.
Step-by-step guide for installing the fiber optic probe into a modified radial spacer.
Procedure for inserting the modified spacer into the coil assembly.
Procedure for taping the probe tip directly onto winding conductors in shell form transformers.
Steps for installing probe tips directly onto winding conductors.
Discusses using nylon or fiberboard tubing as guides for probe insertion.
Guidance on routing probes inside the transformer, ensuring slack and avoiding tension.
Instructions for positioning and securing the tank wall adapter plate.
Details the assembly of the Tank Wall Plate (TWP) and connecting probes.
Lists key features like channel configuration, relays, communication, and power.
Covers wall and panel mounting methods for the controller.
Step-by-step guide for mounting the LumaSMART controller to a vertical surface.
Step-by-step guide for mounting the LumaSMART controller flush with a vertical surface.
Instructions for routing and connecting the external fiber optic extension cable.
Provides directions for wiring power, outputs, and communication.
Details the LumaSMART controller's power requirements and wiring diagram.
Explains how to wire the optional analog output current (AOC) options.
Discusses surge protection and voltage limits for current loop connections.
Describes wiring for programmable Form-C relays and the system status relay.
Explains the function of the System Status Relay in indicating overall system health.
Details wiring for Ethernet, RS485, and RS232 communication ports.
Instructions for powering on and starting the LumaSMART instrument.
Guide for verifying probe signal strength through the touchscreen interface.
Displays scrolling list of probe channels with temperature and status updates.
Shows a scrollable list of all relays and their current statuses.
Displays a condensed list of all probe temperatures and their status.
Lists all channels and their current signal strengths in the diagnostic screen.
Provides access to main functions and configuration options via buttons.
Allows configuration of transformer info, relays, date/time, outputs, and channels.
Enables input of transformer details like name, type, year, and operating parameters.
Allows setting the system date, time, time zone, and daylight saving time.
Accesses firmware updates, authentication codes, and inventory data.
Procedure for updating firmware using a USB thumb drive.
Allows changing setup and administrative menu authentication codes for security.
Enables exporting and importing system configuration files for backup or diagnosis.
A service function to temporarily disable the watchdog timer for 5 minutes.
Service function to test relay operations and ensure control logic is correct.
Allows entering or verifying the controller's serial number for software upgrades.
Allows configuration of each relay, including the System Status Relay.
Configures relay name, configuration, control settings, and alarm/restore setpoints.
Configures relay logical functions (OR/AVG) and associated channels.
Sets the temperature at which a relay transitions to its non-normal state.
Sets the temperature at which a relay transitions back to its normal state.
Shows current analog output configurations, set during manufacture.
Lists channels and their current analog output configurations.
Allows scaling of a channel module’s temperature and current levels.
Configures channel names and disables unused channels to optimize system performance.
Monitors the controller's battery life and prompts for replacement after eight years.
Allows configuring channel scroll speed, backlight timeout, and screen brightness.
Exports data log reports to a USB thumb drive for analysis and backup.
Provides access to tools for monitoring, analyzing, and testing system characteristics.
Screens for viewing probe signal strength and diagnosing channel issues.
Allows testing relay configuration settings by simulating temperature readings.
Function to erase all history logs within the LumaSMART controller.
Allows selection of electrical interfaces (RS485/TCP/IP) and communication protocols.
Displays sample interface selections for RS485 and TCP/IP.
Configures serial interface parameters like baud rate, data bits, parity, and stop bits.
Configures Ethernet TCP/IP parameters such as port number and IP address.
Guides for setting up the DNP3 protocol, including Device ID and authentication.
Steps for setting up the Modbus protocol, including interface and Device ID.
Instructions for setting up the IEC61850 protocol over Ethernet TCP/IP.
Steps to configure Modbus Poll software for testing via RS485 interface.
Instructions for opening and loading workspace files in the Modbus Poll software.
Demonstrates basic monitoring, configuration, and control using Modbus functions.
Explains how to read coil status, indicating relay energized/deenergized states.
Describes reading discrete input status for Analog Output modules and I/O status.
Used to read and write parameters for FOT analog outputs and configuration.
Details registers for monitoring and controlling relay settings and logic.
Covers registers for enabling or disabling temperature probes via bit mapping.
Provides read-only access to probe information and system level values like temperature.
Example of configuring Relay 5 using Modbus write functions for setpoints and logic.
Reference for Modbus registers, covering coil status, input status, and holding registers.
Maps coil addresses to parameters like System Status Relay and individual relay states.
Maps input addresses to analog output module status and I/O module status.
Maps holding register addresses to analog output settings and relay configurations.
Maps input register addresses to temperature values and probe signal strengths.
Details the test setup for interfacing with the IEC 61850 Hammer Test tool.
Steps to configure the IEC 61850 protocol in LumaSMART and the test harness.
Guides for establishing a successful connection between LumaSMART and the test harness.
Example of setting up Relay 4 using IEC 61850, including configuration and channel association.
Describes accessing and enabling various reports available through the IEC 61850 protocol.
How to set and read unique temperature alarms per channel via IEC 61850.
Demonstrates setting and reading a temperature alarm threshold for Channel 4.
How to set and read unique signal strength alarms per channel via IEC 61850.
Demonstrates setting and reading a signal strength alarm threshold for Channel 4.
Maps for temperature channel supervision, control, and alarm setpoints.
Maps for temperature channel supervision, control, and alarm setpoints.
Maps for relay channel supervision, control, configuration, and alarm setpoints.
Maps for FOT setup, status monitoring, including probe signal strength.
Maps for the System Status Relay report, including mode and behavior.
Maps for general system configuration information, including FOT and relay counts.
Maps report contents for temperature measurements and relay status.
Maps report contents for channel temperature and probe signal strength alarms.
Maps probe signal strength levels for alarm setpoint configuration.
Steps to configure DNP3 protocol in LumaSMART via Ethernet TCP/IP.
Overview of the Test Harness software window and command selection for DNP3 testing.
Shows the window for selecting DNP3 commands like integrity polls and data reads.
Displays LumaSMART data and allows selection of data classifications for viewing.
Enables unsolicited reports for automatic data window refreshing during testing.
Explains how to view binary input data, including system configuration and relay states.
Describes how to view binary output data, including channel enable/disable states.
Steps to enable or disable a channel using the Control Relay Output Block command.
Displays analog input data, showing temperature and signal strength values.
Shows analog output values for installed FOTs and relay setup parameters.
Demonstrates configuring analog output values and temperature ranges for FOTs.
Shows default entries for Relay Control variables and how to configure them.
Maps DNP3 registers for binary outputs, binary inputs, and analog outputs.
Maps point IDs to parameters for enabling/disabling temperature channels.
Maps point IDs to analog output module status and relay status indicators.
Maps point IDs to analog output parameters for FOTs and relay configurations.
Maps point IDs to temperature values and probe signal strengths for each channel.
Details the information contained in data reports: date, time, temperature values, and relay states.
Explains the format of retrieved data reports, including temperature values and relay states.
Describes system behavior during data retrieval, including ignored commands and active logic.
Outlines rules for command case sensitivity, syntax, parameters, and error handling.
Details the rtrv command for retrieving data log reports and its output format.
Instructions for replacing the CR2032 coin-type lithium battery in the LumaSMART controller.
Lists suppliers for third-party products used with the LumaSMART system.
Provides a list of all tables present in the LumaSMART User Manual.
| Brand | LumaSense |
|---|---|
| Model | LumaSMART |
| Category | Controller |
| Language | English |