82 Chapter 9: Basic Operation
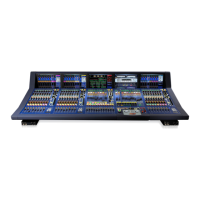
PRO2 Live Audio System
Owner’s Manual
Automation
PRO2 automation is managed from the Automation screen of the GUI menu, with
support from the automation section of the control surface (output bay).
The Automation screen (a typical example is
shown right) has the following functions and
features:
• Show management — see “Managing the
shows” on page 82.
• Scene management — see “Managing the
scenes” on page 84.
• Event management — see “Additional control
— managing events” on page 85.
• Cue list — shows the scenes and point scenes
in performance order. The cue list includes information such as scene number,
name, notes etc. You can expand and unexpand the point scenes and ‘zoom’ the list
on/out. It also lets you reorder the scenes.
• Scope — the Recall Scope and Store Scope buttons open the scope screens, from
which you can select the automated controls that you want to leave in/out of a scene
when it is stored or recalled.
• Rehearsal — the Rehearsal button lets you carry out a rehearsal, which will ‘skip’
(leave out) any scenes that you choose.
Note: Note: With no show loaded, the Automation screen will be blank.
>> To open the Automation screen
Do one of the following:
• At the GUI, choose home
AutomationAutomation.
• In the navigation zone, press the automation / filing screen access button.
Managing the shows
The four buttons (NEW, LOAD, SAVE and SAVE AS) towards the top of Automation
screen let you create a new show, load an existing show, update the current show or
create a new show using the current settings.
Important:
We recommend that you save your show
settings regularly (see “Saving a show
versus storing a scene” on page 36). The
PRO2 will indicate that there are show
settings to be saved by changing the
background colour of the SAVE button to red
(shown right).
The eye icon in the Automation screen (just under the ADD MIDI button) opens
the Show window. This window contains a number of filter options, such as empty
scenes, MIDI events etc., that you can choose to exclude from your show.
>> To create a new show
1 Click NEW.