Startup and validation
108580_en_02 PHOENIX CONTACT 83 / 272
4 Startup and validation
4.1 Initial startup
The following information starting up the RFC 4072S must be observed.
– Familiarization with the previous sections of this user manual is essential in order to
carry out the steps listed in the following table correctly. Therefore, if you have not done
so already, please read the previous sections carefully. The section in the appendix of
this user manual which corresponds to the previous sections must also be observed.
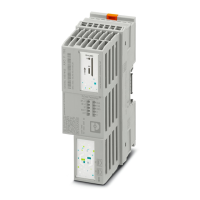
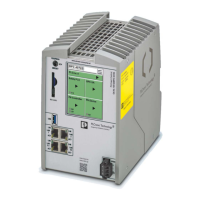
– The RFC 4072S starts up immediately:
– After power up, if a parameterization memory (SD card) with a valid project is
inserted.
– After a download from PLCnext Engineer, if you have selected the corresponding
option: “Write and Start Project (Project Changes)”.
With appropriate safety-related programming, the safety function is active immediately
after the startup phase of the SPNS, and the outputs of the F-devices and the outputs
of the non-safety-related PROFINET devices and I/O devices (e.g., Axioline F or Inline
modules) can be set depending on the programming.
For initial startup, proceed as described in Table 4-1.
WARNING:
Take appropriate measures to ensure that your system/machine does not present any
danger during startup and validation.
WARNING:
The planned system/machine safety function is only available following validation.
The following table describes all the steps from unpacking the RFC 4072S through mount-
ing/installation to startup.
Table 4-1 Steps for initial startup of the RFC 4072S
Step Relevant section and literature
Remove the device from the packaging while observing the
ESD regulations.
Section “Safety notes for mounting and removal” on page 69
Mount the device in accordance with your application. Section “Mounting the RFC 4072S” on page 72
Insert the parameterization memory. Section “Inserting/removing the SD card (parameterization
memory)” on page 73
Connect the device to an Ethernet network. Section “Connecting an Ethernet network” on page 75
 Loading...