ACU-RITE MILLPWR
G2
155
8.1 Milling and Drilling
Selecting a tool
The first step for a program is to choose the tool that will be used to
begin the machining. For this example, a 1/4” diameter Flat End Mill
will be used as an example.
Press the DRO/PGM key to enter PGM mode.
Press the Program Steps soft key.
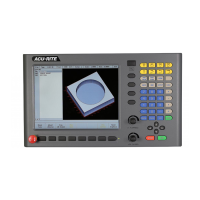
Press the Tool soft key to open the Set Tool dialogue.
In the Set Tool dialogue, the tool settings may be entered directly
into the fields, the current settings from a tool in the Tool Table may
be imported into the dialogue, or a tool in the table may be
programmed by its number.
Entering the Tool data
In the Set Tool dialogue the cursor defaults to the Size: Diameter
field. Enter 0.25 in the Size / Diameter field.
Select the unit of measure using the Inch or MM soft keys if a change
is required.
ARROW DOWN to highlight the Tool Type field. The Length: field will be
left blank.
Enter the plunge angle to be used when ramping into pockets.
If the tool can safely plunge straight down into the material, press
the Plunge soft key or enter 90° for the angle.
ARROW DOWN to highlight the Tool Type field, press the Tool Types soft
key to open the Tool Type drop down menu.
ARROW DOWN to highlight the Flat End Mill.
Press the ENTER key to select the tool.
Though in most cases, pressing the ENTER key will enter
the data into the field, and place the cursor into the next
field, the ARROW keys will be used in these steps for
navigation, and entering data.
In most dialogues that contain a drop down menu, there
are soft keys available for choosing a selection. These
examples will refer to the use of the soft keys when
available.