Model 100E Instruction Manual Operating Instructions
045150102 Rev XB1 75
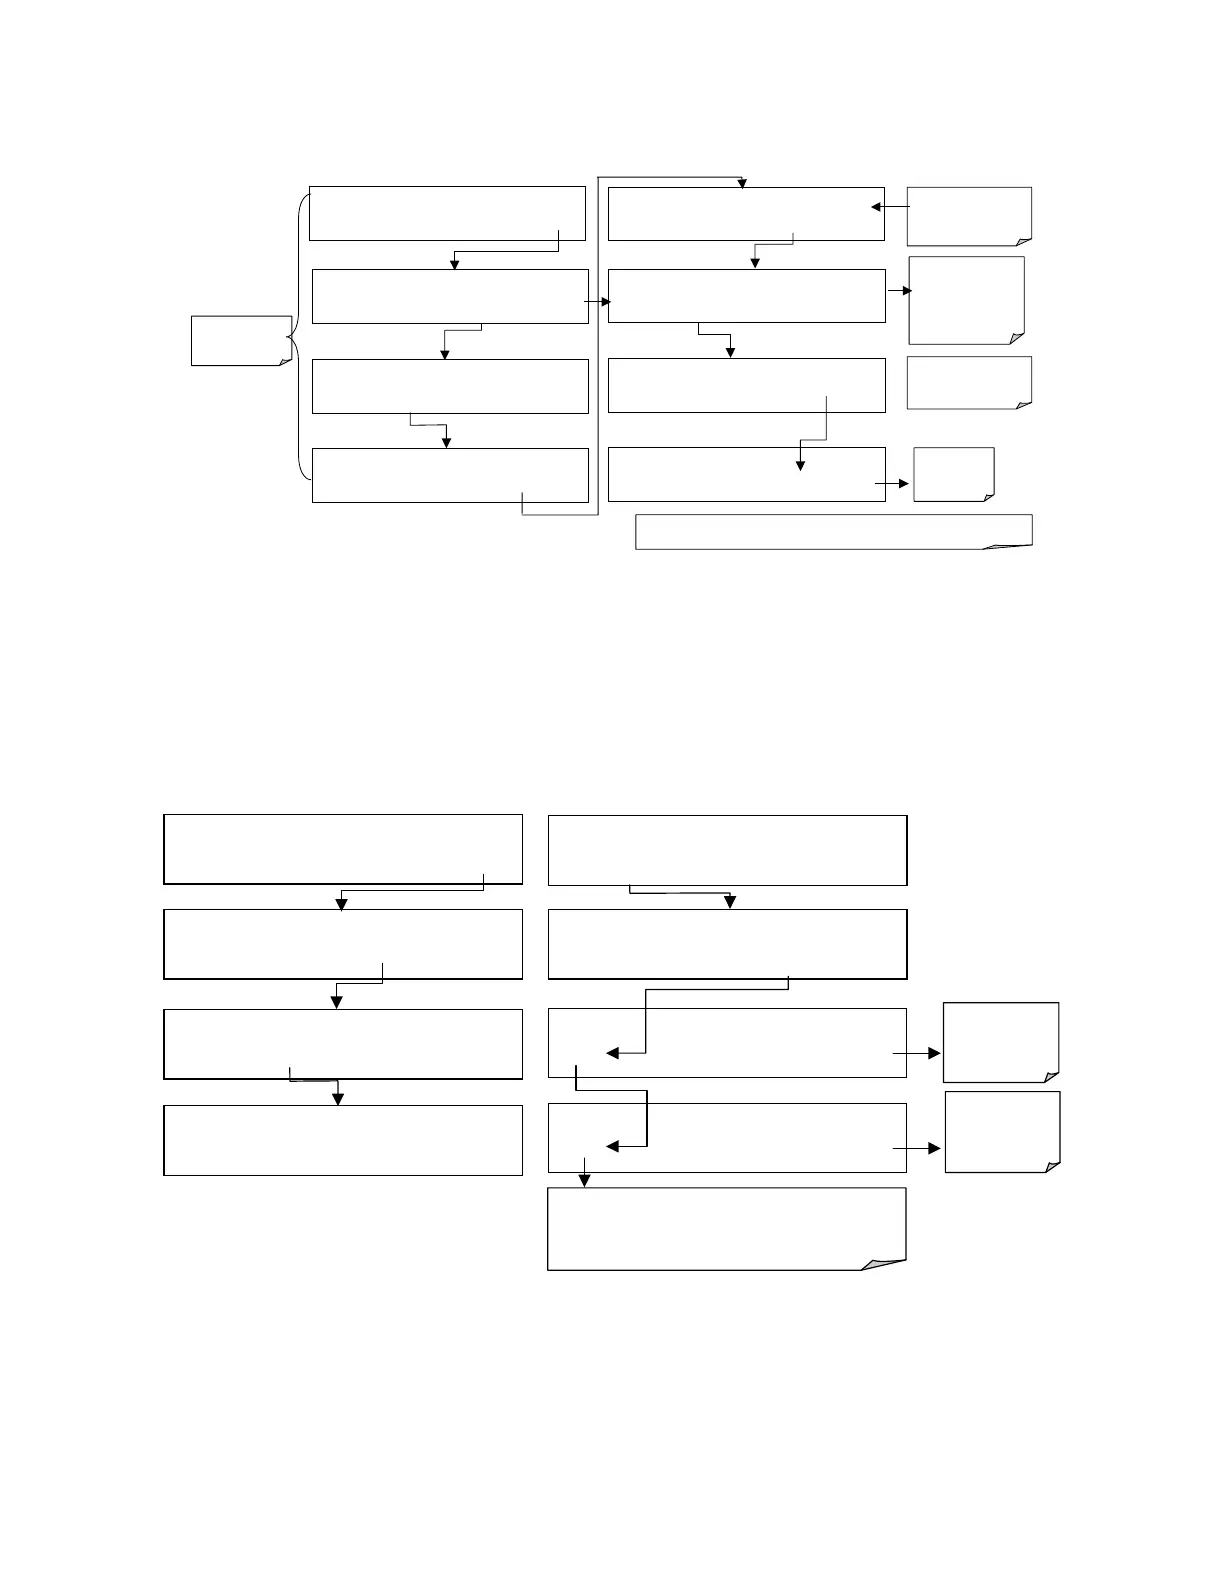
To enter the signal I/O test mode, press:
SAMPLE RANGE = 500.000 PPB SO2 =X.XXX
< TST TST > CAL
SETUP
EXAMPLE
SETUP X.X
PRIMARY SETUP MENU
CFG DAS RNGE PASS CLK
MORE
EXIT
SETUP X.X
SECONDARY SETUP MENU
COMM VARS
DIAG
EXIT
DIAG
SIGNAL I / O
PREV NEXT
JUMP
ENTR
EXIT
DIAG I / O
Test Signals Displayed Here
PREV NEXT
JUMP
PRNT EXIT
Use the JUMP key to
go directly to a
specific signal
See Appendix A-4 for
a complete list of
available
SIGNALS
DIAG I / O
JUMP TO: 12
1 2 ENTR
EXIT
Enter 12 to Jump
to Signal 12:
(
ST_CONC_VALID
)
DIAG I / O
ST_CONC_VALID = ON
PREV NEXT
JUMP
ON
PRNT EXIT
Exit to return
to the
DIAG
menu
SETU`P X.X ENTER DIAG PASS: 818
8 1 8
ENTR
EXIT
Use the
NEXT
&
PREV
keys to move between
signal types.
Pressing the PRNT key will send a formatted printout to the serial port and can be
ca
tured with a com
uter or other out
ut device.
EXIT
returns
to the main
SAMPLE
display
6.7.3. Analog Output Step Test
This test can be used to check the accuracy and proper operation of the analog outputs.
The test forces all four analog output channels to produce signals ranging from 0% to
100% of the full scale range in 20% increments. This test is useful to verify the operation
of the data logging/recording devices attached to the analyzer.
To begin the Analog Output Step Test press:
SAMPLE RANGE = 500.000 PPB SO2 =X.XXX
< TST TST > CAL
SETUP
SETUP X.X
PRIMARY SETUP MENU
CFG DAS RNGE PASS CLK
MORE
EXIT
SETUP X.X
SECONDARY SETUP MENU
COMM VARS
DIAG
EXIT
DIAG SIGNAL I / O
NEXT
ENTR
EXIT
Exit-Exit
returns to the
DIAG
menu
SETUP X.X ENTER DIAG PASS: 818
8 1 8 ENTR
EXIT
DIAG
ANALOG OUTPUT
PREV
NEXT
ENTR
EXIT
DIAG AOUT
ANALOG OUTPUT
0%
EXIT
Performs
analog output
step test.
0% - 100%
DIAG AOUT ANALOG OUTPUT
[0%] EXIT
Pressing the key under “0%” while performing the test will
pause the test at that level. Brackets will appear around
the value: example: [20%] Pressing the same key again
will resume the test.