TPDesign4 Project Files
30
TPDesign4 Touch Panel Design Software (v2.10 or higher)
3. Select Next to proceed to the New Project Wizard - Step Two dialog (FIG. 16 on page 19). Fill in the
fields in this dialog as desired.
4. Select Next to proceed to the New Project Wizard - Final Step dialog (FIG. 17 on page 19). Fill in
the fields in this dialog as desired.
5. Select Finish to close the New Project Wizard.
At this point, the initial page is opened in the Design View, ready for you to:
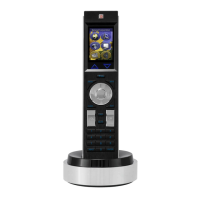
Add Pages and Popup Pages (note that the display area on R-4 remotes is 240x320 pixels).
See the Working With Pages section on page 37 for details.
Add Buttons
See the Working With Buttons section on page 57 for details.
Set General, Programming and States properties for Buttons, Pages and Popup Pages (keep in
mind that R-4 projects work just like any other panel type).
See the Working With Properties section on page 111 for details.
Configure the external pushbuttons.
See the External Controls (Pushbuttons/LEDs) section on page 80 for details.
R-4 Remote Devices - Unsupported Button Types
Computer Control, TakeNote, and Text Input buttons are not supported by R-4 remote controllers, and
are not displayed in the Properties Control Window (when an R-4 project is active).
Using Quick Input
Select Quick Input from the Edit menu or Design View context menu to access the Quick Input sub-
menu.
The Quick Input setting determines how typing directly into a Design View or into the State Manager
will be handled:
Current Property - This setting redirects keyboard input to the currently selected property on
the currently visible tab of the Properties Control (assuming one is selected). For example, if
you select the Name property (in the General tab of the Properties control window), any time
you select a button in the Design View, you can just type and press the Enter key to enter a
new button name for the selected button.
The result of the keystroke will depend on the property selected.
Text - This setting redirects keyboard input to the button Text property for all selected button
states (in the States tab of the Properties Control window). For example, if you select several
states on a Multi-State button (in the State Manager window), you can type and press the
Enter key to enter new button text for the selected states. If no states are selected, text is will
be applied to all states of the button selected in the Design View.
R-4 projects do not support all button types (see R-4 Remote Devices - Unsupported
Button Types below).
All button types continue to be available in the Drawing Toolbar. However, TPDesign4
will display an error message if you attempt to add an unsupported button type in an
R-4 project.