HelixNet | User Guide
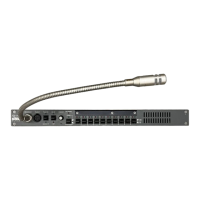
Key to Main Station: rear panel
Slots for optional interface modules.
H – Slot 1
I – Slot 2
J – Slot 3
For more information, see HMS-4X Main Station rear panel: Interface modules
Warning: Only connect power supply to earthed supply sockets. Ensure that the power supply is
routed to avoid sharp bends, hot surfaces, pinches and abrasion.
For more safety guidance, see the Safety Instructions at the front of this guide.
Note: The HMS-4X Main Station does not have a power switch, button or key. The system
powers up when you connect the power supply.
2.3.1 HMS-4X Main Station Rear Panel: Interface Modules
Up to three Interface modules (of the same or different types) can be fitted to the extension bay of
the Main Station. When looking at the rear of the Main Station, expansion slot 1 is the left-hand
slot, expansion slot 2 is the middle slot, and expansion slot 3 is the right-hand slot.
Warning: The interface modules are NOT hot pluggable. Ensure that the Main Station is powered
down before inserting or removing modules.
Page 27
 Loading...