50
ENGLISH
DIA
High limit (Low limit+0.1)~30.1 (Low limit+0.1)~20.0 (Low limit+0.1)~13.3
Low limit 1.3~(High limit-0.1) 1.3~(High limit-0.1) 1.3~(High limit-0.1)
6.4.2 Factory Default Alarm Limit Seng Value
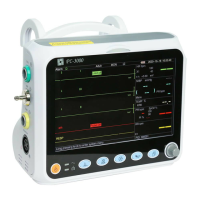
Type
Parameter
Adult Pediatric Neonate
HR
High limit 180 bpm 200 bpm 220 bpm
Low limit 40 bpm 50 bpm 50 bpm
RR
High limit 30 rpm 30 rpm 100 rpm
Low limit 8 rpm 8 rpm 30 rpm
TEMP
High limit 39 °C 39 °C 39 °C
Low limit 35 °C 35 °C 35 °C
SYS
High limit 180 mmHg 130 mmHg 110 mmHg
Low limit 60 mmHg 50 mmHg 50 mmHg
DIA
High limit 120 mmHg 90 mmHg 90 mmHg
Low limit 50 mmHg 40 mmHg 30 mmHg
MAP
High limit 160 mmHg 110 mmHg 100 mmHg
Low limit 50 mmHg 40 mmHg 30 mmHg
SpO
2
High limit 100 % 100 % 100 %
Low limit 90 % 85 % 85 %
S-T segment
High limit +1.00mV +1.00mV +1.00mV
Low limit -1.00mV -1.00mV -1.00mV
PR
High limit 180 bpm 200 bpm 220 bpm
Low limit 40 bpm 50 bpm 50 bpm
TD 2 °C 2 °C 2 °C
6.5 Tesng Alarms
When the monitor starts up, a self-test is performed. In this case the alarm lamp will light, and the system gives a beep.
This indicates that the visible and audible alarm indicators are funconing correctly.
For further tesng of individual measurement alarms, perform the measurement on yourself (for example SpO
2
) or enter
Demo Mode, or use a simulator. Adjust alarm limits and check that appropriate alarm behavior is observed.
6.6 When an Alarm Occurs
When an alarm occurs, observe the following steps and take proper acons:
1. Check the paent’s condion.
2. Conrm the alarming parameter or alarm category.