Section 04 TRANSMISSION
Sub-Section 06 (BRAKE)
04-06-5
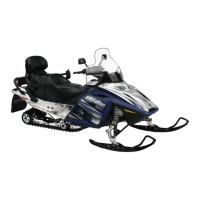
1. Spacers
To install bearing on countershaft, use installer (P / N
529 0302 00) and spacer(s) from remover as re-
quired.
1. Spacer
COUNTERSHAFT AND BRAKE DISC REMOVAL
S-Series with Hydraulic Brake
– Remove muffler.
– Refer to CHAINCASE 04-07 in order to remove
chaincase cover.
– Remove upper sprocket castellated nut.
– Remove belt guard, drive belt and driven pulley
referring to DRIVEN PULLEY 04-04.
– Slacken set screw and unlock collar
no. 18
if
bearing is needed to be disassembled. See
above S-Series illustration and procedure.
– Remove 3 retaining screws
no. 20
from coun-
tershaft bearing housing.
– Unbolt oil reservoir support to make room for
countershaft or brake disc removal.
– Pull countershaft toward driven pulley side to
gain access to clip
no. 25
.
– Remove clip
no. 25
on countershaft.
– Pull countershaft toward driven pulley side to
free from chaincase. Withdraw countershaft to-
ward chaincase.
– Remove connecting pipe between tuned pipe
and after muffler.
– Disconnect brake line from caliper and plug it.
– Unbolt caliper from chaincase.
– Remove brake disc from countershaft.
DISASSEMBLY
7,15,16,23, Brake Pad, Brake Lever, Pin
and Screw
All Models with Mechanical Brake
Pull pin out off caliper and remove lever.
On Tundra II LT, remove self-tapping screw. Un-
screw ratchet wheel in order to remove moving
pad.
Remove fixed pad.
S-Series with Mechanical Brake
Fixed pad is riveted to chaincase on these mod-
els. Caliper must be split to remove moving pad.
To removed fixed pad, drill out its rivet then pry
disc in order to free fixed pad.
All Models with Hydraulic Brake
Only brake pads are available as spare parts. If cal-
iper or master cylinder are damaged, replace each
of them as an assembly.
CLEANING
Clean all metal components in a general purpose
solvent. Thoroughly dry all components before as-
sembling.
CAUTION : Do not clean brake pads in sol-
vent. Soiled brake pads must be replaced
by new ones.
A03D1JA
529 0301 00 1
A03D1KA
529 0302 00 1