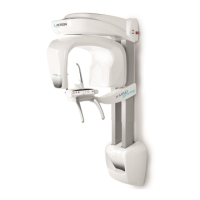
Other than the power supply, X-Mind Prime 3D provides the following connections.
All connections are located in the base of the unit and are protected by a metallic
cover.
•
RJ45 Ethernet connection for 3D detector
: dedicated line for point-to-point
connection from the 3D detector to the host PC. A Cat 6 cable (5m long) is
supplied with the unit. In case a longer cable is needed, make sure the cable
is Cat 6 or better.
•
RJ45 Ethernet connection for ceph detector and system interface
: point-
to-point connection from the unit to the host PC. A Cat 6 cable (5m long) is
supplied with the unit. In case a longer cable is needed, make sure the cable
is Cat 6 or better.
•
READY light
: The signal is active when the unit is ready to perform the exam.
Normally Open dry Contact, maximum load 24V, 40W. Contacts X11-1 and
X11-2
•
X-RAY ON light
: The signal is active during X-Ray emission. Normally Open
dry Contact, maximum load 24V, 40W. Contacts X11-3 and X11-4
The unit only provides dry contacts relative to the above mentioned functions.
Power supply for the relevant devices has to be provided externally, making sure
not to exceed the indicated ratings.
•
Remote X-RAY button
: An external pushbutton can be connected so that
the operator can start exposure from outside the exam room. It is
mandatory to use a
MOMENTARY pushbutton
in order to guarantee “dead
man” operation. The standard X-ray button supplied with the unit has the
above characteristic. Contacts X51-3 and X51-4. Only a dry contact shall be
connected to this input.