Service Manual – Corrective maintenance
SERVICE MANUAL • X-MIND prime 3D • (19) • 11/2019 • NXMPEN080A
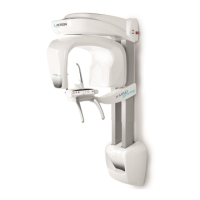
11.2.11
Ceph Axis alignment
Warning
All the following sub-paragraphs of this chapter are organized in checks
and adjustments procedures.
Before making any adjustment (mechanical regulation or offsets
modification), it’s mandatory to ensure that the checks required by the
previous sub-paragraphs are within the prescribed tolerances. If they are
not in the tolerances, first perform the adjustments prescribed by the
previous sub-paragraphs.
Warning
If during the following paragraph an offsets adjustment is required:
-
refer to chapter “Machine configuration and setup” paragraph 8.4
-
After the changes update the paper copy of the equipment
parameters table (supplied as paper copy with the unit
documentation) with the new offset values (see Appendix A at
paragraph 14.1).
11.2.11.1
Ceph ear rods adjustment
Checks
1.
Rotate the ceph head support in the lateral position
2.
Open "PhD_C_Test.exe" service program
3.
And select the following parameters:
- Format: No collimator
- Resolution: High
- Param1: View of Primary collimator field
- 70kV 8mA
4.
In the image processing menu select: “Dynamic adjustment”
5.
Prepare the unit to take the ceph exam and then press the X-Ray button until
the end of the exposure
6.
Save the image as “Rods.bmp”