82 / 374
SOCT User Manual Version 10.0 rev. A
NOTE: If there is a shadow on the edge of the tomogram some slight left/right/up/down
movement may be required to find the correct position (whole tomogram properly
saturated and QI as high as possible)
In order to obtain the best saturation of OCT signal verify correct refraction and tilt of optic
disc. Operator can drag the tomogram to desired position on the live OCT window.
7) Once the scan location is set on selected place in the disc, click twice on tomogram preview
window or press [Acquire] button. Device will begin the acquisition process and then data
calculation will be performed.
OCT Angiography examination
1. Prepare the patient as explained in chapter 8.1 Preparation for examination.
2. Ask the patient to look at the center of green cross and blink freely if the sound support is
Mute or disabled. If required, use the large fixation target. See chapter 7.8 Fixation target
change.
3. Select one of Angiography scan program.
4. Follow the procedure depending on the Acquisition mode. See chapter 8.2 Acquisition
modes description
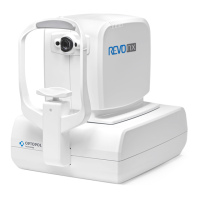
5. After the scan has been acquired, verify the result on the acceptance screen.
8.3.4.1 Acceptance screen
Figure 41. Angio acceptance window
Rescan Comes back to the Acquisition of scan. Examination is saved in database and
localization is marked. This marker can be used for motion correction values.
Accept Saves examination. In mosaic mode system loads next examination and starts
the procedure of shifting fixation and tomogram.
Reject Comes back to Acquisition window. Examination is not stored.
Mosaic mode When selected system goes to mosaic acquisition mode.
For REVO FC 130 the acceptance window presents MC Results provided by iTracking.