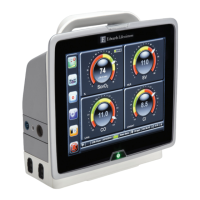
HemoSphere Advanced Monitor 10 Monitoring with the HemoSphere Pressure Cable
140
3
Use the Select Pressure panel to select the type/location of pressure sensor being used. The
choices for Pressure Transducer are:
• ART
• CVP
• PAP
4 Level the stopcock valve (vent port) just above the TruWave transducer to the patient’s
phlebostatic axis position according to the instructions for use.
5 Open the stopcock valve to measure atmospheric conditions. The pressure should display as a flat
line.
6 Press the physical zero button directly on the pressure cable, or touch the zero button
located on the screen. When zeroing is complete, a tone sounds, and the message “Zero
Complete” appears.
7 Confirm stable zero pressure value and turn stopcocks such that sensors are reading patient
intravascular pressure.
8 If desired, output the pressure signal to a connected patient monitor. See Pressure-Out on page 142
for more information on this option.
9 Touch the home icon to begin monitoring. See table 10-1 for which key parameters are
available based on the type of configuration.
Once pressure cable monitoring is initiated, the blood pressure waveform can also be viewed using the real-
time arterial (ART) waveform display. See Live Arterial Waveform (ART) Display on page 71.
Parameter values monitored using the TruWave DPT are averaged over a 5 second interval, and displayed
every 2 seconds. See table 6-1 on page 95.
10.5 Pressure Cable Monitoring in Swan-Ganz Module Monitoring
Mode
The HemoSphere pressure cable connects to a single Swan-Ganz pulmonary artery pressure port to provide
pulmonary artery pressure (PAP).
While in HemoSphere Swan-Ganz module monitoring mode, the pressure cable can be connected to a
TruWave DPT on a pulmonary artery line.
1 Connect one end of the pressure cable to the HemoSphere advanced monitor.
2 Use a straight in or out motion to connect or disconnect the TruWave DPT. Refer to the TruWave
pressure transducer’s instructions for use and to steps 2-6 in section 10.4.1 above for instructions
on flushing air from the system.
3 Use routine transducer calibration procedures (according to institutional policy) to ensure proper
pressure signals are being transmitted.
4 Touch clinical actions icon More icon Zero & Waveform icon
OR
Press the physical zero button directly on the pressure cable (see figure 10-1).
Status = Released Printed Date: 2018-01-16 Released Date: 2017-09-14