Chapter 2 Basic Operations
45
2
Printing the Saved Original Data
Printing from [Storage]
1
Turn on the power to this machine.
Press the [X] side of the power switch.
2
Check that the master making
basic screen is displayed.
If a screen other than the master making basic
screen is displayed, press the [MASTER MAK-
ING] key (A 24).
3
Check the paper.
(A 32 “Setting up the paper feed tray and the
paper”)
4
Check the paper receiving tray.
(A 33 “Setting up the paper receiving tray”)
5
Touch [Storage] in the [Functions]
tab screen.
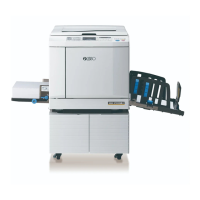
6
Touch the original data that you
want to print.
• To select original data that is saved in another
folder, touch the folder tab.
• When there are 6 or more original data files,
touch [F] or [G] to change the list that is dis-
played.
7
Touch [Details].
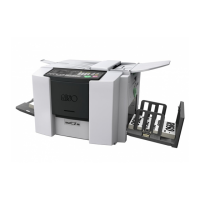
8
Check the original data to be
printed.
9
Touch [Retrieve].
You can print the original data that is saved using
the following methods.
• [Storage]: Original data that is saved in this
machine
– For the method to save data from paper originals, see
the section below.
(A 43 “Saving Paper Original as Data”)
– For the method to save data from a computer, see the
“RISO Printer Driver User’s Guide” (DVD-ROM).
• [USB Job List]: Original data that is saved in a
USB flash drive
– For the method to save data from paper originals, see
the section below.
(A 43 “Saving Paper Original as Data”)
– For the method to save data from a computer, see the
“RISO Printer Driver User’s Guide” (DVD-ROM).
• [USB print (Auto process)]: Original data that is
saved in a USB flash drive using the printer driver
(The data can be printed with minimum required
steps.)
– For the method to save data, see the “RISO Printer
Driver User’s Guide” (DVD-ROM).
BWhen an authentication screen
(A 25) is displayed, follow the
instructions on the screen.
BDepending on the type of original
data, the following icon is displayed:
: Original data that is edited using
the [Editor]
BTo manage the original data, see the
page below.
(A 74 “Managing the Saved Origi-
nal Data [Storage], [USB Job List]”)