136 APOLLO Digital Broadcast Production Console
Passing Signals out of Apollo
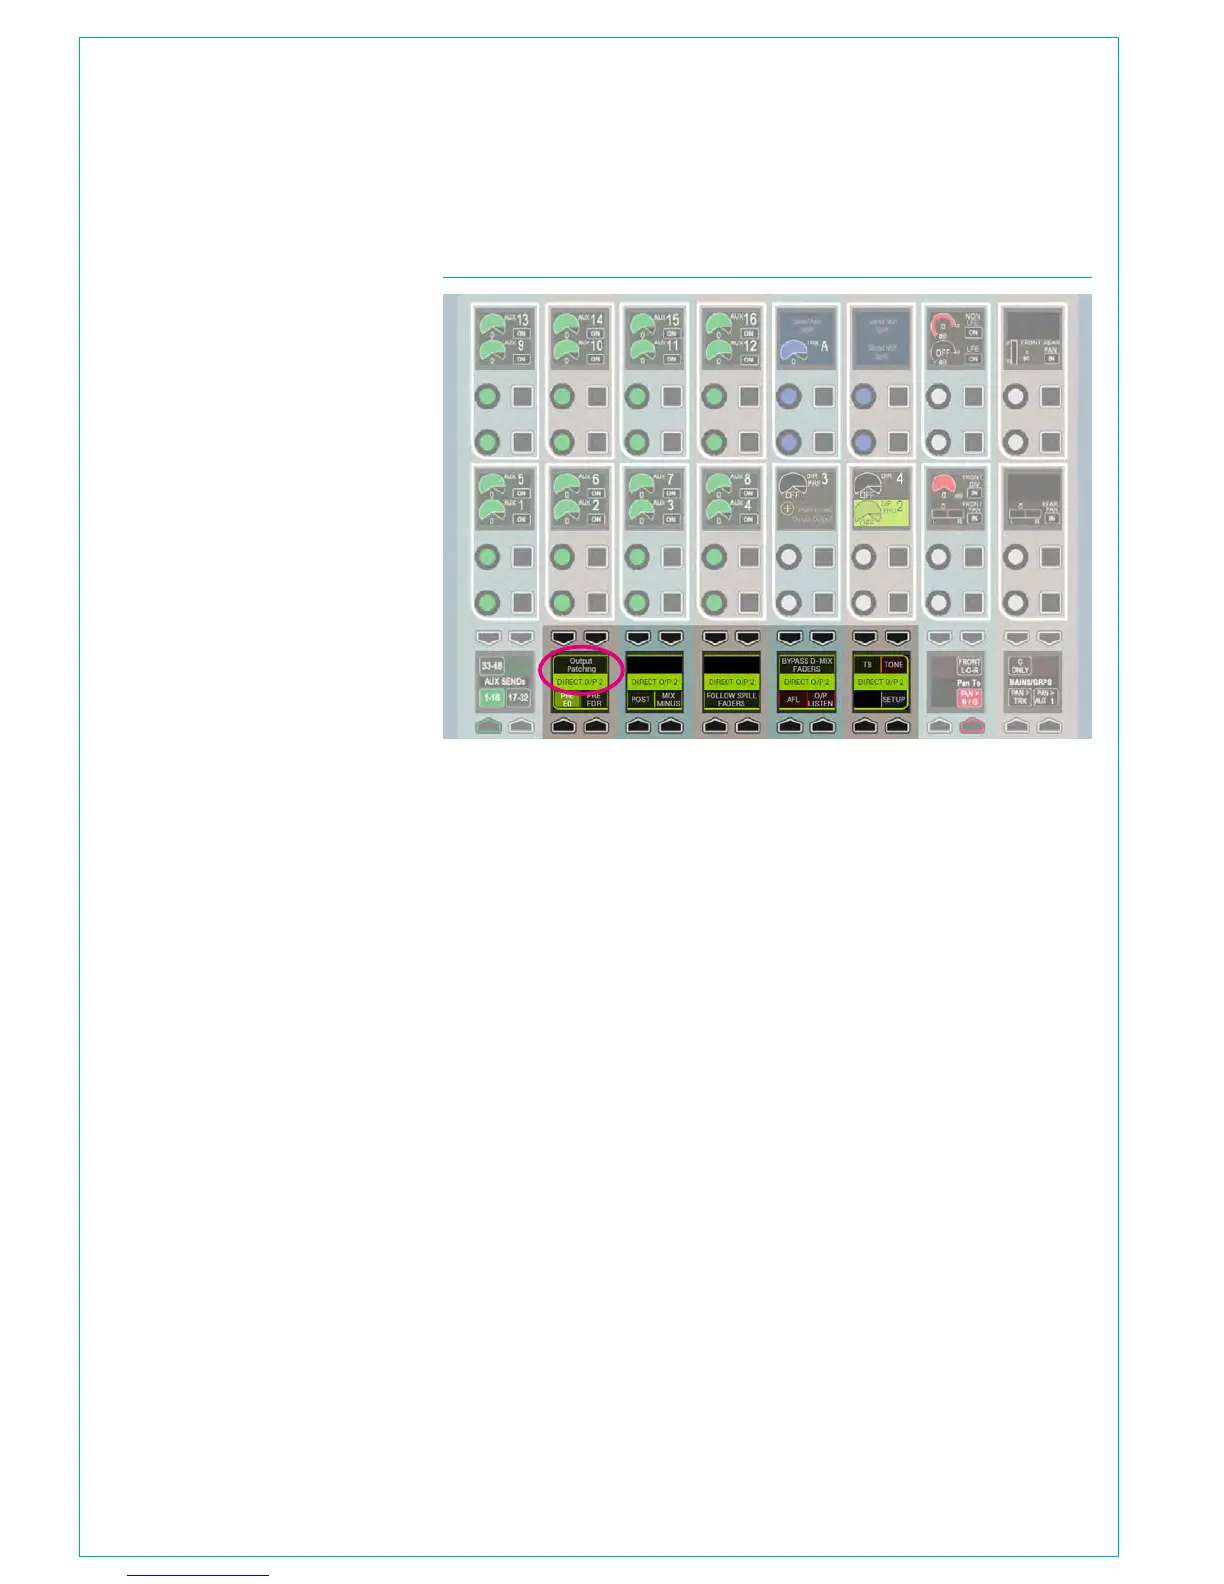
FIG 3 - ADDITIONAL CONTROLS FOR EACH DIRECT OUTPUT
• Additional controls for each send on the SEND-ROUTE panel mode can be shown
in the area highlighted above by pressing on the rotary level control for the required
send. Note the particular send currently being displayed is labelled across the centre
of these displays
Like other console DSP outputs, each
direct output can be simultaneously
patched to multiple destinations—physical
output ports, Hydra2 patchbays, or
channel inputs.
Direct Output Controls
If a path has direct outputs assigned to
it, level controls, colour-coded olive, will
be available in the SEND-ROUTE panel
mode when viewing that path.
Additional controls for each send can
be viewed by pressing down on a rotary
controller to display functions related to
that send across displays in the bottom
of the panel as shown in Fig 3. The
send that is the current focus of this area
is displayed across the centre of the
displays.
When a direct output is selected, buttons
in this area allow for the send to be set
pre EQ, pre fader or post fader, and for
the send to be routed via a mix-minus bus.
The same menu area also has an AFL
button to solo the direct send over the
monitor output, as well as buttons to route
talkback and tone to the direct output.
A button labelled ‘Setup’ in this area
brings up a direct output assign/width
menu in the TFT screen above. This menu
is the same as the one accessed from
the main application. This pop-up TFT
screen menu can be accessed from the
control surface even if no direct outputs
have been assigned to the current path by
pressing on the greyed out direct output
level control, and then selecting Setup
from the lower send menu.
Direct Output Delay
Delay on direct outputs comes from the
same pool of DSP resource as bus output
delay. The direct output setup screen
shows the amount of available delay
resource and allows delay to be assigned.
Open the direct output setup screen by
pressing a direct output rotary controller
to open the direct output control functions
menu below and then press SETUP to
view the screen on the panel’s TFT.
Alternatively, find the same screen on the
main application from >I/O>I/O Patch>
Select Source>Direct Outputs and click
on the output cell for the required fader.
To switch in and adjust delay, see
Processing “Delay” on page 93 . As
with input delay and bus output delay,
the value can be displayed in either
milliseconds, or video frames.
The control area on that panel allows the
user to either nudge the delay value with
+/- buttons to allow the delay value to be
stepped up or down by a pre-determined
amount, or use the rotary control to allow
finer control of delay settings
The >Show Settings>General Settings
page of the main application allows the
delay display default for the whole console
to be selected as either milliseconds or
video frames, the number of video frames
per second to be selected to match the
format of video being used, and the +/-
delay button step size to be selected.
Direct Output Talkback
Pressing and holding the Talkback button
in the lower control area (see above
button top row next to last). When a
direct output is selected will momentarily
replace audio on that direct send with
talkback. A ‘TB’ button is also located in
the functions row above each fader (as
long as the panel is not displaying a Tools
or Layer Tools menu. If so, exit the Tools /
Layer Tools menu using the exit button at
the right hand side of the row).
This easy access TB button will route
talkback to direct output 1 only. Note,
dual fader panels do not currently support
this button location.
Direct Output Patching Shortcut
From V6.0 the Direct Output Focus
window at the bottom of the Sends-
Routes page has an Output Patching
button added to speed up the patching
workflow as shown in Figs 1 & 3,
for more details on this see
“Patching Shortcuts” on page 65.