Shows, Memories and Presets
174 APOLLO
Digital Broadcast Production Console
Backing up shows and memories
Shows, and the memories within them can
be backed up from the console controller
card to the console PC HDD, or a USB
drive connected to the console’s upstand
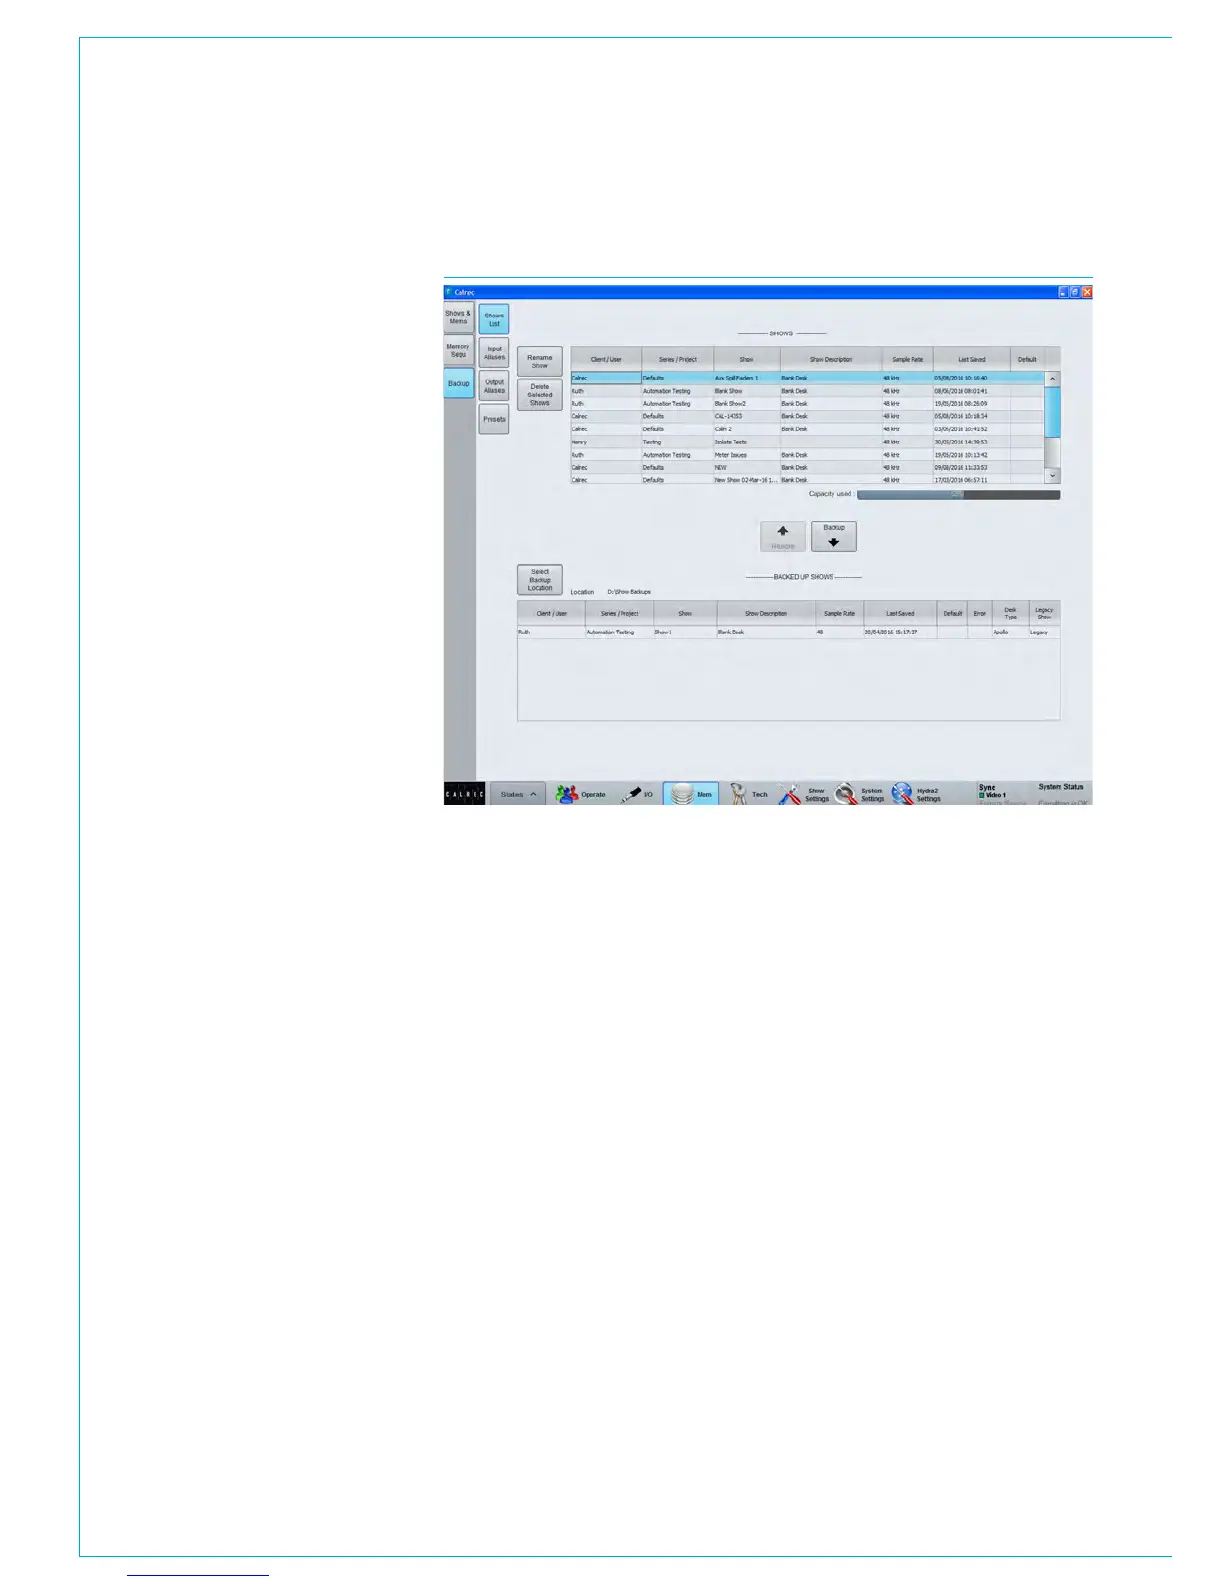
USB port. Fig 4 on the right shows the
main application >Mem>Backup screen.
The list in the upper half displays all the
shows currently available on the controller
card. The list in the lower half of the
screen displays all the shows available in
the currently selected backup location.
Press ‘Select Backup Location’ to choose
a folder on the PC HDD, or on a USB
drive to make the backups to.
It is recommended that dedicated folders
are used for backups - When the backup
location is changed, the chosen folder is
scanned to locate existing backups. If the
folder contains lots of files, it can take
time to scan. New folders can be created
via the ’Select Backup Location’ button.
Shows can be backed up individually or in
multiples. Select the show(s) to backup
from the upper list by clicking on them
to highlight. Highlight multiple shows
individually by holding down the keyboard
control key whilst clicking on each, or
highlight the first required, then hold shift
whilst clicking on the last required to
select a group. Press the ‘Backup’ button
to copy the selected shows to the desired
location.
Backup Shows at different sample
rates
Note that the sample rate of the show
is shown in the left hand column of the
show list, the backup method remains
unchanged.
Restoring shows and memories
Previously backed up show files can be
restored back to the console’s controller
card using a similar process. Press
‘Select Backup Location’ to browse to the
PC HDD or USB folder containing the
show files. Highlight the required show
file(s) from the Backed Up Shows list in
the lower portion of the screen and then
press ‘Restore’.
Renaming shows
The >Mem>Backup>Shows List screen
can be used to rename show files located
on the console. Highlight the desired
show in the console show list and press
‘Rename Show’.
Deleting shows
Show files can be deleted from the
>Mem>Backup>Shows List screen.
Highlight the shows to be deleted from
the console’s shows list in the upper
portion of the screen and press ‘Delete
Selected Shows’. Note, default show
templates are visible in this list, but can
only be deleted by users logged in to the
main application as technicians.
Changes to Format of Show Data
and Backups
In previous versions, Apollo and Artemis
allowed the creation of multiple meter
layout files, and multiple user split files.
Each show referenced one of these files
so that when you loaded a show, you
would also load the settings from these
referenced files.
From V6.0, this data structure has
changed, and each show now contains its
own meter layout and its own user split
configuration. This means that whenever
you load a show, you can be sure that
the meter layout, and the position of user
splits, will be exactly as you left them.
To support the changes made to the
structure of show data mentioned above,
the format of shows that are backed up, or
exported, from a desk has also changed.
Previously, when you made a show
backup, a folder structure was created
on the backup device, based on the
information client, series, and show labels
of each show. Each show you back up,
is now contained in its own file, with a
“.CalrecShow” extension. When you
export multiple shows, you get a simple
collection of files – one for each show.
The main application maintains support
for the legacy format, so you can still
import show backups made in the old
folder-based format.
FIG 4 - MAIN APPLICATION>MEM>BACKUP>SHOWS LIST SCREEN