O P E R A T I O N C H A P T E R 1 0
Power-Up Procedure
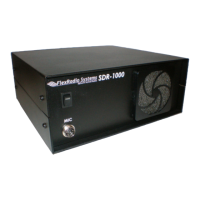
The SDR-1000 is unique in that the software does not have a way to cut the 13.8V power to the hardware
unit. For this reason, we recommend the following procedure to ensure that the radio starts in a stable, safe
state on Power Up:
1. Connect the SDR-1000 to the sound card, parallel port (or USB port if you are using the USB to
parallel adapter), external key and power supply. Check the connections to ensure good contact.
2. Boot up the computer and make sure the PowerSDR software is ready to be launched (no hour
glass cursor).
3. Turn on the power supply for the radio and flip the SDR-1000 Enclosure switch to the “On” (up)
position. You should hear relays click as they receive power. The current should read in the 1A
range before starting the software (possibly more depending on installed options).
4. Start up the PowerSDR software. You should hear the relays switch as they are reset to the “Stand
By” setting. Make sure this step takes place fairly soon after step three as the relays should not be
left in the higher current setting for long periods of time. The current should read around 700mA
after starting the software.
Power-Down Procedure
The power-down sequence is almost the reverse of the power-up procedure.
1. Close the PowerSDR software by clicking on the “X” in the upper right hand corner of the Front
Console. This will put the radio in the low power “Stand By” state.
2. Flip the SDR-1000 Enclosure power switch to the “Off” (down) position and turn off the power
supply.
Note: It is necessary to cut the power at the supply in order to completely power
down the radio and ensure the amplifier circuitry is not in a bias state.
CAUTION: Always power down and disconnect the radio before running any other
software that requires the use of the parallel port to prevent sending
unintended settings to the radio. Such signals could cause damage to the
unit.
[The rest of this page has been left blank intentionally]
130 FlexRadio Systems