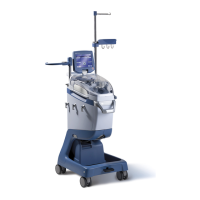
Maintenance
15-8
20077/021 US XTRA Operator’s Manual
Figure 15-8 Replacement of the Paper Roll
Changing Printer Ribbon Cartridge
When it is time to change the ribbon, the print will begin to lighten.
1. Open the printer’s front cover
2. The ribbon cartridge is a “U” shape with the ribbon exposed across the open end of the “U”
3. Push on the left side of the ribbon cartridge at the point marked by “PUSH”; this will release the
right side of the cartridge. Remove the ribbon cartridge from the printer.
4. Insert the new ribbon into its slot and make sure that the paper is between the ribbon and the
plastic ribbon cartridge.
Note: If necessary, press the FEED button to feed the paper forward.
5. Snap the ribbon in place.
6. Use the paper advance button to advance about 2 inches of paper out of the printer. This is
necessary to make the installation of the cover easier.
7. Route the paper through the opening in the cover. Close the printer cover.
Centrifuge Well Fluid Container
During following procedures, avoid contact with the fluids contained.
Figure 15-9 Removal of the Centrifuge Well Fluid Container
To re-use the container, operate as follow:
1. Unscrew the container and remove it from its seat;
2. Clean the container from the fluids it contains and disinfect with disinfectant solution;
3. Finally, dry the wet parts with a dry cloth and reposition the container on its seat, screwing it
completely.