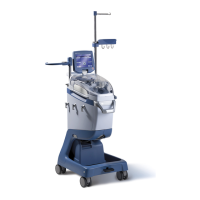
Installing the Disposables
X
TRA Operator’s Manual 20077/021 US 4-1
Chapter 4: Installing the Disposables
The following pages describe the step-by-step procedures for installing the disposables.
Detailed instructions for use regarding the setup of disposable products are provided below. It is
necessary to read carefully the following information before initiating the procedure.
Before beginning the setup, it is good practice to record into the appropriate record as determined by
hospital protocol the lot number from all sterile disposables used during the procedure.
Peelable stickers are available on the product label to be used for recording the item number, lot
number, and expiration date.
Setup for Standby Collection
Sometimes it is hard to predict whether or not enough blood will be recovered to render autologous
transfusion worthwhile. Thus, when setting up the X
TRA for standby, some operators prefer to
postpone the connection of the X
TRA Bowl Set until a sufficient amount of blood has been aspirated.
All caps and luer locks need to remain sealed and clamps need to be closed until an X
TRA Bowl Set is
mounted.
Before initializing the aspiration of blood, prime the reservoir filter with 200ml of anticoagulant
solution, attaching both the suction line and the vacuum line to the relative connections on the
reservoir lid.
Once the decision has been made to process the blood, the bowl set can be installed very quickly and
connected to the reservoir via the outlet port covered with a blue cap.
Supplies Required
• Blood Collection Reservoir
• Anticoagulant Solution
• Suction Line (plus a suction cannula and a vacuum source)
• Vacuum line
Setup for Whole Blood Separation Program
If you plan to use Poor Platelet Plasma (PPP) or Platelet Rich Plasma (PRP) program, see
Chapter
10: Preoperative Sequestration (PPP and PRP)
for instructions.