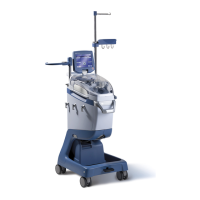
Installing the Disposables
X
TRA Operator’s Manual 20077/021 US 4-9
Figure 4-8 Seating the Pump Loop Cartridge (Left); Latching the Clamp Lid (Right)
Note: Do not force the pump loop down the rotor since it will load automatically when the LOAD
PUMP button is pressed.
13. Make sure that the tubing is correctly seated into the air sensor (see “C” in Figure 4-6).
14. Close and latch the clamp lid (see the right image of Figure 4-8).
15. Make sure the waste line is properly seated into the waste fluid transparency indicator.
16. Close the centrifuge lid.
17. Connect the fill line (blue) to the outlet port of the reservoir covered with a blue cap . . .
a. located on the reservoir lid, marked WASH, for a Blood Collection Reservoir TOP (see
Figure 4-9).
b. located on the bottom of the reservoir for a Blood Collection Reservoir BOTTOM. In this case
once connected, open the slide clamp (see Figure 4-10).
Figure 4-9 Connecting the Bowl Set to the Top of the Blood Collection Reservoir
Figure 4-10 Connecting the Bowl Set to the Bottom of the Blood Collection Reservoir