○○○○○○○○○○○○○○○○○○○○○○
4•18 Reference Guide
○○○○○○○○○○○○○○○○○○○○○○
4•18 Reference Guide
Copy operations
Use the Copy command to copy a file from one
location to another within the same device, or from
the Hard Disk to floppy (bypassing the RAM) and
vice versa, or from a SCSI device to Hard Disk or
floppy and vice versa. The source file remains
intact.
To copy a file from one floppy disk to another,
first load the file to RAM, then save it to the other
floppy.
Copy operations are executed using the same
procedures are those described for the Load and
Save commands. This section provides general
information relating to the Copy operation. The
user is encouraged to apply the same logic to
Copy operations as those used for Load and Save
operations.
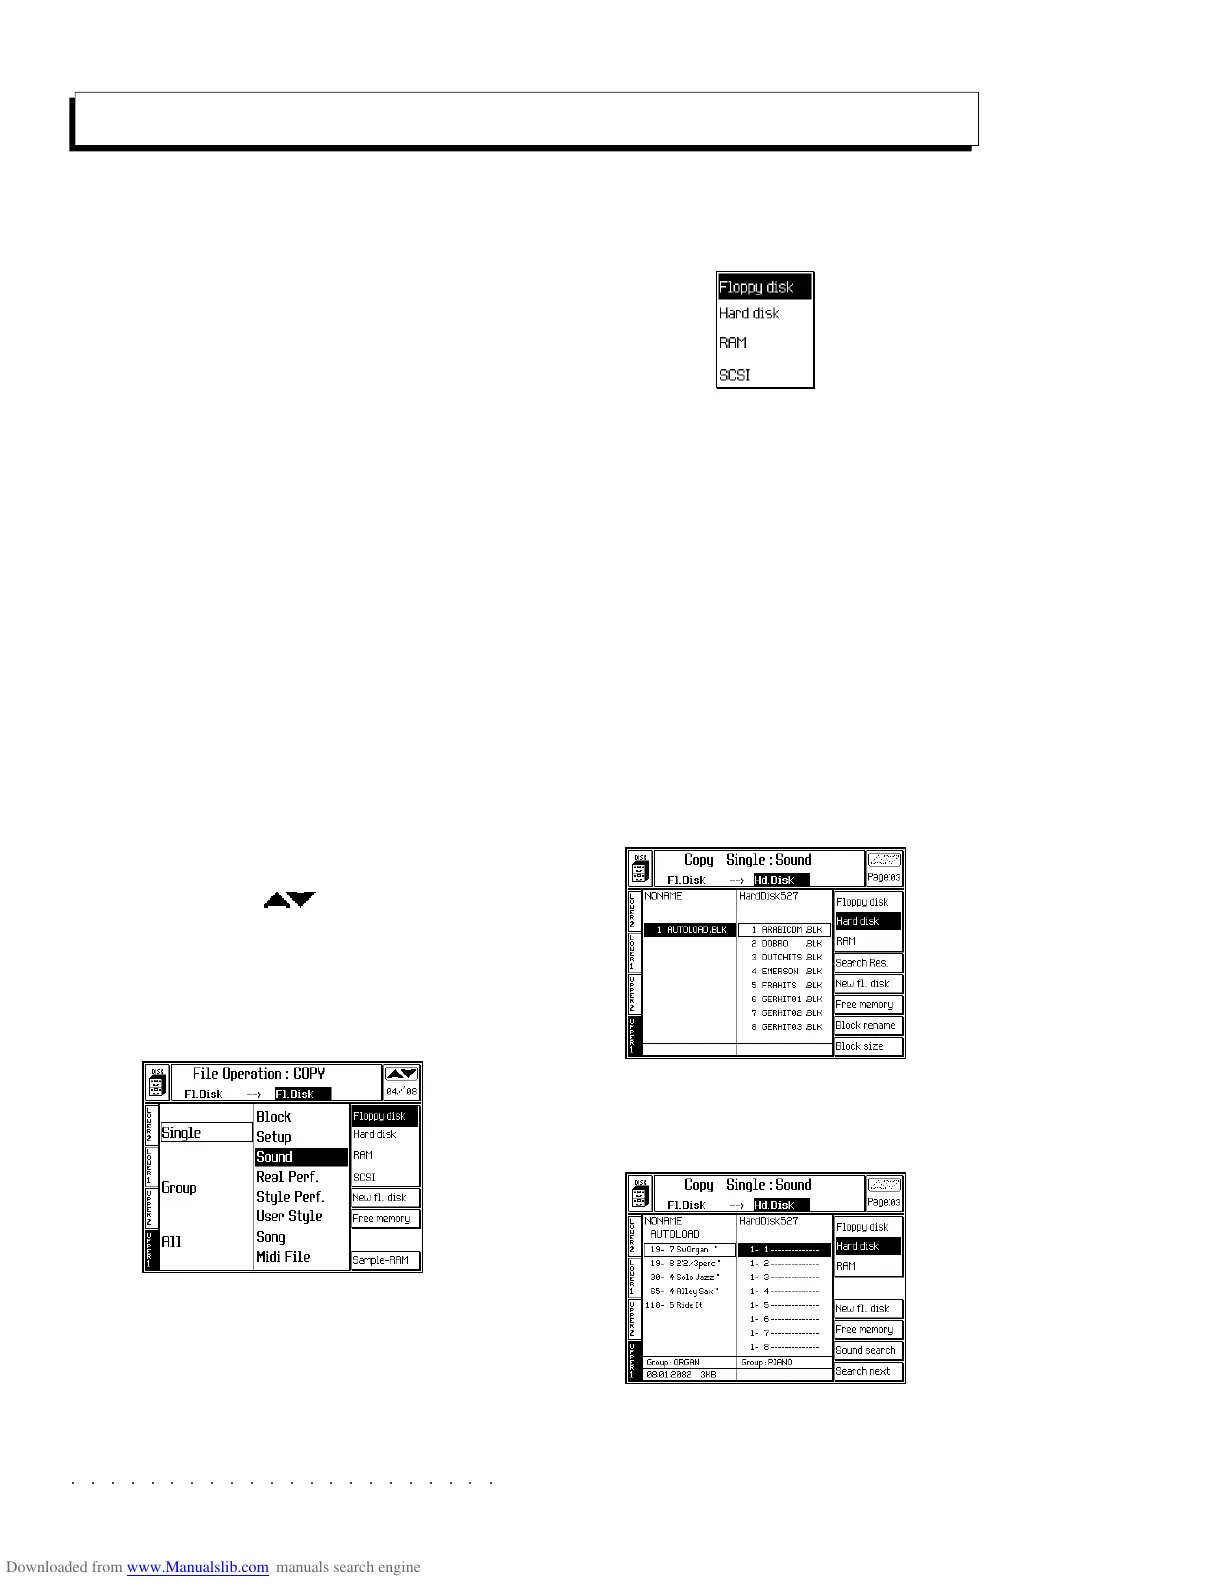
The following example shows how to copy a sin-
gle Sound file from Floppy disk to Hard Disk.
COPY SINGLE SOUND
1. Press DISK to enter Disk Mode and use the
+/– Page/Bank ( ) buttons to open the
main COPY page.
2. Select the COPY command required from the
main page.
3. Select the source and destination devices with
soft buttons F1, F2, F3 or F4 and directional
arrows.
In this case, pass to the source directory and,
if necessary, select Floppy Disk (F1).
Then pass to the destination directory and
select the Hard disk (F2) as the destination.
Entering the Hard disk for the first time takes
some time, depending on the number of files
already present.
A “Please Wait” message appears during the
scanning period.
Selecting «Floppy disk» or «RAM» automat-
ically assigns the same device to source and
destination.
4. Press ENTER to enter the file selector, select
the source Block containing the desired file
and press ENTER to gain access.
5. Select the File to Copy from the source di-
rectory.
Copy operations
Use the Copy command to copy a file from one
location to another within the same device, or from
the Hard Disk to floppy (bypassing the RAM) and
vice versa, or from a SCSI device to Hard Disk or
floppy and vice versa. The source file remains
intact.
To copy a file from one floppy disk to another,
first load the file to RAM, then save it to the other
floppy.
Copy operations are executed using the same
procedures are those described for the Load and
Save commands. This section provides general
information relating to the Copy operation. The
user is encouraged to apply the same logic to
Copy operations as those used for Load and Save
operations.
The following example shows how to copy a sin-
gle Sound file from Floppy disk to Hard Disk.
COPY SINGLE SOUND
1. Press DISK to enter Disk Mode and use the
+/– Page/Bank (
) buttons to open the
main COPY page.
2. Select the COPY command required from the
main page.
3. Select the source and destination devices with
soft buttons F1, F2, F3 or F4 and directional
arrows.
In this case, pass to the source directory and,
if necessary, select Floppy Disk (F1).
Then pass to the destination directory and
select the Hard disk (F2) as the destination.
Entering the Hard disk for the first time takes
some time, depending on the number of files
already present.
A “Please Wait” message appears during the
scanning period.
Selecting «Floppy disk» or «RAM» automat-
ically assigns the same device to source and
destination.
4. Press ENTER to enter the file selector, select
the source Block containing the desired file
and press ENTER to gain access.
5. Select the File to Copy from the source di-
rectory.
○○○○○○○○○○○○○○○○○○○○○○
Performances- Edit Performance 3•19
○○ ○○○○○○○○○○○○○○○○○○○○
Performances- Edit Performance 3•19
Tracks/Split
Here you can program the parameters exclusive
to the tracks, such as Section Transpose, Mas-
ter transpose enable/disable, Detune, Random
Pitch, Touch Sensitivity, Polyphony priority, Ve-
locity. These parameters would affect any sound
you decide to assign to the tracks being pro-
grammed.
TRANSPOSE (F1)
Here you can change the pitch of the sound in
half tone steps, within a maximum range of 60
steps up or down.
Assignable values: –60…0…+60.
MASTER TRANSPOSE ENABLE/DISABLE (F2)
Usually you will want to leave this set to ON. It
confirms that this sound will be affected by the
TRANSPOSE buttons on the front panel.
In some situations, for example, when using drum
kits, you may not want the track to be shifted. In
this case, set this function to OFF (default set-
ting).
DETUNE (F3)
This allows you to adjust the fine pitch of the
sound in steps of 1/64th of a semitone.
Assignable values: - 63…0…+63
.
RANDOM PITCH (F4)
This function automatically applies a little detuning
to the sound each time a new note is played. The
amount by which it detunes the note is limited by
the value you select. At maximum value, (7), this
automatic detuning may be as much as a half step
sharp or flat.
Assignable values: 0 (no effect) ... 7 (maximum
randomness)
.
TOUCH SENSITIVITY (F5)
This function enables or disables the tracks of