○○○○○○○○○○○○○○○○○○○○○○
6•10 Reference Guide
○○○○○○○○○○○○○○○○○○○○○○
6•10 Reference Guide
The Record method
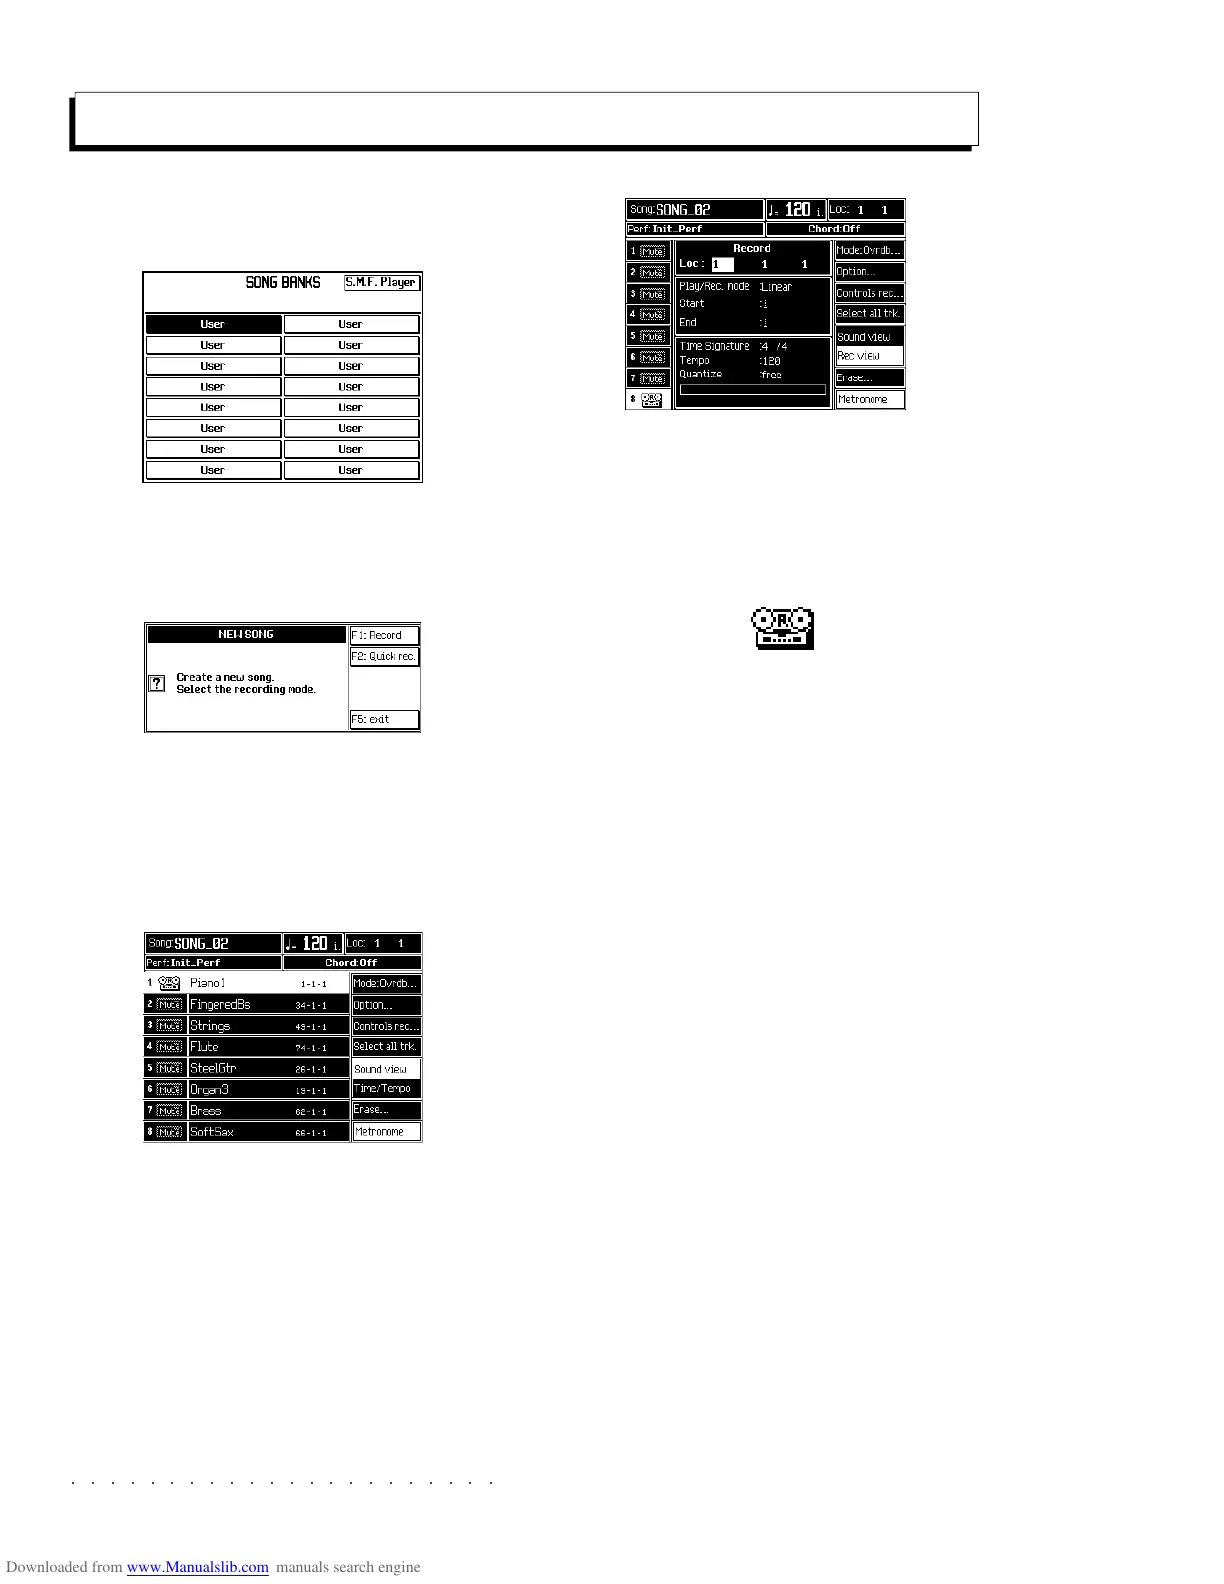
1. Press the SONG button to open the Song Banks
window.
2. Select an empty location (User).
You are prompted to select a recording mode
to create a New song.
3. Press Record, (F1) to enter Song Record mode.
The LED of the RECORD panel button lights
up and the display shows the Sound View
page in negative highlight with the first track
active for recording.
Entering Song Record activates a default
Song Performance. You can program your
Song Performances just like the other Per-
formances (Global and Style). Refer to the
Performance chapter, page 3.1 for specific
information regarding Performance program-
ming tasks.
4. If you want to program the recording options,
press the Time/Tempo button (F6).
Here you can program a number of record-
ing parameters before starting. Refer to the
section entitled Time/Tempo on page 6.12.
5. A track will already be selected for the record-
ing shown by the record icon:
If you want to record a different track, simply
select it. To place all the tracks in record,
press SELECT ALL TRACKS (F4). All the
tracks will be activated for recording and the
parameter changes to DESELECT ALL
TRACKS.
6. To change sounds, select the Sound View option
by pressing F5.
It will not be necessary to store the changes
in the Song Performance. They will be auto-
matically stored.
7. To record with or without the Metronome press
the relative soft button (F8) and set it accord-
ingly.
8. Press PLAY to start the recording.
If Countdown is ON, wait for the countdown
to finish before playing (events are not re-
corded during this phase).
9. Start to play after the countdown.
Events will be recorded in the track or tracks
active for recording.
The Record method
1. Press the SONG button to open the Song Banks
window.
2. Select an empty location (User).
You are prompted to select a recording mode
to create a New song.
3. Press Record, (F1) to enter Song Record mode.
The LED of the RECORD panel button lights
up and the display shows the Sound View
page in negative highlight with the first track
active for recording.
Entering Song Record activates a default
Song Performance. You can program your
Song Performances just like the other Per-
formances (Global and Style). Refer to the
Performance chapter, page 3.1 for specific
information regarding Performance program-
ming tasks.
4. If you want to program the recording options,
press the Time/Tempo button (F6).
Here you can program a number of record-
ing parameters before starting. Refer to the
section entitled Time/Tempo on page 6.12.
5. A track will already be selected for the record-
ing shown by the record icon:
If you want to record a different track, simply
select it. To place all the tracks in record,
press SELECT ALL TRACKS (F4). All the
tracks will be activated for recording and the
parameter changes to DESELECT ALL
TRACKS.
6. To change sounds, select the Sound View option
by pressing F5.
It will not be necessary to store the changes
in the Song Performance. They will be auto-
matically stored.
7. To record with or without the Metronome press
the relative soft button (F8) and set it accord-
ingly.
8. Press PLAY to start the recording.
If Countdown is ON, wait for the countdown
to finish before playing (events are not re-
corded during this phase).
9. Start to play after the countdown.
Events will be recorded in the track or tracks
active for recording.
○○○○○○○○○○○○○○○○○○○○○○
Edit Sound 2•27
○○○○○○○○○○○○○○○○○○○○○○
Edit Sound 2•27
Balance envelope response to key velocity vari-
ations.
Positive values increase the response of the Bal-
ance envelope with increased key velocity while
negative values have the inverse effect. Assign-
able values: –7 ... +7. 0 = no effect.
KEY OFF BALANCE ENV. RATE DYN. SENS.:
Links the response of the key off Balance enve-
lope completion velocity to key velocity varia-
tions.
Positive values increase the completion velocity
of the Key Off Balance envelope with increased
key velocity while negative values have the in-
verse effect. Assignable values: –7 ... +7. 0 = no
effect.
BALANCE ENVELOPE KEY ON & KEY OFF
The Balance Key On and Key Off Envelopes are
10 segment curves (maximum), allowing you to
enhance the presence of one Waveform with re-
spect to the other in the key on and key release
situations.
The Key On Envelope represents the variation
of the Balance for the entire duration that the
notes are held pressed.
The Key Off Envelope represents the variation
of the Balance after the notes have been re-
leased.
The options and parameters used to shape the
Balance Envelope (Zoom, Segment, Time and
Level), are identical to those used for the Ampli-
tude Key On/Key Off Envelope explained on page
2..24.
An illustrated example of how to program a Key
On & Key Off Envelopes appears on the page
2.25.