○○○○○○○○○○○○○○○○○○○○○○
2•2 Reference Guide
○○○○○○○○○○○○○○○○○○○○○○
2•2 Reference Guide
Individual Sounds are recalled using the buttons
of the SOUND GROUPS section. The sounds
recalled are assigned to the selected track of the
current Performance. A selected track is shown
highlighted on the display.
1. Press one of the SOUND GROUPS buttons to
open a «Sound Group» selection window
showing 8 Sounds to choose from.
2. Scroll through the Banks with the +/– Page/
Bank buttons [ ].
The current Bank number is shown in the top
right hand corner of the selection window.
As you scroll through the Banks, you’ll see
that most of them will contain only one or two
Sounds to choose from, others will be emp-
ty. Empty locations are shown by a string of
dashes (------). These locations represent the
locations where you can store your edited
sounds or disk-based sounds.
3. Select a Sound with the corresponding Soft
button.
Selecting Sounds
If the Display Hold (D.HOLD) function is on
(LED on), the SOUND GROUPS selection
window will remain active, allowing you to
select another sound either from the same
Group, or from another Group. To do this,
simply select a different SOUND GROUP
button to open the corresponding selection
window.
To see your selection, press ESCAPE to close
the current selection window and return to
the Performance display without turning D.
HOLD off.
If D. HOLD is off (LED off), every time you
select a Sound from the SOUND GROUP
selection, the display will return to the Per-
formance display.
You can also select Sounds directly by entering
a number on the Number keypad (with the
KEYPAD LED on); this is the quickest way to go
directly to the sound you need (see page 1.16 of
the Quick Guide for details of this method).
Another way of selecting Sounds is by recalling
Performances (Real or Style Performances). Per-
formances offer the possibility of selecting Sound
combinations which you can program as pre-
ferred. Refer to the next chapter, Performances,
for all relevant information.
MOVING BETWEEN FAMILIES
Sometimes you might want to jump directly from
one sound family to another when looking for a
particular sound. This is best done with DISPLAY
HOLD on (LED on).
Pressing any SOUND GROUP button will open
the corresponding SOUND GROUP window,
showing the same Bank as the previous selec-
tion.
Individual Sounds are recalled using the buttons
of the SOUND GROUPS section. The sounds
recalled are assigned to the selected track of the
current Performance. A selected track is shown
highlighted on the display.
1. Press one of the SOUND GROUPS buttons to
open a «Sound Group» selection window
showing 8 Sounds to choose from.
2. Scroll through the Banks with the +/– Page/
Bank buttons [
].
The current Bank number is shown in the top
right hand corner of the selection window.
As you scroll through the Banks, you’ll see
that most of them will contain only one or two
Sounds to choose from, others will be emp-
ty. Empty locations are shown by a string of
dashes (------). These locations represent the
locations where you can store your edited
sounds or disk-based sounds.
3. Select a Sound with the corresponding Soft
button.
Selecting Sounds
If the Display Hold (D.HOLD) function is on
(LED on), the SOUND GROUPS selection
window will remain active, allowing you to
select another sound either from the same
Group, or from another Group. To do this,
simply select a different SOUND GROUP
button to open the corresponding selection
window.
To see your selection, press ESCAPE to close
the current selection window and return to
the Performance display without turning D.
HOLD off.
If D. HOLD is off (LED off), every time you
select a Sound from the SOUND GROUP
selection, the display will return to the Per-
formance display.
You can also select Sounds directly by entering
a number on the Number keypad (with the
KEYPAD LED on); this is the quickest way to go
directly to the sound you need (see page 1.16 of
the Quick Guide for details of this method).
Another way of selecting Sounds is by recalling
Performances (Real or Style Performances). Per-
formances offer the possibility of selecting Sound
combinations which you can program as pre-
ferred. Refer to the next chapter, Performances,
for all relevant information.
MOVING BETWEEN FAMILIES
Sometimes you might want to jump directly from
one sound family to another when looking for a
particular sound. This is best done with DISPLAY
HOLD on (LED on).
Pressing any SOUND GROUP button will open
the corresponding SOUND GROUP window,
showing the same Bank as the previous selec-
tion.
○○○○○○○○○○○○○○○○○○○○○○
Score/Edit Score 6 •35
○○○○○○○○○○○○○○○○○○○○○○
Score/Edit Score 6 •35
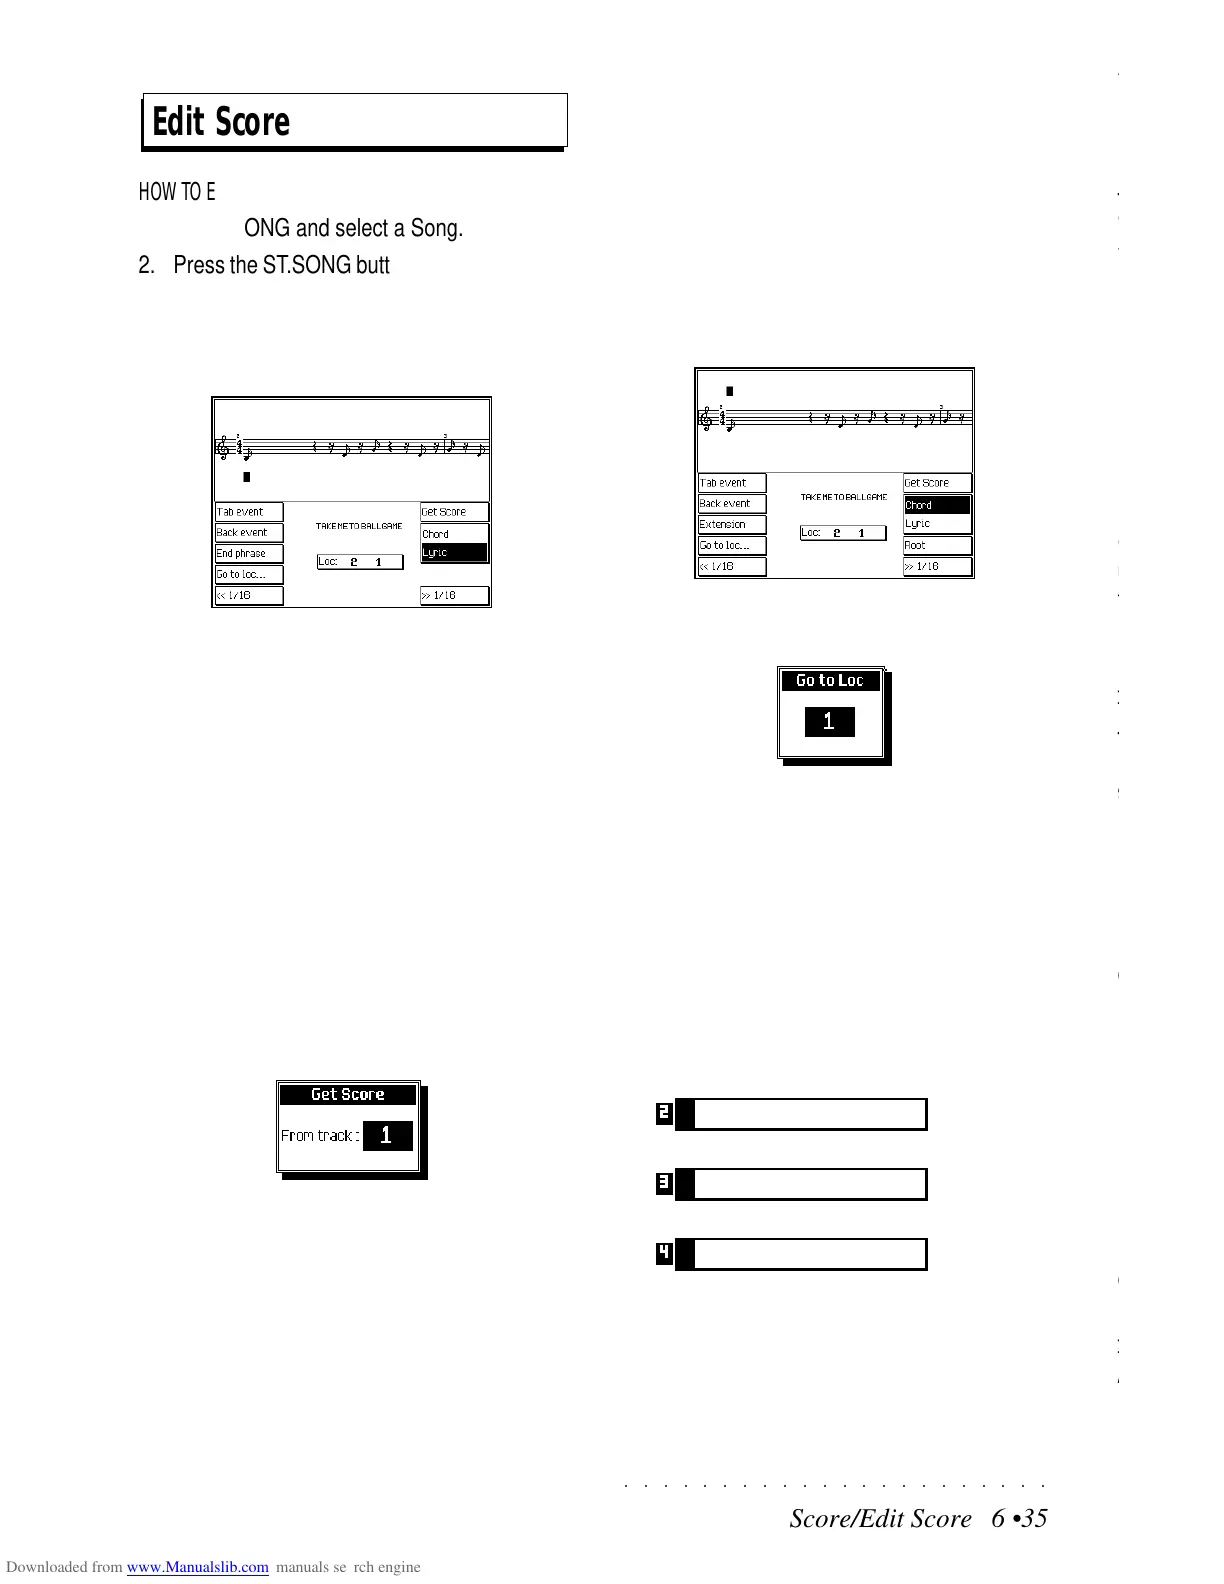
Edit Score
HOW TO ENTER EDIT SCORE
1. Press SONG and select a Song.
2. Press the ST.SONG button to open the main
Edit Song menu.
3. Press EDIT SCORE (F6) to enter the Score
page.
If the Song does not contain a score, press
GET SCORE (F4) to create one (
this proce-
dure is explained afterwards
).
HOW TO EXIT EDIT SCORE
Press ESCAPE once to return to the main Edit
Song menu, twice to return to main Edit menu
and a third time to return to the Sound View page.
INSERTING NOTES
To create a Score, notes are withdrawn from a
Song track.
1. Press F4 («Get Score»):
2. Use the DIAL to select the track to transcribe.
3. Press ENTER to confirm. Wait a few sec-
onds for the score to be generated.
INSERTING CHORD SYMBOLS
Chord symbols correspond to the MIDI ‘Text’
event. These are loaded and saved with MIDI
files. Chord symbols can be inserted into a new
Song using the procedure explained on the next
page.
1. Press F5 («Chords») to take the cursor to
the chord line (above the staff).
2. Press the soft button G («Go to loc...») to go
to a specific measure:
Specify the measure with the DIAL then press
ENTER to confirm or ESCAPE to cancel.
3. Move the insertion point to the previous or
next note using the soft buttons D («Next
event») and E («Previous event»).
4. Each note is ideally subdivided into 1/16ths.
In addition to a symbol at the beginning of a
note (first 1/16th), you can insert symbols in
one of the 1/16ths which follow. Press F8 to
open the symbol insertion zone:
Insertion of the symbol at the second 1/16th
Insertion of the symbol at the third 1/16th
Insertion of the symbol at the fourth 1/16th
The number shown on the left of the inser-
tion zone indicates the current 1/16th. To
move the insertion point to one of the other
1/16ths, use the soft buttons H («<<1/16»)