○○○○○○○○○○○○○○○○○○○○○○
2•46 Reference Guide
○○○○○○○○○○○○○○○○○○○○○○
2•46 Reference Guide
Loading samples
LOAD (F1)
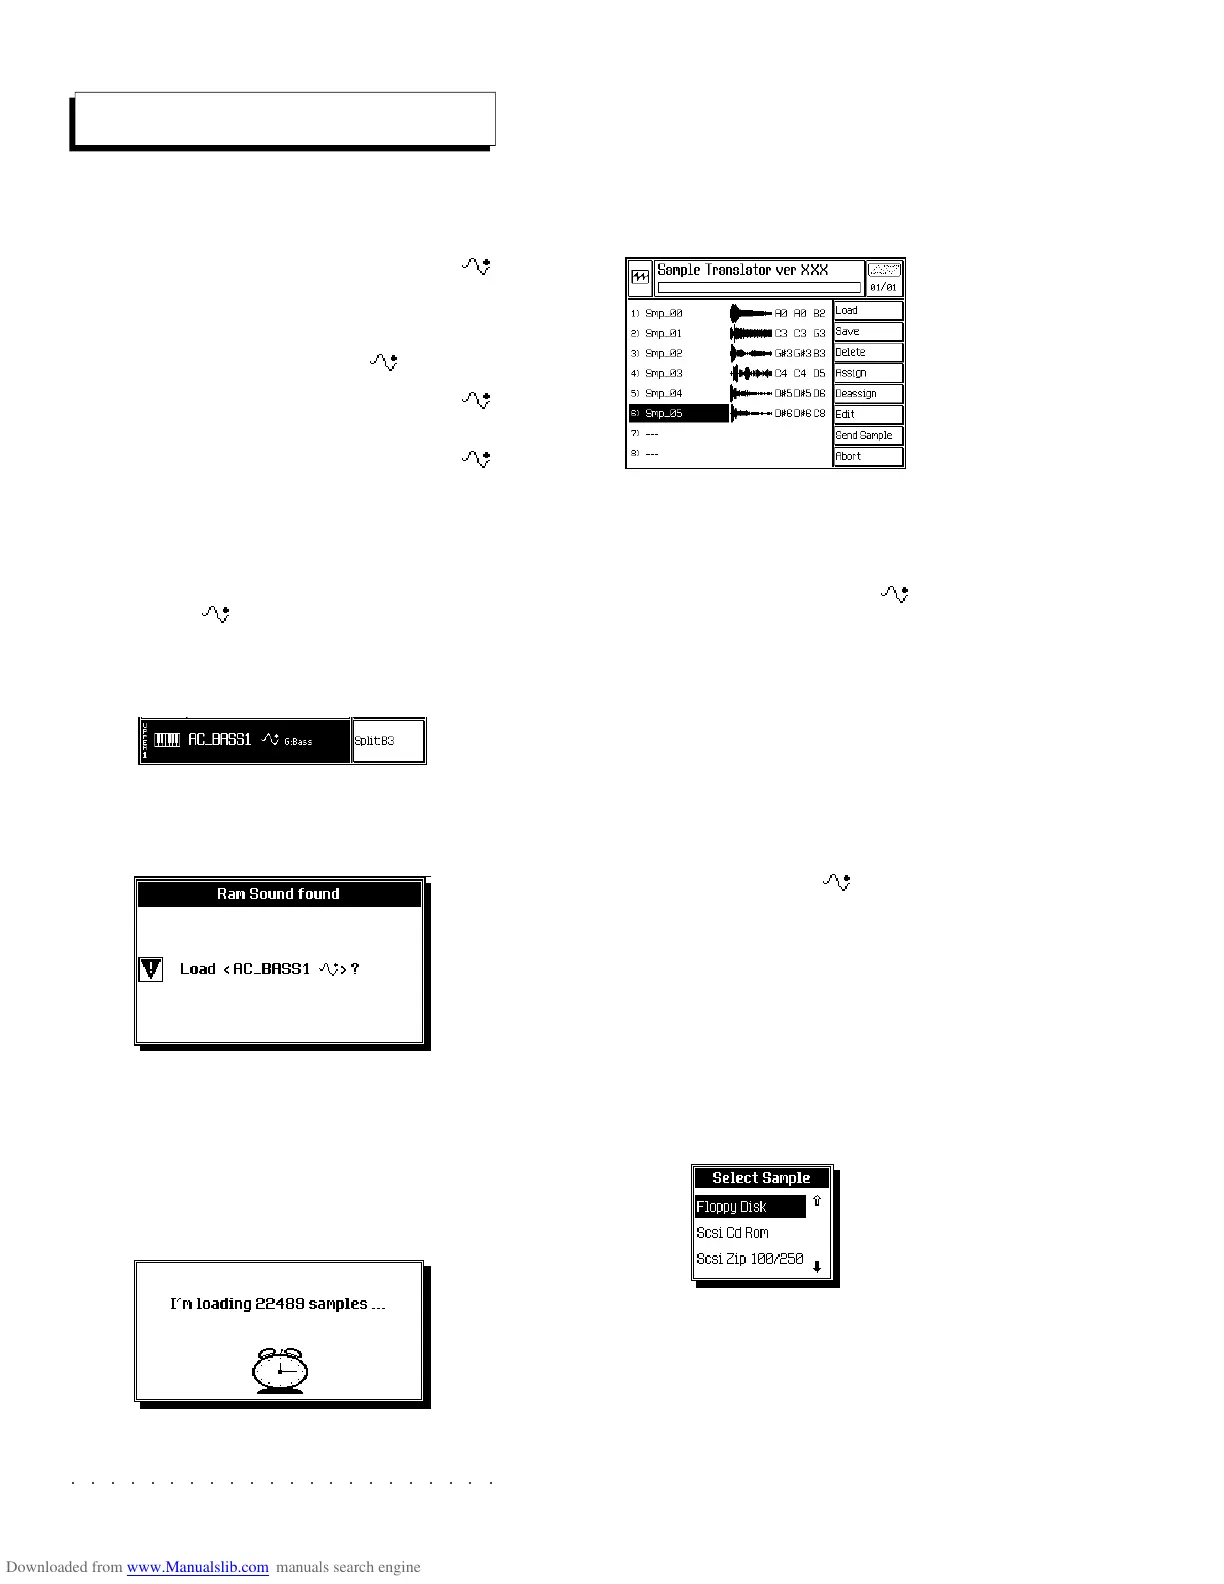
The Load option allows you to load Samples into
the Sample Translator directly from a RAM -
Sound, or from disk or SCSI device (optional).
1. LOADING A SAMPLE FROM A RAM -SOUND
This operation should be carried out with RAM -
Sounds originating from previous Series instru-
ments (WK6/8, S, SX, PS/GPS) or from Ram -
Sounds containing a Waveform created by Sam-
ple Translator. Set the instrument in Style/
RealTime mode with a single track active in Full
mode.
1. With a RAM -Sound assigned to a track of
a Performance, enter Sample Translator via
SYNTH/EDIT SOUND/SAMPLE TXL.
A dialog window is displayed informing that a
Ram-Sound has been found and the associ-
ated Waveform is ready to be loaded.
2. Press ENTER to confirm the operation, or
escape to cancel.
A dialog window showing an animated clock
keeps you informed of the samples being
loaded:
The time taken depends on the size of the
sample. When loading has finished, the dis-
play shows a situation similar to the example
below, with one or more samples which con-
stitute the Waveform.
2. LOADING SAMPLES FROM DISK OR SCSI DEVICE
To load samples from disk, in practice you can
enter with any sound, including a RAM -Sound,
because once you enter the Sample Translator,
you can override the sound assigned to the track
and listen to a sample loaded from disk. If, in-
stead, other tracks are active, you will hear these
as well.
1. Insert the sample disk into the drive.
2 Enter Sample Translator via SYNTH/EDIT
SOUND/SAMPLE TXL.
A. If you enter with a RAM -Sound, you
are prompted to load the associated
Waveform. Press ESCAPE to ignore
the prompt and pass to the load phase
(point 3).
B. If you enter with a Rom-Sound, the
dialog window does not appear and you
pass directly to the load phase.
3. Press LOAD (F1).
4. From the selection window, select the device
from which the sample will be loaded and
press ENTER.
The sample data contained in the storage
Loading samples
LOAD (F1)
The Load option allows you to load Samples into
the Sample Translator directly from a RAM
-
Sound, or from disk or SCSI device (optional).
1. LOADING A SAMPLE FROM A RAM
-SOUND
This operation should be carried out with R
AM -
Sounds originating from previous Series instru-
ments (WK6/8, S, SX, PS/GPS) or from Ram -
Sounds containing a Waveform created by Sam-
ple Translator. Set the instrument in Style/
RealTime mode with a single track active in Full
mode.
1. With a R
AM -Sound assigned to a track of
a Performance, enter Sample Translator via
SYNTH/EDIT SOUND/SAMPLE TXL.
A dialog window is displayed informing that a
Ram-Sound has been found and the associ-
ated Waveform is ready to be loaded.
2. Press ENTER to confirm the operation, or
escape to cancel.
A dialog window showing an animated clock
keeps you informed of the samples being
loaded:
The time taken depends on the size of the
sample. When loading has finished, the dis-
play shows a situation similar to the example
below, with one or more samples which con-
stitute the Waveform.
2. LOADING SAMPLES FROM DISK OR SCSI DEVICE
To load samples from disk, in practice you can
enter with any sound, including a R
AM -Sound,
because once you enter the Sample Translator,
you can override the sound assigned to the track
and listen to a sample loaded from disk. If, in-
stead, other tracks are active, you will hear these
as well.
1. Insert the sample disk into the drive.
2 Enter Sample Translator via SYNTH/EDIT
SOUND/SAMPLE TXL.
A. If you enter with a RAM -Sound, you
are prompted to load the associated
Waveform. Press ESCAPE to ignore
the prompt and pass to the load phase
(point 3).
B. If you enter with a Rom-Sound, the
dialog window does not appear and you
pass directly to the load phase.
3. Press LOAD (F1).
4. From the selection window, select the device
from which the sample will be loaded and
press ENTER.
The sample data contained in the storage
○○○○○○○○○○○○○○○○○○○○○○
Edit Style 5•15
○○○○○○○○○○○○○○○○○○○○○○
Edit Style 5•15
Erase
This editor cancels events.
ERASE TRACK (F5)
Allows you to work on a single Track of the Style.
PARAMETERS:
Variation: Selects one of the 4 Variations. Only
Variations that contain at least one recorded riff
can be selected.
Riff: Selects one of the riffs of the selected Vari-
ation. Only existing riffs can be selected. If the
Style is empty, the phrase «No Riff» appears.
Event type: Determines the type of event to be
erased. Duplicate note eliminates the note with
the lowest velocity value when two notes of the
same pitch start at the same position.
Options: All, Duplicate note, Note, Pitch Bend,
Mono touch, Poly touch, Velocity Off,
ProgramChange, ControlChange 00...31,
ControlChange 64...127.
Note range from... to...: Sets the upper and
lower limits of the notes to cancel. To cancel a
single percussive instrument of the Drum track,
assign the same note to the highest and lowest
limit. For example, to cancel the snare (D2) set
the parameter to «Note range from D2 to D2».
Assignable values: C-1 ... G9.
From locator... To locator...: Determines the start
and end point of the part to cancel. It is possible to
specify the measure, beat and resolution.
Assignable values: within the actual limits of the
riff. It is not possible to specify a point beyond
the end of the riff.
ERASE RIFF (F6)
Here you can erase all the tracks of a Riff.
PARAMETERS:
Same as ERASE TRACK but without the Note
Range From...To... parameter.
ERASE VARIATION (F7)
Here you can erase a Style Variation.
ERASE STYLE (F8)
Here you can cancel the entire Style.