○○○○○○○○○○○○○○○○○○○○○○
2•48 Reference Guide
○○○○○○○○○○○○○○○○○○○○○○
2•48 Reference Guide
several different “Levels” (dynamic levels).
Sample Translator can load single Samples, or it
can convert, in a single operation, an entire “level”
of the Program into a SK760/880SE Series Wave-
form. If a Program contains more than one “level”,
it can be converted entirely in successive phases,
using
(a)
a Sound Patch,
(b)
a multi track con-
figuration,
c)
a Sound containing a key-dynamic
assignment (executed in Edit Sound).
CONVERSION LIMITATIONS
A SK760/880SE Waveform can contain only 16
samples. For example, an Akai S1000™ level
can contain up to 99 Samples, therefore, when a
conversion is carried out, only the 16 Samples
from the lowest register are loaded.
These kind of Samples can overlap even inside
a dynamic Level. Sample Translator eliminates
this overlap, using the lowest limit-note of the
highest pitched sample as the limit between sam-
ples.
RECEIVING SAMPLES VIA A DUMP
You can also Dump samples into Sample Trans-
lator via the Sample Request option (F7). This is
discussed in detail on page 2.53.
Assigning samples
ASSIGN (F4)
Once you’ve loaded in the samples that you need,
the only essential step you need to take before
you can save them is to ASSIGN, (or “map”), your
samples to a specific range of keys. Only as-
signed samples become a part of a Waveform
which you can then save to the SK760/880SE
Wave Library.
When you load a new Waveform into Sample
Translator, the samples that constitute the Wave-
form are shown assigned to specific key ranges.
In such cases, three values are shown, the low-
est note, the sample pitch and the highest note:
If you load new Samples from disk or a SCSI
device, or receive them via MIDI, they will nor-
mally be shown without an assignment, but with
the sample pitch. In such cases, Sample Trans-
lator allows you to listen to the sample across
the entire keyboard, to help you decide the in
which note range you can obtain the best results.
Once you have decided the best note range,
press the ASSIGN button (F4) to open the AS-
SIGN MENU.
The selected Sample is shown with a temporary
key range, represented by the black line. The
“notch” shown in the line represents the Sample
Pitch.
Sample pitch
Lowest note
Highest note
○○○○○○○○○○○○○○○○○○○○○○
Edit Style 5•13
○○○○○○○○○○○○○○○○○○○○○○
Edit Style 5•13
Edit Style
After recording a User Style, the Style riffs can
be modified using the functions of the EDIT
STYLE MENU. If you select a User Style to edit,
all the Edit Style functions will be available. If
you select a ROM Style, only the Copy function
will be available.
ENTERING EDIT STYLE
In Style/RealTime mode, select the User Style
you wish to modify.
Press the ST/SONG button (in the Edit Numbers
section) to open the main EDIT STYLE menu.
Entering this section the first time opens the main
menu page (00). On all successive occasions,
the last page selected is recalled.
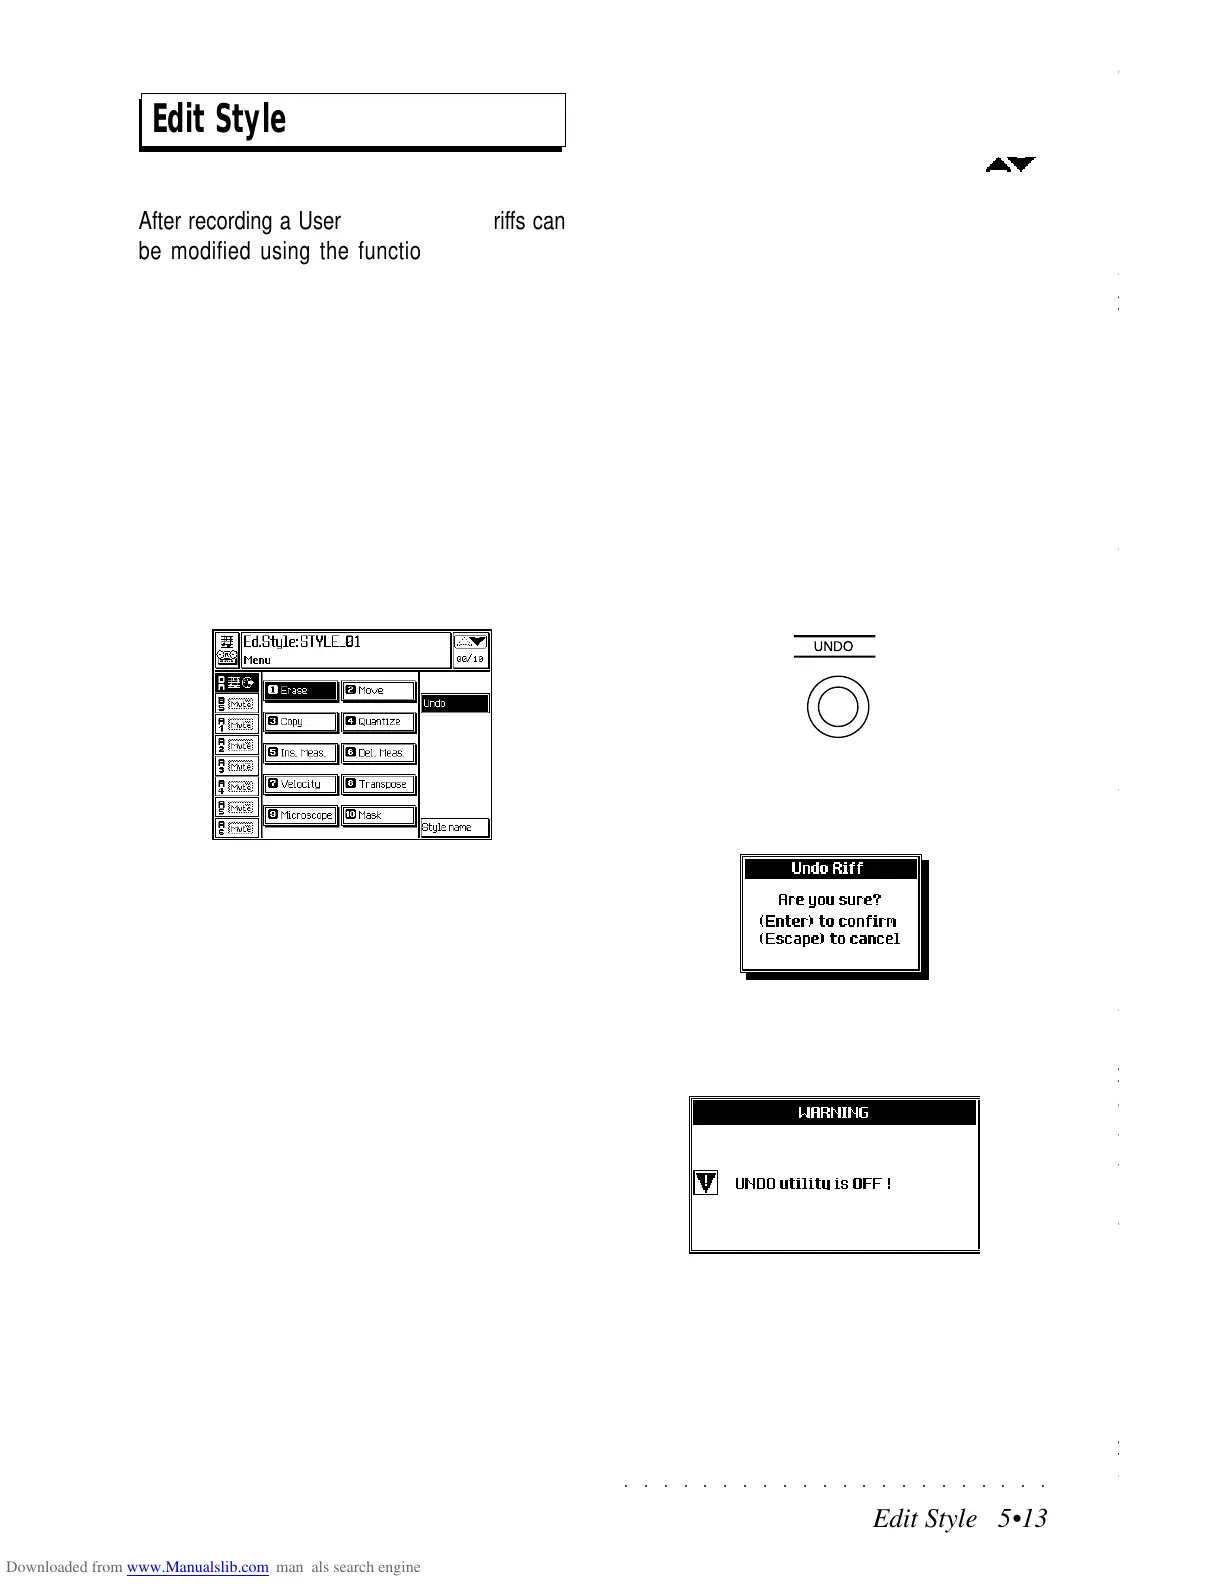
THE EDIT STYLE MENU
The Edit Style menu contains 10 Style Editing
functions (or “Editors”):
Erase, Move, Copy, Quantize, Insert Measure,
Delete Measure, Velocity, Transpose, Micro-
scope, Mask.
Two options are also available: Undo and Style
name.
ESCAPE FROM EDIT STYLE
To escape from EDIT STYLE press ST/SONG or
ESCAPE (once or twice, depending on the cur-
rently selected level).
To escape without closing the edit page, press
the ST/SONG button. To pass to another edit
environment, use the +/– PAGE buttons ( ).
THE EDIT STYLE OPTIONS
UNDO (F2)
When this parameter is selected (shown in nega-
tive highlight), the UNDO function is enabled.
Undo cancels the last operation or series of op-
erations carried out. This function consumes ex-
actly the same amount of RAM memory as the
Style. If there is a shortage of memory in RAM, it
is a good idea to deactivate UNDO.
Press the UNDO panel button to execute the de-
sired Undo operation.
You will be prompted with a request to confirm
the operation with ENTER or cancel with ES-
CAPE.
If UNDO is disabled, pressing the UNDO button
and confirming with ENTER activates the follow-
ing user message:
Press ESCAPE to close the window and repeat
the UNDO operation, this time with UNDO ena-
bled.
Edit Style
After recording a User Style, the Style riffs can
be modified using the functions of the EDIT
STYLE MENU. If you select a User Style to edit,
all the Edit Style functions will be available. If
you select a ROM Style, only the Copy function
will be available.
ENTERING EDIT STYLE
In Style/RealTime mode, select the User Style
you wish to modify.
Press the ST/SONG button (in the Edit Numbers
section) to open the main EDIT STYLE menu.
Entering this section the first time opens the main
menu page (00). On all successive occasions,
the last page selected is recalled.
THE EDIT STYLE MENU
The Edit Style menu contains 10 Style Editing
functions (or “Editors”):
Erase, Move, Copy, Quantize, Insert Measure,
Delete Measure, Velocity, Transpose, Micro-
scope, Mask.
Two options are also available: Undo and Style
name.
ESCAPE FROM EDIT STYLE
To escape from EDIT STYLE press ST/SONG or
ESCAPE (once or twice, depending on the cur-
rently selected level).
To escape without closing the edit page, press
the ST/SONG button. To pass to another edit
environment, use the +/– PAGE buttons (
).
THE EDIT STYLE OPTIONS
UNDO (F2)
When this parameter is selected (shown in nega-
tive highlight), the UNDO function is enabled.
Undo cancels the last operation or series of op-
erations carried out. This function consumes ex-
actly the same amount of RAM memory as the
Style. If there is a shortage of memory in RAM, it
is a good idea to deactivate UNDO.
Press the UNDO panel button to execute the de-
sired Undo operation.
You will be prompted with a request to confirm
the operation with ENTER or cancel with ES-
CAPE.
If UNDO is disabled, pressing the UNDO button
and confirming with ENTER activates the follow-
ing user message:
Press ESCAPE to close the window and repeat
the UNDO operation, this time with UNDO ena-
bled.