○○○○○○○○○○○○○○○○○○○○○○
3•6 Reference Guide
○○○○○○○○○○○○○○○○○○○○○○
3•6 Reference Guide
When OFF, the track does not respond to the
keyboard, but responds to MIDI IN messages, or
it can be used by a Song or Style.
INTERNAL SOUND GENERATOR ICON: The
events generated by the track are directed to the
internal sound engine. When OFF, the track is
not connected to the internal sound engine, but
can send data to an external MIDI device via the
SK760/880SE MIDI OUT port.
MIDI OUT ICON: The events generated by the
track are sent to an external MIDI device via the
SK760/880SE MIDI OUT port. When OFF, the
track does not transmit MIDI via MIDI OUT.
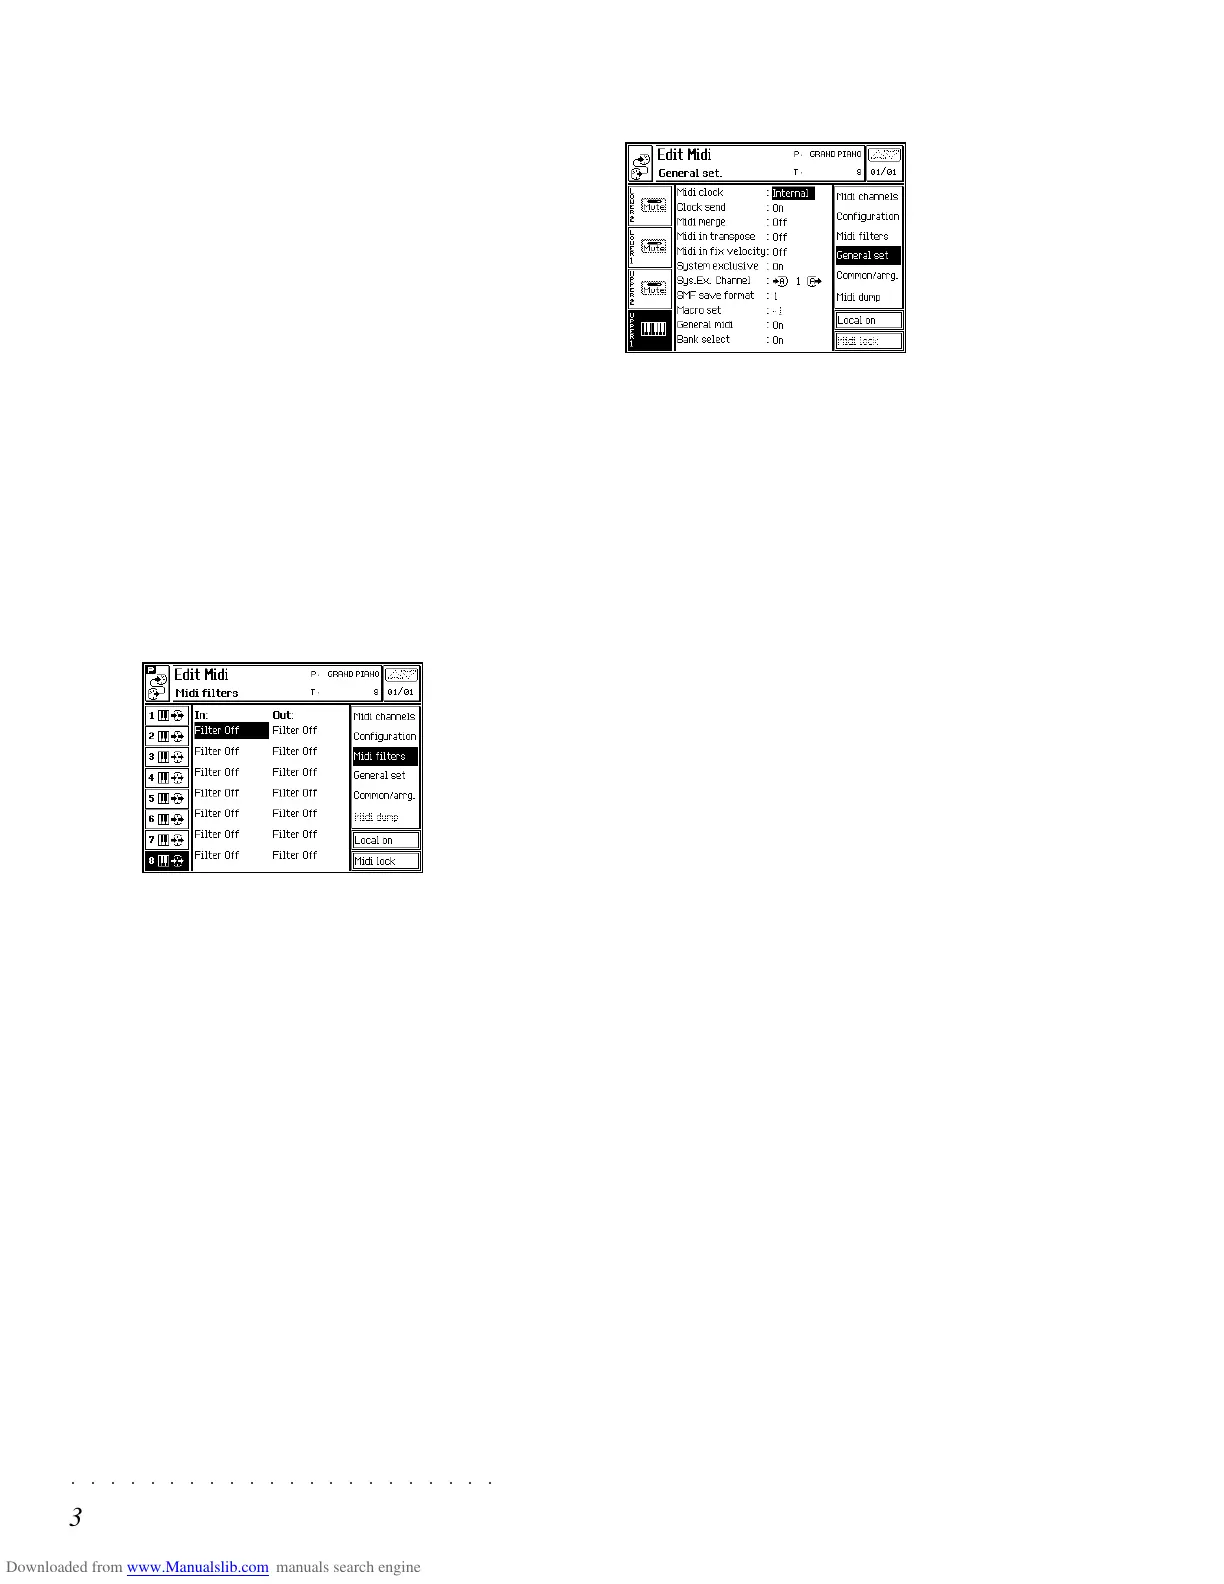
MIDI FILTERS (F3)
Each Track has 14 filters available; 7 filters for
MIDI IN and 7 filters for MIDI OUT. These filters
allow you to specify up to 7 events which you do
not want the selected Track to either send or re-
ceive.
Options: Off, Program Change, Pitchbend, Mono
touch, Poly touch, ControlChange 00...31,
ControlChange 64...127.
GENERAL SETTINGS (F4)
This option provides settings that influence the
instrument as a whole and are saved to the Gen-
eral Setup.
MIDI CLOCK: This allows you to select whether
the sequencer will synchronize to the SK760/
880SE Internal clock or to an External clock.
Note:
SK760/880SE
receives or transmits MIDI
Clock on the same MIDI port (A or B) as the Com-
mon Channel.
CLOCK SEND: Selects whether or not the
SK760/880SE’s internal MIDI CLOCK informa-
tion will be sent via MIDI OUT.
Options: On, Off.
MIDI MERGE: Allows the data received at both
MIDI IN 1 and MIDI IN 2 to be passed to MIDI
OUT A and MIDI OUT B after having been proc-
essed by the Performance settings. This means
that the MIDI IN data can be processed by the
volume, transpose, MIDI filters etc. before being
sent to MIDI OUT.
Options: On, Off. On is the default setting.
Note: The parameter cannot be programmed when
the COMPUTER port is in use. See “Computer”.
MIDI IN TRANSPOSE: This allows the simple
pitch shifting, (in half step increments), of all data
received at MIDI IN.
Deactivating this parameter can be useful to avoid
unwanted transpositions when you program
Songs with a computer. A computer operates as
a THRU device. After receiving data by a track
When OFF, the track does not respond to the
keyboard, but responds to MIDI IN messages, or
it can be used by a Song or Style.
INTERNAL SOUND GENERATOR ICON: The
events generated by the track are directed to the
internal sound engine. When OFF, the track is
not connected to the internal sound engine, but
can send data to an external MIDI device via the
SK760/880SE MIDI OUT port.
MIDI OUT ICON: The events generated by the
track are sent to an external MIDI device via the
SK760/880SE MIDI OUT port. When OFF, the
track does not transmit MIDI via MIDI OUT.
MIDI FILTERS (F3)
Each Track has 14 filters available; 7 filters for
MIDI IN and 7 filters for MIDI OUT. These filters
allow you to specify up to 7 events which you do
not want the selected Track to either send or re-
ceive.
Options: Off, Program Change, Pitchbend, Mono
touch, Poly touch, ControlChange 00...31,
ControlChange 64...127.
GENERAL SETTINGS (F4)
This option provides settings that influence the
instrument as a whole and are saved to the Gen-
eral Setup.
MIDI CLOCK: This allows you to select whether
the sequencer will synchronize to the SK760/
880SE Internal clock or to an External clock.
Note:
SK760/880SE
receives or transmits MIDI
Clock on the same MIDI port (A or B) as the Com-
mon Channel.
CLOCK SEND: Selects whether or not the
SK760/880SE’s internal MIDI CLOCK informa-
tion will be sent via MIDI OUT.
Options: On, Off.
MIDI MERGE: Allows the data received at both
MIDI IN 1 and MIDI IN 2 to be passed to MIDI
OUT A and MIDI OUT B after having been proc-
essed by the Performance settings. This means
that the MIDI IN data can be processed by the
volume, transpose, MIDI filters etc. before being
sent to MIDI OUT.
Options: On, Off. On is the default setting.
Note: The parameter cannot be programmed when
the COMPUTER port is in use. See “Computer”.
MIDI IN TRANSPOSE: This allows the simple
pitch shifting, (in half step increments), of all data
received at MIDI IN.
Deactivating this parameter can be useful to avoid
unwanted transpositions when you program
Songs with a computer. A computer operates as
a THRU device. After receiving data by a track
○○○○○○○○○○○○○○○○○○○○○○
Disk 4•31
○○○○○○○○○○○○○○○○○○○○○○
Disk 4•31
Disk handling information
If you’re new to working with floppy disks and
are not sure as to how you should handle these
delicate accessories, please read this section for
some useful information.
INSERTING A DISK INTO THE DISK DRIVE
Floppy disks must be inserted into the disk drive
label side up and shutter first. Push the disk firmly
into the drive until it “clicks” into place.
Avoid forcing a disk into the drive and hold the
disk straight while inserting it.
EJECTING A FLOPPY DISK
Before ejecting a disk, make sure that the disk
drive operating led is off and that the SK760/
880SE display is not currently showing a “Load-
ing” or “Saving” message.
To extract the disk, press the eject button and
remove the disk.
THE WRITE PROTECT TAB
Floppy disks contain a write protect tab which
allows you to protect valuable data from being
accidentally overwritten.
To prevent writing data to disk and so avoid acci-
dental erasure, slide the tab fully down to “open”
the window. To permit writing data to disk, slide
the tab fully up to “close” the window.
Disk not protected Disk protected
Use a pen or other pointed object to set the tab
as shown.
HANDLING FLOPPY DISKS
When handling floppy disks, certain precautions
should be taken to avoid damage or data loss.
• Do not open the metal protection shutter or
touch the surface of a disk
• If your SK760/880SE has to be transported,
make sure that a floppy disk is not inserted
in the disk drive. Vibration may cause the disk
drive head to scratch the disk, rendering it
unusable.
• Do not store or place floppy disks in close
proximity of television sets, computer moni-
tors, loudspeakers, or other devices that are
potential sources of magnetic fields. Doing
so may render the disk unusable.
• Do not store or place floppy disks in loca-
tions subject to extremes of temperature and
humidity, direct sunlight, or excessive dust
and dirt.
• Do not place objects on top of a floppy disk.
• Return disks to their protective cases after
use.
EJECT BUTTON
DRIVE
OPERATING
LED