○○○○○○○○○○○○○○○○○○○○○○
3•20 Reference Guide
○○○○○○○○○○○○○○○○○○○○○○
3•20 Reference Guide
the current Performance for the action of the touch
sensitive keyboard. Tracks set to “Off” will not
react to velocity changes.
Assignable values: 0n, Off.
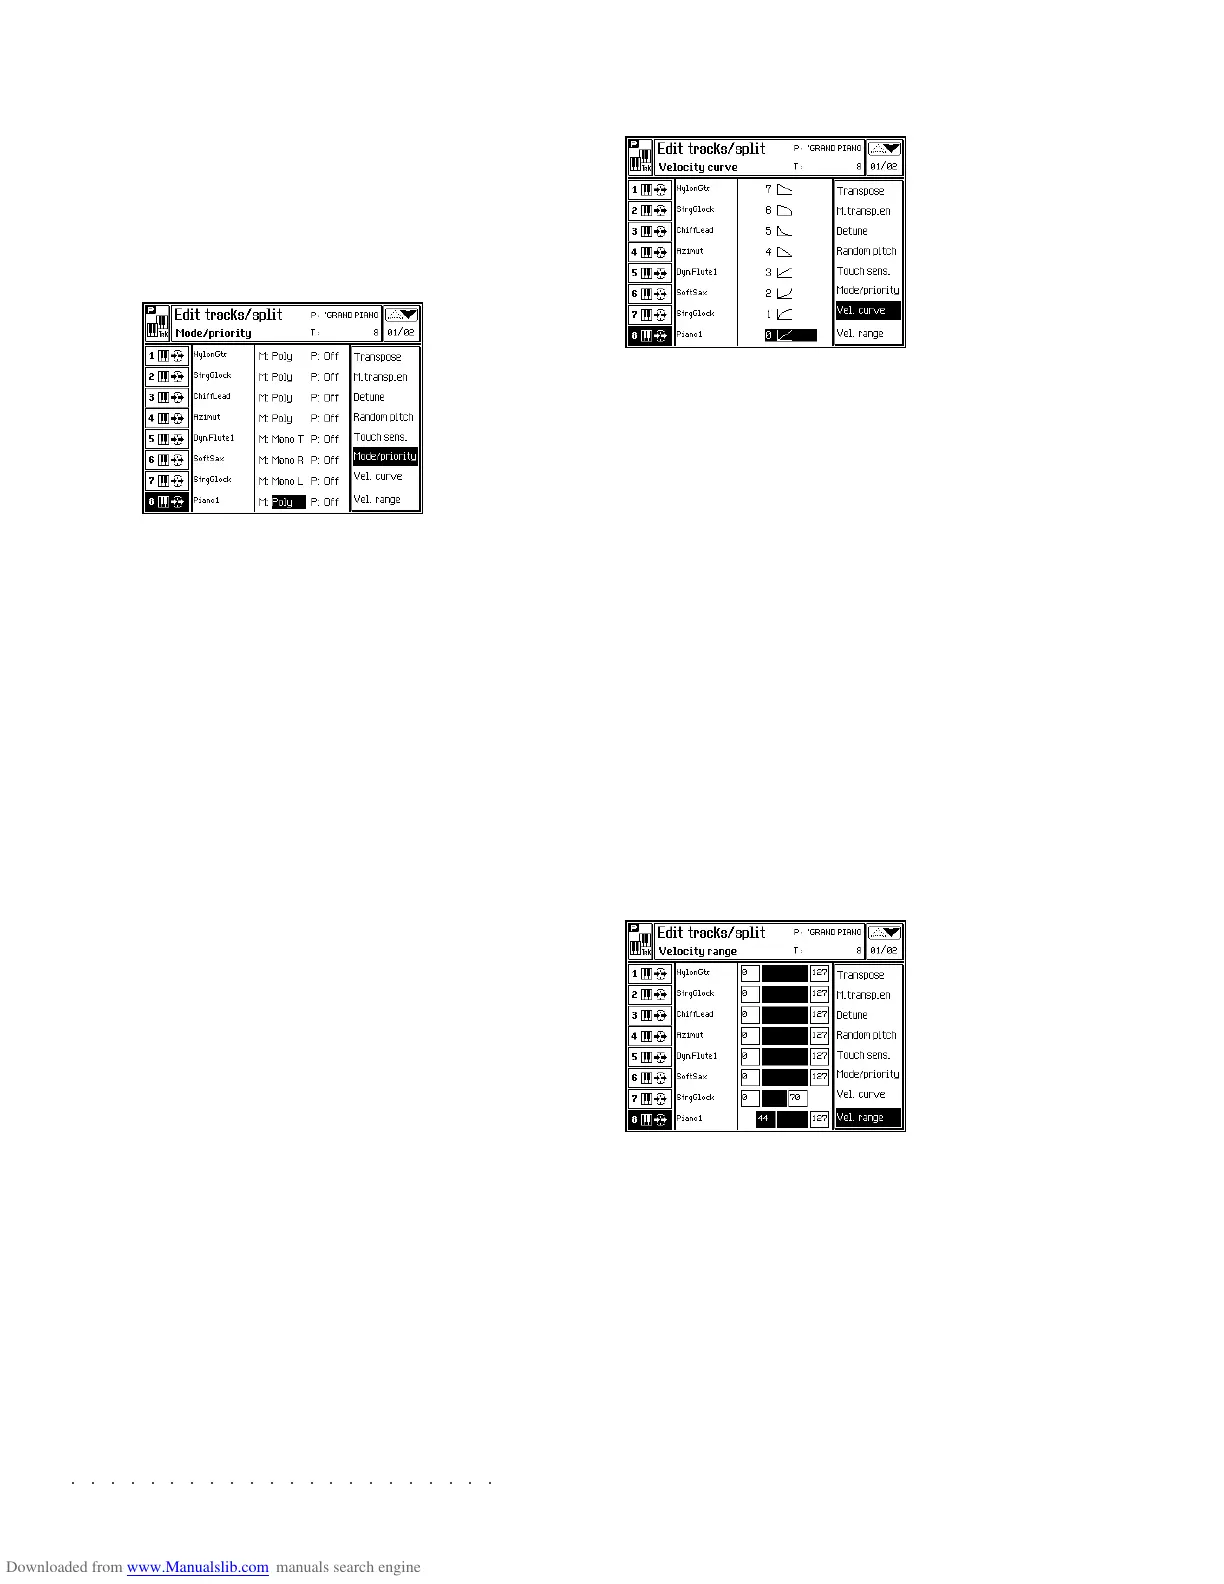
MODE/PRIORITY (F6)
Selects the polyphonic/monophonic mode for the
tracks and activates/deactivates the Priority op-
tion (guaranteed minimum polyphony for the
track).
MODE: Sets the track to play monophonically
(one note at a time) or polyphonically (two or more
simultaneous notes). Mono R gives priority to
the right note, Mono L to the left note, Mono T to
the last note played.
Options: Poly, Mono L, Mono R, Mono T.
PRIORITY: Setting this function to On gives the
current sound “priority of polyphony”. This signi-
fies that this particular sound will never have notes
“stolen” by other Performance tracks or tracks of
the sequencer. If you subsequently try to play
this sound while all of the available polyphony is
being used, it will “steal” the notes it needs from
other tracks.
Note:
Avoid assigning Priority=On to too many tracks,
as this will cancel the function due to conflicts be-
tween the assigned tracks.
VELOCITY CURVE (F7)
Provides a selection of Velocity response curves.
As well as modifying the velocity data, velocity
curves allow the creation of crossfade effects
between two tracks.
For example, it is possible to assign two tracks
with opposing dynamic curves (for example, two
opposing linear curves [ex. 1 & 4], or two oppos-
ing exponential curves [ex. 2 & 5].
The resulting effect is one of hearing the sound
of the second track fade in by gradually increas-
ing the keystrike velocity while the sound of the
fist track fades out. Playing softly triggers one
sound and playing hard triggers the second. Play-
ing with “in between” values creates a blend of
both sounds.
VELOCITY RANGE (F8)
The Velocity Range parameter is used to specify,
for each track, exactly how and when it will be
activated from the keyboard. The limits applied
allow the creation of cross-switching effects by
assigning tracks different velocity ranges.
For example, to make a three part velocity switch,
activate Tracks 1, 2 and 3 (using the correspond-
ing soft buttons).
the current Performance for the action of the touch
sensitive keyboard. Tracks set to “Off” will not
react to velocity changes.
Assignable values: 0n, Off.
MODE/PRIORITY (F6)
Selects the polyphonic/monophonic mode for the
tracks and activates/deactivates the Priority op-
tion (guaranteed minimum polyphony for the
track).
MODE: Sets the track to play monophonically
(one note at a time) or polyphonically (two or more
simultaneous notes). Mono R gives priority to
the right note, Mono L to the left note, Mono T to
the last note played.
Options: Poly, Mono L, Mono R, Mono T.
PRIORITY: Setting this function to On gives the
current sound “priority of polyphony”. This signi-
fies that this particular sound will never have notes
“stolen” by other Performance tracks or tracks of
the sequencer. If you subsequently try to play
this sound while all of the available polyphony is
being used, it will “steal” the notes it needs from
other tracks.
Note:
Avoid assigning Priority=On to too many tracks,
as this will cancel the function due to conflicts be-
tween the assigned tracks.
VELOCITY CURVE (F7)
Provides a selection of Velocity response curves.
As well as modifying the velocity data, velocity
curves allow the creation of crossfade effects
between two tracks.
For example, it is possible to assign two tracks
with opposing dynamic curves (for example, two
opposing linear curves [ex. 1 & 4], or two oppos-
ing exponential curves [ex. 2 & 5].
The resulting effect is one of hearing the sound
of the second track fade in by gradually increas-
ing the keystrike velocity while the sound of the
fist track fades out. Playing softly triggers one
sound and playing hard triggers the second. Play-
ing with “in between” values creates a blend of
both sounds.
VELOCITY RANGE (F8)
The Velocity Range parameter is used to specify,
for each track, exactly how and when it will be
activated from the keyboard. The limits applied
allow the creation of cross-switching effects by
assigning tracks different velocity ranges.
For example, to make a three part velocity switch,
activate Tracks 1, 2 and 3 (using the correspond-
ing soft buttons).
○○○○○○○○○○○○○○○○○○○○○○
Disk 4•17
○○○○○○○○○○○○○○○○○○○○○○
Disk 4•17
Erase operations
Use the Erase command to cancel files no longer
needed from a data storing device; Disk, Hard
Disk or SCSI, or from RAM, to make room for
other files.
The Erase File Selector does not operate be-
tween source and destination directories (as in
the Load and Save File selector), but on a single
directory contained in the device you are cancel-
ling files from.
Erase operations are executed using the same
procedures are those described for the Load and
Save commands. This section provides general
information relating to the Erase operation. The
user is encouraged to apply the same logic to
Erase operations as those used for Load and
Save operations.
The following example shows how to Erase a sin-
gle Song from RAM memory.
ERASE SINGLE SONG
1. Press DISK to enter Disk Mode and use the
+/– Page/Bank ( ) buttons to open the
main ERASE page.
2. Select the desired ERASE command.
3. Select the source device to erase from.
In this case, select the RAM option with soft
button F3.
If you are erasing from a floppy disk, insert
the disk into the drive and check that the
“Floppy Disk” option is selected (soft button
F1.
If you are erasing from the Hard Disk, select
the “Hard Disk” option with soft button F2.
If you are erasing from a SCSI device, select
the “SCSI” option with soft button F4.
4. Press ENTER to enter the file selector.
5. If necessary, select the Block containing the
file to erase then press ENTER to access the
Block.
6. Select the file to erase.
7. Press ENTER twice to erase the file from the
directory.
Erase operations
Use the Erase command to cancel files no longer
needed from a data storing device; Disk, Hard
Disk or SCSI, or from RAM, to make room for
other files.
The Erase File Selector does not operate be-
tween source and destination directories (as in
the Load and Save File selector), but on a single
directory contained in the device you are cancel-
ling files from.
Erase operations are executed using the same
procedures are those described for the Load and
Save commands. This section provides general
information relating to the Erase operation. The
user is encouraged to apply the same logic to
Erase operations as those used for Load and
Save operations.
The following example shows how to Erase a sin-
gle Song from RAM memory.
ERASE SINGLE SONG
1. Press DISK to enter Disk Mode and use the
+/– Page/Bank (
) buttons to open the
main ERASE page.
2. Select the desired ERASE command.
3. Select the source device to erase from.
In this case, select the RAM option with soft
button F3.
If you are erasing from a floppy disk, insert
the disk into the drive and check that the
“Floppy Disk” option is selected (soft button
F1.
If you are erasing from the Hard Disk, select
the “Hard Disk” option with soft button F2.
If you are erasing from a SCSI device, select
the “SCSI” option with soft button F4.
4. Press ENTER to enter the file selector.
5. If necessary, select the Block containing the
file to erase then press ENTER to access the
Block.
6. Select the file to erase.
7. Press ENTER twice to erase the file from the
directory.