○○○○○○○○○○○○○○○○○○○○○○
8•6 Reference Guide
○○○○○○○○○○○○○○○○○○○○○○
8•6 Reference Guide
Display controls
Edit General - Display controls
Viewing controls for the display. The settings are
conserved to memory after power down. They
cannot be saved to disk.
CHORD LANGUAGE
Determines the viewing language (English/Ital-
ian/French/German) of the chord notation in the
Score.
HELP LANGUAGE
Selects the language for the Help file.
Your model may not contain a file in a different
language.
DISPLAY MODE
Offers the choice of viewing black text on a white
background (Positive) or white texts on a black
background (Negative).
LAST SELECTION MEMORY
If enabled (ON), the last selected carried out in
either Style, Performance or Sound mode is
memorised. If disabled (off), the selection win-
dow of these modes to not show the last selec-
tion made.
Mic/Line Input
This is where you can regulate your input signal
when using the Audio Vocal Processor. This page
contains bar graphs to monitor the level of sig-
nals fed into the Mic/Line inputs 1 and 2.
The input signal is directed to the internal sound
generator and effects processor before being di-
rected to the LEFT and RIGHT outputs and the
speaker system.
You can regulate the signal gain with the GAIN
knobs located next to the Mic/Line jacks. An op-
timum signal level can be obtained when the in-
put signal, at maximum volume, almost touches
the extreme right of the VU bar graph (the clip-
ping zone).
Regulate the maximum volume with the MIC/LINE
panel slider. The M. VOL slider regulates the sum
of the internal sound generator output level
(SK760/880SE sounds and signal of the MIC/
LINE IN inputs).
INPUT VU
Monitors the level of the input signal. Controls
the signal gain of the two signals fed into the Mic/
Line IN1 and IN2 jacks with the knobs 1 and 2
located next to the inputs.
Edit General - Mic/Line In
○○○○○○○○○○○○○○○○○○○○○○
Quick Guide 1•35
○○ ○○○○○○○○○○○○○○○○○○○○
Quick Guide 1•35
1
2
3
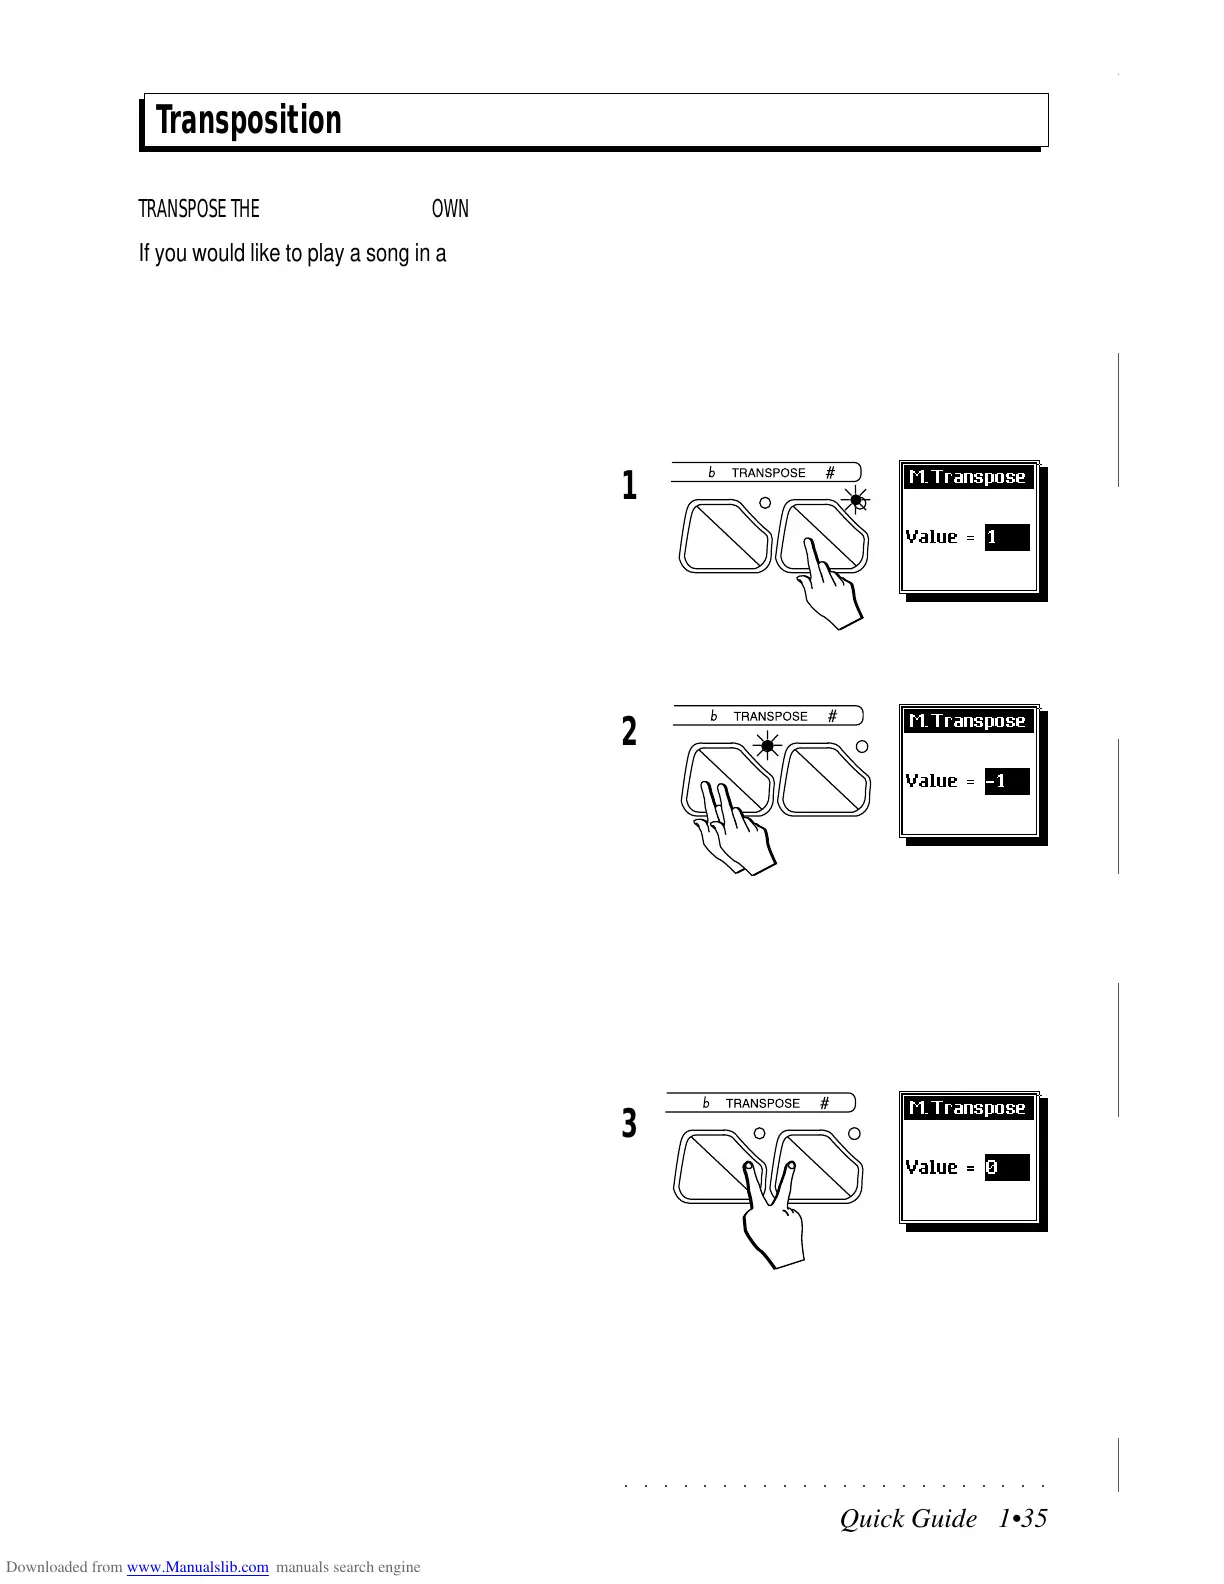
Transposition
TRANSPOSE THE INSTRUMENT UP OR DOWN
If you would like to play a song in a different key,
or a song is too high or too low for a singer or
another instrument, you can transpose the instru-
ment to play the song in an easier key.
The TRANSPOSE b/# buttons allow real time
semitone adjustments (transpositions) of the
overall pitch (range
±
24 semitones = 2 octaves).
1. Press TRANSPOSE # to raise the pitch.
An insertion screen shows the current Trans-
pose value (0 = standard pitch).
Press the Transpose # button as many times
as necessary until you reach the desired
pitch.
2. Press TRANSPOSE
b
to lower the pitch.
An insertion screen shows the current Trans-
pose value.
Continue pressing the TRANSPOSE
b
but-
ton until the dialog window shows a negative
reading.
The LED on one of the buttons will be on to
indicate that the instrument is currently in a
Transposed status (sharp or flat ).
TO CLEAR THE KEYBOARD TRANSPOSE SETTING
3. Press both TRANSPOSE buttons simultane-
ously.
The LED on the active button goes off and
the instrument’s normal pitch is restored. The
display shows the “0” setting for a few sec-
onds then returns to normal.
1
2
3
Transposition
TRANSPOSE THE INSTRUMENT UP OR DOWN
If you would like to play a song in a different key,
or a song is too high or too low for a singer or
another instrument, you can transpose the instru-
ment to play the song in an easier key.
The TRANSPOSE b/# buttons allow real time
semitone adjustments (transpositions) of the
overall pitch (range
±
24 semitones = 2 octaves).
1. Press TRANSPOSE # to raise the pitch.
An insertion screen shows the current Trans-
pose value (0 = standard pitch).
Press the Transpose # button as many times
as necessary until you reach the desired
pitch.
2. Press TRANSPOSE
b
to lower the pitch.
An insertion screen shows the current Trans-
pose value.
Continue pressing the TRANSPOSE
b
but-
ton until the dialog window shows a negative
reading.
The LED on one of the buttons will be on to
indicate that the instrument is currently in a
Transposed status (sharp or flat ).
TO CLEAR THE KEYBOARD TRANSPOSE SETTING
3. Press both TRANSPOSE buttons simultane-
ously.
The LED on the active button goes off and
the instrument’s normal pitch is restored. The
display shows the “0” setting for a few sec-
onds then returns to normal.