○○○○○○○○○○○○○○○○○○○○○○
1•38 Quick Guide
○○○○○○○○○○○○○○○○○○○○○○
1•38 Quick Guide
Using the Midi File Player
The MIDI FILE PLAYER plays MIDI files directly
from floppy disk or Hard Disk without loading data
into RAM memory. If a Floppy disk containing
MIDI Files is already inserted in the drive, the
MIDI File player engages the floppy, otherwise
the Hard Disk (if present) is engaged automati-
cally.
The following example shows how to use the MIDI
File player utilizing a floppy disk containing MIDI
files. If you have saved some MIDI Files to your
Hard Disk, follow the example without inserting a
disk into the drive.
1. Insert a disk containing MIDI Files into the
drive and press the SONG button.
The display shows the SONG BANKS selec-
tion window (with or without a selection of
Songs). The example shows 8 Songs present
in RAM memory.
2. Press either of the +/– Page/Bank ( )
buttons to activate the MIDI File player.
The MIDI File player selects the MIDI File
folder contained in the disk.
1
2
Using the Midi File Player
The MIDI FILE PLAYER plays MIDI files directly
from floppy disk or Hard Disk without loading data
into RAM memory. If a Floppy disk containing
MIDI Files is already inserted in the drive, the
MIDI File player engages the floppy, otherwise
the Hard Disk (if present) is engaged automati-
cally.
The following example shows how to use the MIDI
File player utilizing a floppy disk containing MIDI
files. If you have saved some MIDI Files to your
Hard Disk, follow the example without inserting a
disk into the drive.
1. Insert a disk containing MIDI Files into the
drive and press the SONG button.
The display shows the SONG BANKS selec-
tion window (with or without a selection of
Songs). The example shows 8 Songs present
in RAM memory.
2. Press either of the +/– Page/Bank (
)
buttons to activate the MIDI File player.
The MIDI File player selects the MIDI File
folder contained in the disk.
1
2
○○○○○○○○○○○○○○○○○○○○○○
Edit General 8•3
○○○○○○○○○○○○○○○○○○○○○○
Edit General 8•3
The final configuration can then be copied to se-
lected octaves of the keyboard, or to all octaves.
EXAMPLE - TO PROGRAM A SCALE BY FINE TUNING ONE
OR MORE NOTES:
1. With the “Octave Up” function (F5), select the
octave to program.
2. Use the directional arrows to select the fine
tune parameter (in this case “0”) and rotate
the Dial to fine tune the note according to your
requirements. While tuning, play the note
repeatedly.
3. Repeat the microtuning operation for other
notes.
4. Select the “Copy to oct.” function (F3), select
“Fine Tune” in the “Copy” parameter and
“ALL” in the “to octave” parameter, then press
ENTER to confirm.
5. When the scale has been programmed, save
it to the Setup by pressing F7 («Save»). You
will be prompted to select a User location.
THE TUNING/SCALE OPTIONS
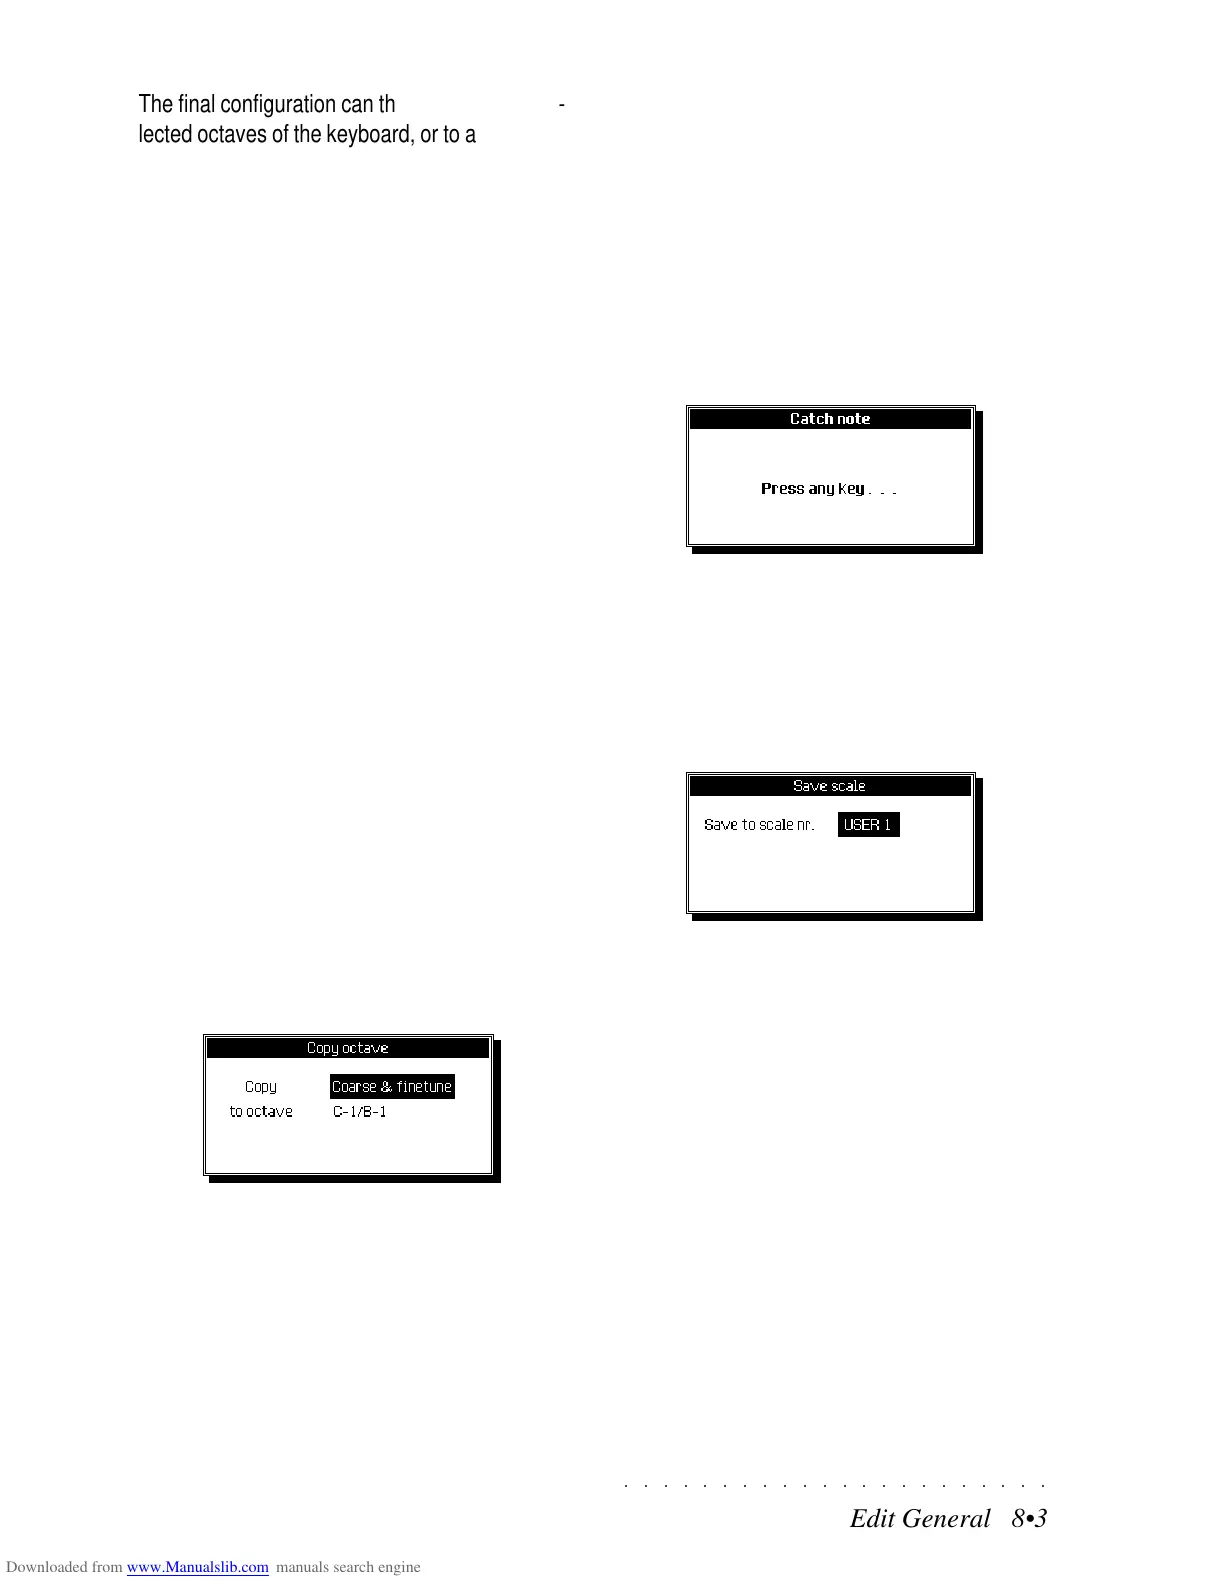
COPY TO OCTAVE... (F3)
Copies the current setting to another octave. The
«Copy to octave» dialog window is opened where
you can specify the elements to copy and the
octave to copy the user programmed data to.
Coarse&Fine - Copies both the coarse tuned
notes as well as the fine..
Coarse - Copies only the coarse tuned notes.
Finetune - Copies only the fine tuning.
To octave - Selects the octave to copy to. Se-
lect the ALL option to copy a programmed oc-
tave to the entire keyboard.
OCTAVE UP (F5)
Selects the next highest octave to edit.
OCTAVE DOWN (F6)
Sets the next lowest octave to edit.
CATCH NOTE... (F7)
Selects the note to edit. Press F7. The following
message appears:
Play the note to edit.
SAVE... (F8)
Saves the User programmed scale to the Setup.
The «Save» dialog window is opened where you
can choose from 8 User scale destinations.
Select the User scale with the DIAL. Press ENTER to confirm or
ESCAPE to cancel.
The final configuration can then be copied to se-
lected octaves of the keyboard, or to all octaves.
EXAMPLE - TO PROGRAM A SCALE BY FINE TUNING ONE
OR MORE NOTES:
1. With the “Octave Up” function (F5), select the
octave to program.
2. Use the directional arrows to select the fine
tune parameter (in this case “0”) and rotate
the Dial to fine tune the note according to your
requirements. While tuning, play the note
repeatedly.
3. Repeat the microtuning operation for other
notes.
4. Select the “Copy to oct.” function (F3), select
“Fine Tune” in the “Copy” parameter and
“ALL” in the “to octave” parameter, then press
ENTER to confirm.
5. When the scale has been programmed, save
it to the Setup by pressing F7 («Save»). You
will be prompted to select a User location.
THE TUNING/SCALE OPTIONS
COPY TO OCTAVE... (F3)
Copies the current setting to another octave. The
«Copy to octave» dialog window is opened where
you can specify the elements to copy and the
octave to copy the user programmed data to.
Coarse&Fine - Copies both the coarse tuned
notes as well as the fine..
Coarse - Copies only the coarse tuned notes.
Finetune - Copies only the fine tuning.
To octave - Selects the octave to copy to. Se-
lect the ALL option to copy a programmed oc-
tave to the entire keyboard.
OCTAVE UP (F5)
Selects the next highest octave to edit.
OCTAVE DOWN (F6)
Sets the next lowest octave to edit.
CATCH NOTE... (F7)
Selects the note to edit. Press F7. The following
message appears:
Play the note to edit.
SAVE... (F8)
Saves the User programmed scale to the Setup.
The «Save» dialog window is opened where you
can choose from 8 User scale destinations.
Select the User scale with the DIAL. Press ENTER to confirm or
ESCAPE to cancel.