Training Guide Course No. 196514
Level 2 Maintenance, X-1000 Series Dispensing Systems 4-125 P/N 196515 (Revision A)
In Windows NT, open HyperTerminal as follows:
• Click on
Start > Programs > Accessories >
HyperTerminal.
• Click on the
HyperTerminal icon.
• In the Connection Description dialog box, enter
a name.
• In the Connect To dialog box, select
Using
COM1
.
• In the Com1 Properties dialog box, enter the
settings shown in Table 1 and then click OK.
Contact Asymtek
Technical Support
Connect the Power Cable
to the facility outlet and
switch Main Circuit Breaker
to ON (I) position,
NoneFlow Control
1Stop Bits
NoneParity
8Data Bits
9600Bits per Second
COM1 Properties
TABLE 1
Click on the Settings tab and
then select
ASCII Setup.
Select the Echo typed
characters locally
checkbox.
Click OK and then OK again.
Type [P], press [Enter], and
observe if the Scale responds
with a numeric value.
Did the Scale respond
with a value?
Close HyperTerminal.
Open the NDSNcomm.ini. file as follows:
• Click on Start, click on Programs, and
click on Windows NT Explorer.
• Browse to C:\FmNT.
• Open NDSNcomm.ini.
• DTR = 0• RTS-CTS = 0
• Min Free Space = 0• Event Char = None
• Stop Bits = 1• Data Bits = 8
• Parity = None• Baud Rate = 9600
• Port Name – COM1• Port Type = Serial
• Name = DI104• [SCALE DI104]
Scroll down to [SCALE DI104] and confirm the following
settings:
Did the [SCALE DI104]
file match the settings?
Make corrections to the [SCALE
DI104] file, save settings, and
test Scale in accordance with
Steps 5 through 10 of “Scale
Operational Verification”
Shut down Windows NT, press
the black OFF (0) button on the
Operator’s Console, switch Main
Circuit Breaker to OFF (0)
position, and disconnect Power
Cable from the facility outlet.
Yes
Yes
Disconnect the Scale
Communications Cable (P/N 06-
4582-00) from
Com1 and
connect it to
Com2.
Connect the Power Cable to
facility outlet, switch the Main
Circuit Breaker to ON (I) position,
and press the green ON (I)
button on the Operator’s
Console.
Do not enter FmNT.
In Windows NT, open HyperTerminal as follows:
• Click on
Start > Programs > Accessories >
HyperTerminal.
• Click on the
HyperTerminal icon.
• In the Connection Description dialog box, enter
a name.
• In the Connect To dialog box, select
Using
COM2
.
• In the Com2 Properties dialog box, enter the
settings shown in Table 2 and then click
OK.
A
Press the green ON (I) button on
the Operator’s Console.
DO NOT enter FmNT.
No
No
In Windows NT, open HyperTerminal as follows:
• Click on
Start > Programs > Accessories >
HyperTerminal.
• Click on the
HyperTerminal icon.
• In the Connection Description dialog box, enter
a name.
• In the Connect To dialog box, select
Using
COM1
.
• In the Com1 Properties dialog box, enter the
settings shown in Table 1 and then click OK.
Contact Asymtek
Technical Support
Connect the Power Cable
to the facility outlet and
switch Main Circuit Breaker
to ON (I) position,
NoneFlow Control
1Stop Bits
NoneParity
8Data Bits
9600Bits per Second
COM1 Properties
TABLE 1
NoneFlow Control
1Stop Bits
NoneParity
8Data Bits
9600Bits per Second
COM1 Properties
TABLE 1
Click on the Settings tab and
then select
ASCII Setup.
Select the Echo typed
characters locally
checkbox.
Click OK and then OK again.
Type [P], press [Enter], and
observe if the Scale responds
with a numeric value.
Did the Scale respond
with a value?
Did the Scale respond
with a value?
Close HyperTerminal.
Open the NDSNcomm.ini. file as follows:
• Click on Start, click on Programs, and
click on Windows NT Explorer.
• Browse to C:\FmNT.
• Open NDSNcomm.ini.
• DTR = 0• RTS-CTS = 0
• Min Free Space = 0• Event Char = None
• Stop Bits = 1• Data Bits = 8
• Parity = None• Baud Rate = 9600
• Port Name – COM1• Port Type = Serial
• Name = DI104• [SCALE DI104]
Scroll down to [SCALE DI104] and confirm the following
settings:
• DTR = 0• RTS-CTS = 0
• Min Free Space = 0• Event Char = None
• Stop Bits = 1• Data Bits = 8
• Parity = None• Baud Rate = 9600
• Port Name – COM1• Port Type = Serial
• Name = DI104• [SCALE DI104]
Scroll down to [SCALE DI104] and confirm the following
settings:
Did the [SCALE DI104]
file match the settings?
Did the [SCALE DI104]
file match the settings?
Make corrections to the [SCALE
DI104] file, save settings, and
test Scale in accordance with
Steps 5 through 10 of “Scale
Operational Verification”
Shut down Windows NT, press
the black OFF (0) button on the
Operator’s Console, switch Main
Circuit Breaker to OFF (0)
position, and disconnect Power
Cable from the facility outlet.
Yes
Yes
Disconnect the Scale
Communications Cable (P/N 06-
4582-00) from
Com1 and
connect it to
Com2.
Connect the Power Cable to
facility outlet, switch the Main
Circuit Breaker to ON (I) position,
and press the green ON (I)
button on the Operator’s
Console.
Do not enter FmNT.
In Windows NT, open HyperTerminal as follows:
• Click on
Start > Programs > Accessories >
HyperTerminal.
• Click on the
HyperTerminal icon.
• In the Connection Description dialog box, enter
a name.
• In the Connect To dialog box, select
Using
COM2
.
• In the Com2 Properties dialog box, enter the
settings shown in Table 2 and then click
OK.
A
Press the green ON (I) button on
the Operator’s Console.
DO NOT enter FmNT.
No
No
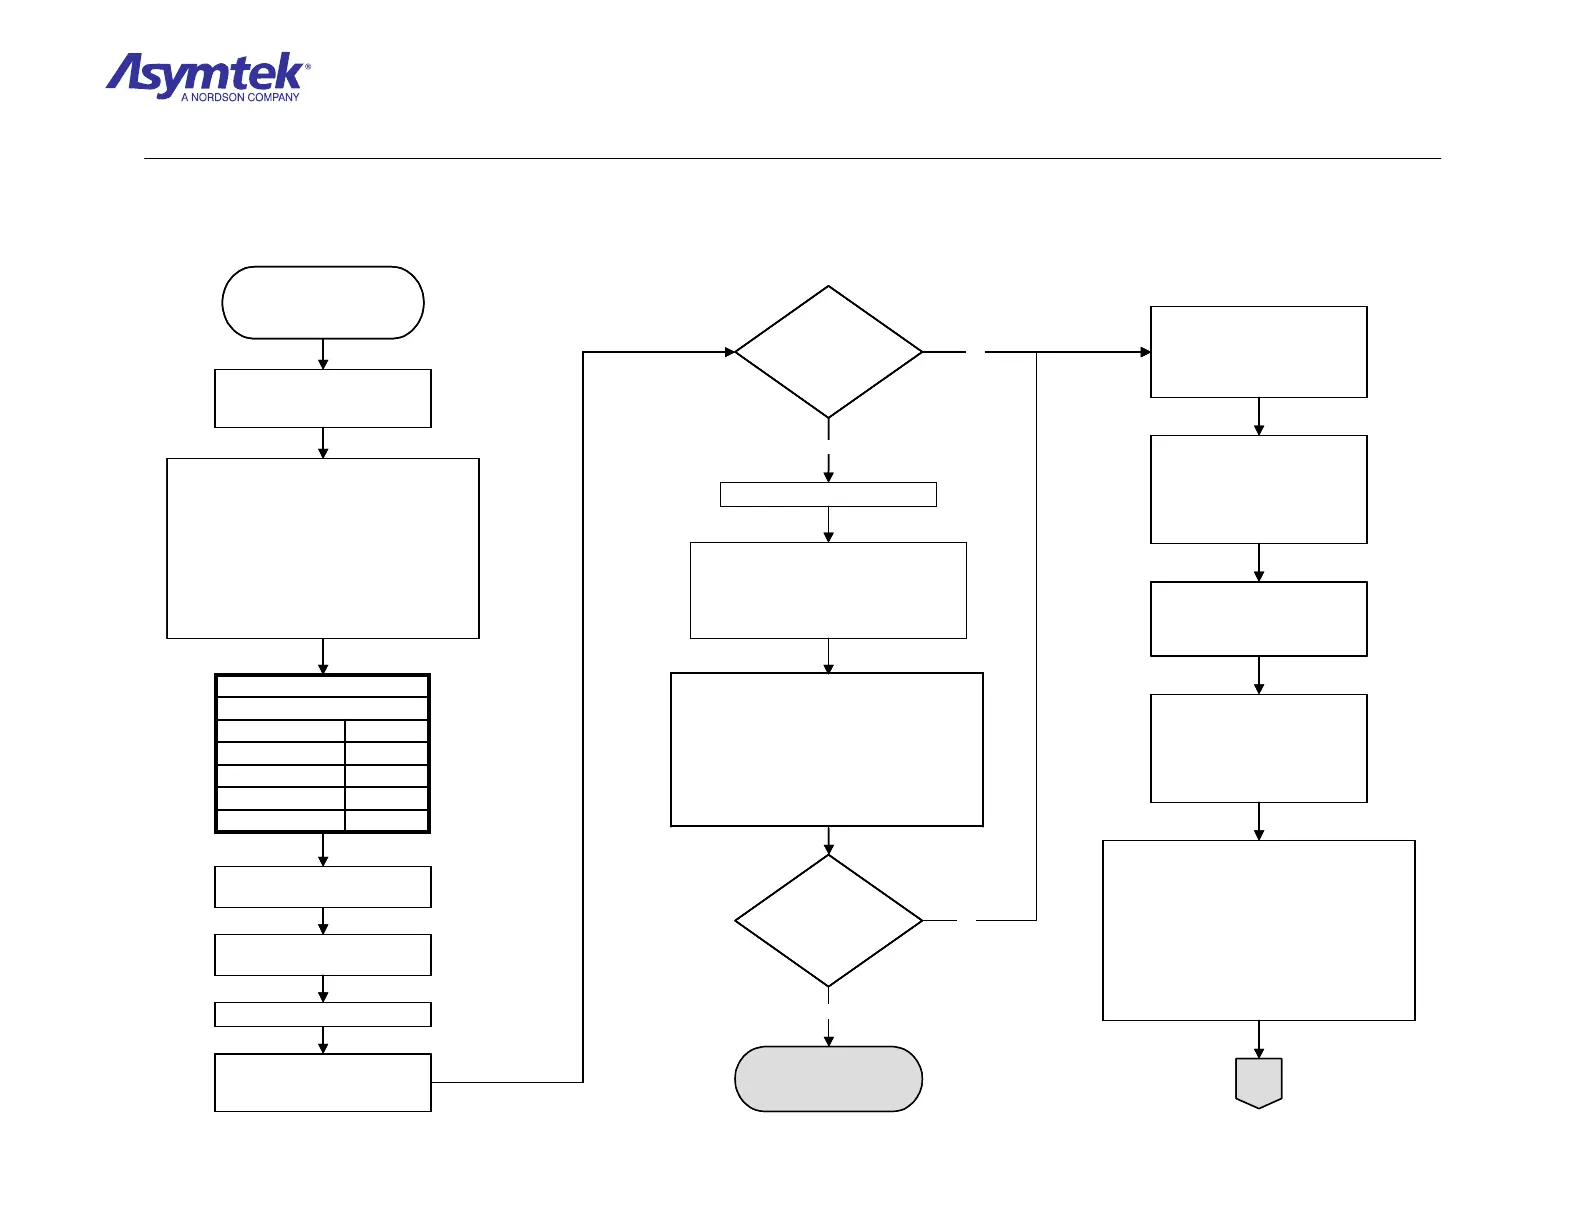
Diagram Sheet 4-9-5
Scale Fault Isolation Procedure – Scale Communications Verification

 Loading...


