Chapter 9 — Configuring and Using Media Lifecycle Management Using PostScan
December 2019 User Guide—Spectra T200, T380, and T680 Libraries
295
Enable PostScan
PostScan is enabled by selecting one or more trigger criteria when you
configure a partition (see Enable and Configure MLM PreScan and
PostScan on page 197). The available PostScan options depend on the drive
type and whether or not a Global Spare drive is assigned to the partition.
Request a Manual PostScan
The automatic PostScan triggers only add MLM-enabled data cartridges to
the PostScan queue. However, cartridges can also be added to the PostScan
queue manually. This is especially useful if your library contains cartridges
that are not MLM-enabled. You can also use the manual PostScan process
to verify a suspect MLM-enabled cartridge even if it was previously
scanned.
Cartridges that are manually added to the PostScan queue are processed
before cartridges that were added as a result of the trigger criteria for the
partition. They are processed using the PostScan option that was specified
for the partition.
Use the following steps to manually start the PostScan process.
1. Enable Media Lifecycle Management if it is not already enabled (see
Enabling MLM and Configuring Global Settings on page 276).
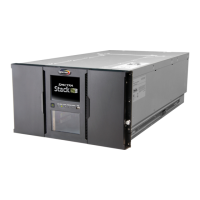
2. From the toolbar menu, select Maintenance > MLM. The Media
Lifecycle Management Tools screen displays.
PostScan is enabled and configured for each individual partition. PostScan does not
operate until the PostScan option is selected and one or more triggers are specified
for the partition
.
Figure 166 Click Manual PostScan on the MLM Tools screen.