○○○○○○○○○○○○○○○○○○○○○○
1•46 Quick Guide
○○○○○○○○○○○○○○○○○○○○○○
1•46 Quick Guide
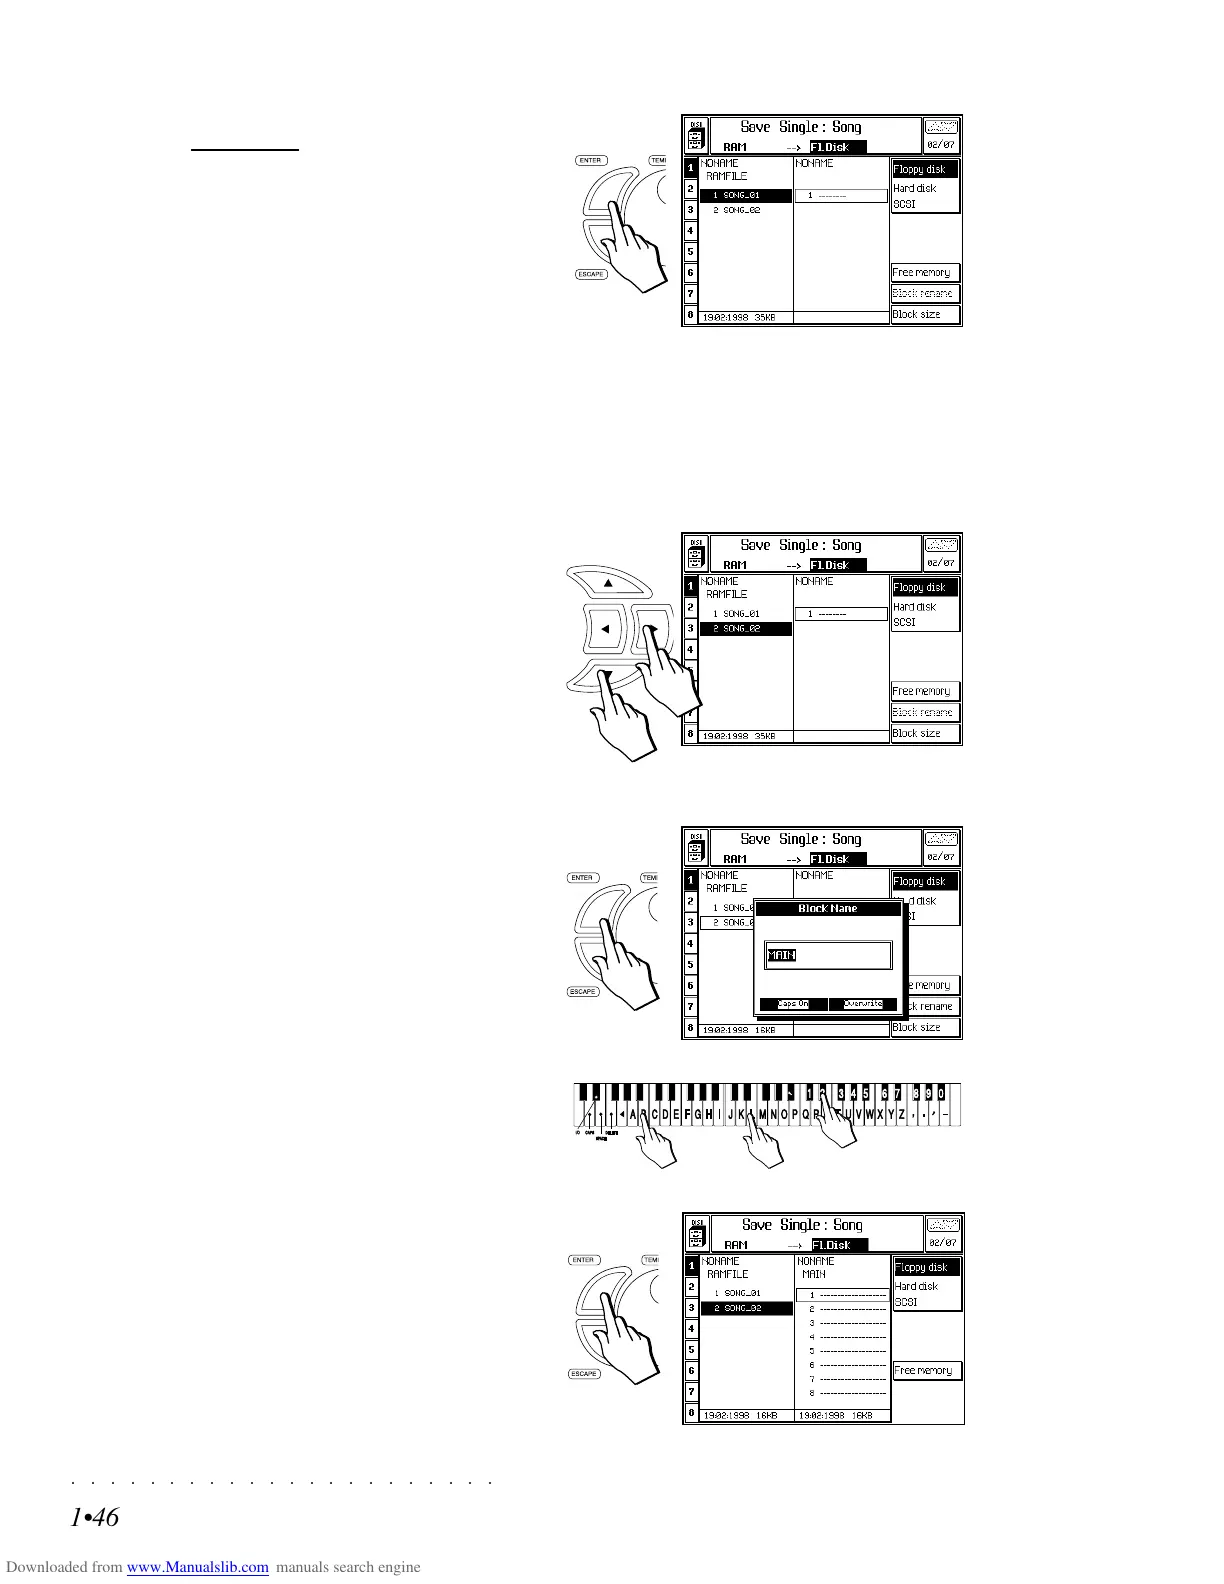
3. Press ENTER to confirm the command and
open the File Selector.
The display shows the directories of the RAM
memory and the floppy disk, or Hard Disk.
In the example, the instrument’s RAM direc-
tory is shown with 2 songs (with generic
names).
If the disk is new (no Blocks present), the di-
rectory will be empty. If the disk is used, one
or more Block files may be present. If you
are working on the Hard Disk, several Block
files will be shown.
4. If necessary, select the Song that you want
to save and its destination, using the direc-
tional arrows.
A selected file is shown in negative highlight.
An empty destination is shown as a broken
line. A preselected destination is shown en-
closed by a rectangular frame.
You can choose to select an existing Block
as the destination, or create a new one by
selecting an empty one (broken line).
5. Press ENTER.
If you chose an empty destination in step 5
above, you’ll be prompted to create a new
Block. The name “MAIN” will suggested au-
tomatically.
Use the keyboard to enter a name for the
block.
3
4
5
6
6. Confirm the new Block name with ENTER.
A new Block directory will show the first 8
empty locations (within the new block). Up
to 16 locations are available by scrolling with
the cursor arrow.
3. Press ENTER to confirm the command and
open the
File Selector.
The display shows the directories of the RAM
memory and the floppy disk, or Hard Disk.
In the example, the instrument’s RAM direc-
tory is shown with 2 songs (with generic
names).
If the disk is new (no Blocks present), the di-
rectory will be empty. If the disk is used, one
or more Block files may be present. If you
are working on the Hard Disk, several Block
files will be shown.
4. If necessary, select the Song that you want
to save and its destination, using the direc-
tional arrows.
A selected file is shown in negative highlight.
An empty destination is shown as a broken
line. A preselected destination is shown en-
closed by a rectangular frame.
You can choose to select an existing Block
as the destination, or create a new one by
selecting an empty one (broken line).
5. Press ENTER.
If you chose an empty destination in step 5
above, you’ll be prompted to create a new
Block. The name “MAIN” will suggested au-
tomatically.
Use the keyboard to enter a name for the
block.
3
4
5
6
6. Confirm the new Block name with ENTER.
A new Block directory will show the first 8
empty locations (within the new block). Up
to 16 locations are available by scrolling with
the cursor arrow.
○○○○○○○○○○○○○○○○○○○○○○
Vocal Processor 7•3
○○○○○○○○○○○○○○○○○○○○○○
Vocal Processor 7•3
The four voices can be selected from the six avail-
able:
Voice 1 : Extreme Lower octave
Voice 2 : Close Lower octave
Voice 3 : Extreme Upper octave
Voice 4 : Close Upper octave
Main : “doubles” the input voice
Bass : “doubles” the input voice one oc-
tave down.
You can regulate the Volume and Pan param-
eters of each single voice (F1/F2).
You can mute or activate the various voices with
the function buttons A-F.
Ex: an active voice shows the icon
a muted voice shows the icon
The Harmony parameter controls the general
volume of the Vocal Processor:
The Volume page operates in the same manner
as the same page in «Edit Mixer»; in other words,
you can regulate the levels with the Dial or Sliders.
The Volume and Pan controls are common to all
three operating modes.
NB. The number of voices produced by the
Vocal Processor is always a maximum of 4.
Example: if voices 1, 2, 3 and 4 are active in
order to activate the Main or Bass voice, you
must mute one of the active voices.
VOCODER (F6)
VOCODER mode operates both in Style mode
as well as Song mode.
The VOCODER mode operates by referring to
the notes played in real time on the keyboard, or
reproduced by the sequencer, and the Vocal Proc-
essor responds by shifting the pitch of your voice
exactly to the notes played.
The Vocoder is always tied to one of the tracks
(see Vocal Processor - Edit).
You can regulate the Volume and Pan param-
eters of each single voice (F1/F2).
You can mute or activate the various voices with
the function buttons A-F.
In VOCODER mode, the Main and Bass voices
are not present.
The assigned Vocoder track is able to receive
Pitch and Modulation messages.
Vocal Processor - Vocoder mode, Volume option