○○○○○○○○○○○○○○○○○○○○○○
2•10 Reference Guide
○○○○○○○○○○○○○○○○○○○○○○
2•10 Reference Guide
THE SOUND PATCH OPTIONS
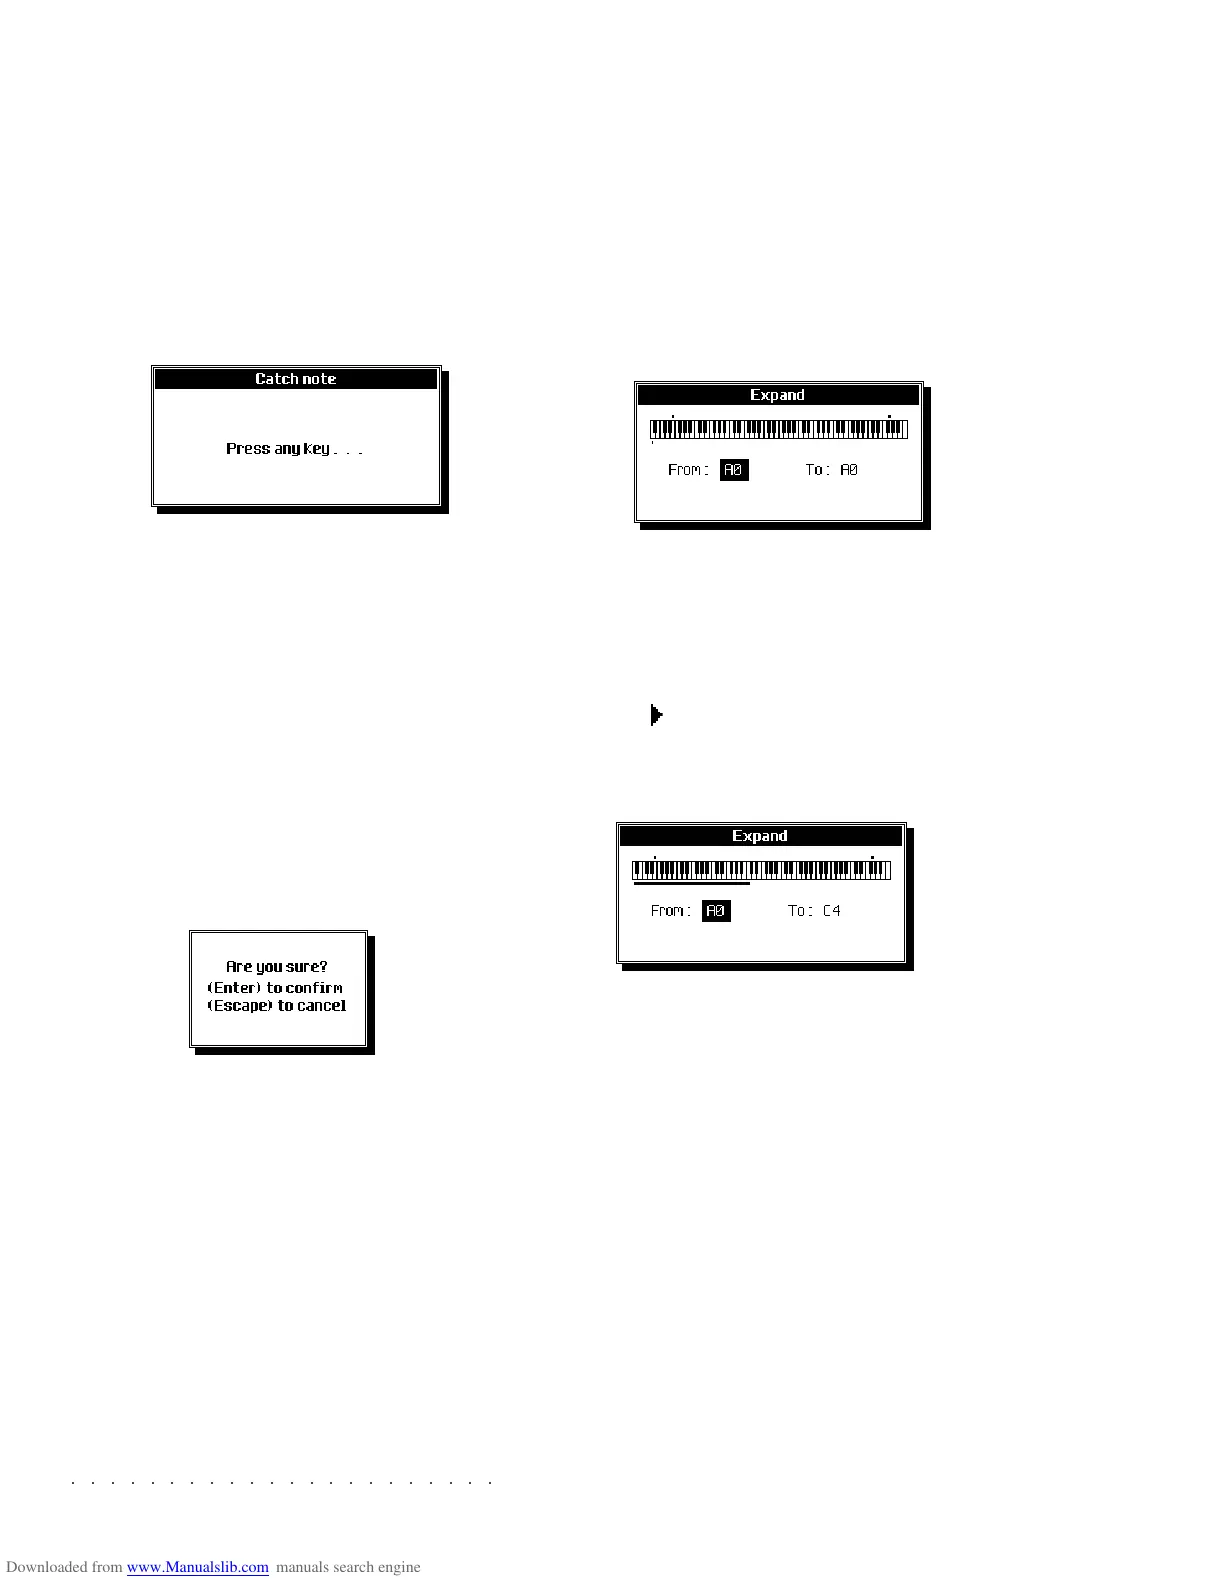
CATCH NOTE... (F1)
Selects the note to place in edit by playing it on
the keyboard.
1. Press F1 («Catch note...»).
The following message appears.
2. Play the note to place in edit.
The dialog window closes and the «Edit note»
parameter is modified.
COPY TO LAYER... (F2)
Copies an entire Layer to the other.
1. Select the Layer to copy with the soft but-
tons A and B.
2. Press F2 («Copy to Layer...»). You are
prompted to reconfirm the operation.
3. Press ENTER to confirm or ESCAPE to cancel.
WARNING - The copy will cancel the programmed
data in the destination Layer.
EXPAND... (F3)
Extends the programmed parameters of the note
in edit to a specified keyboard zone.
1. Select the note whose parameters require
copying.
2. Press F3 («Expand...»).
The «Expand» dialog window opens:
3. With the «From» parameter selected, rotate
the DIAL, or play a note to specify the low-
est note of the required keyboard zone.
4. Pass to the «To» parameter with the cursor
button
. Rotate the DIAL, or play a note to
specify the highest note of the required key-
board zone.
5. Press ENTER to confirm the Expand com-
mand, or ESCAPE to cancel.
Confirming extends the programmed param-
eters of the original note to the specified key-
board zone.
THE SOUND PATCH OPTIONS
CATCH NOTE... (F1)
Selects the note to place in edit by playing it on
the keyboard.
1. Press F1 («Catch note...»).
The following message appears.
2. Play the note to place in edit.
The dialog window closes and the «Edit note»
parameter is modified.
COPY TO LAYER... (F2)
Copies an entire Layer to the other.
1. Select the Layer to copy with the soft but-
tons A and B.
2. Press F2 («Copy to Layer...»). You are
prompted to reconfirm the operation.
3. Press ENTER to confirm or ESCAPE to cancel.
WARNING - The copy will cancel the programmed
data in the destination Layer.
EXPAND... (F3)
Extends the programmed parameters of the note
in edit to a specified keyboard zone.
1. Select the note whose parameters require
copying.
2. Press F3 («Expand...»).
The «Expand» dialog window opens:
3. With the «From» parameter selected, rotate
the DIAL, or play a note to specify the low-
est note of the required keyboard zone.
4. Pass to the «To» parameter with the cursor
button
. Rotate the DIAL, or play a note to
specify the highest note of the required key-
board zone.
5. Press ENTER to confirm the Expand com-
mand, or ESCAPE to cancel.
Confirming extends the programmed param-
eters of the original note to the specified key-
board zone.
○○○○○○○○○○○○○○○○○○○○○○
Edit Song 6•27
○○○○○○○○○○○○○○○○○○○○○○
Edit Song 6•27
The Microscope allows you to modify every sin-
gle event recorded in the tracks. The Event List
at the centre of the display shows all the events
recorded.
ACCESSING THE EVENT EDIT MODE
1. Select the track whose events you wish to
see in the Event List.
2. Use the / buttons to scroll through the
events. The selected notes are played auto-
matically.
3. Select the parameter to modify using the cur-
sor buttons / .
4. Use the DIAL to modify the selected param-
eter.
EVENTS AND PARAMETERS WHICH CAN BE
CHANGED
The «Status» column shows the type of event.
One or more parameters can be modified for each
event.
Refer to the events table on the following page
for an explanation of each event.
Microscope
measure
beat
Event List
event type
(Status)
Value 3
Value 2
Value 1
Gate
track in edit
resolution
SHOW... (F2)
Recalls a dialog window where it is possible to
select the events that will be displayed in the
Event List.
Set the events that you want to mask to OFF.
Set the parameters and press ENTER.
The Microscope allows you to modify every sin-
gle event recorded in the tracks. The Event List
at the centre of the display shows all the events
recorded.
ACCESSING THE EVENT EDIT MODE
1. Select the track whose events you wish to
see in the Event List.
2. Use the /
buttons to scroll through the
events. The selected notes are played auto-
matically.
3. Select the parameter to modify using the cur-
sor buttons / .
4. Use the DIAL to modify the selected param-
eter.
EVENTS AND PARAMETERS WHICH CAN BE
CHANGED
The «Status» column shows the type of event.
One or more parameters can be modified for each
event.
Refer to the events table on the following page
for an explanation of each event.
Microscope
measure
beat
Event List
event type
(Status)
Value 3
Value 2
Value 1
Gate
track in edit
resolution
SHOW... (F2)
Recalls a dialog window where it is possible to
select the events that will be displayed in the
Event List.
Set the events that you want to mask to OFF.
Set the parameters and press ENTER.