Do you have a question about the L3 Mobile-Vision Flashback3 and is the answer not in the manual?
Details on Nite-Watch, HD Optical Zoom, Backseat, and Bullet cameras.
VoiceLink microphone and crash sensor.
Monitor and antenna systems.
Describes the functions of buttons on the monitor.
Compares DVR and monitor button functions.
Explains symbols and indicators on the monitor screen.
Overview of components installed inside the vehicle.
Key differences between Flashback3 and FlashbackHD models.
Components housed at the agency or precinct building.
DVR is not recording or playing back video.
DVR is actively recording video.
DVR is playing back a recorded video.
DVR's menu functions are displayed.
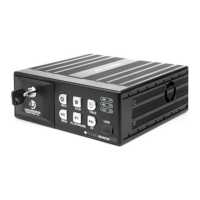
Describes the main buttons on the DVR front panel.
Details USB, SD card, and status indicator locations.
Ports for connecting cameras and input devices.
Ports for antennas, monitor, LAN, USB, radar, power.
Ports for VLP microphones and charging.
SD resolution, 10x optical zoom, night vision.
10x optical zoom, up to 120x total zoom, night vision.
Covers Auto Zoom, Auto Focus, Min/Max Zoom, Zoom In/Out.
Backlight and Nite-Watch feature controls.
Optional camera for rear or front recording.
Small camera for multiple angles, uses Channel 2.
Standard and Dual WiFi/GPS antennas for network & GPS.
Guidelines for optimal VLP2 transmission range and signal.
Starting recording and using the mute feature.
Emergency button and battery maintenance.
Explains the status of Mute/Sync and Error/Battery lights.
Explains SYNC and BATT light status.
Details the Emergency and Communications ports.
Guidelines for optimal VLX transmission range and signal.
Starting recording and muting audio.
Information on charging, battery life, and replacement.
Explains Signal, Battery, Mute, and Mic Error lights.
Explains SYNC and PWR/CHG light status.
Details the communications port for connecting to DVR.
Optional button to initiate recording remotely.
Links Flashback to radar detector for displaying readings.
Detects crashes and automatically initiates recording.
Procedure for turning on the DVR.
Identifies officers for video linking.
Methods to manually start a recording.
Recording initiated by pre-programmed events.
Assigns categories to recorded videos.
Viewing recorded videos before server transfer.
Explains columns like Date, Time, Dur, Category, Trg, Trc.
Wireless transfer of videos when near an access point.
Manually uploading videos via SD card.
Procedure to log out before powering down.
DVR powers off after ignition timer delay.
Steps to open the DVR Main Menu.
Setting the time zone and DST.
Adjusting date format and manually setting date/time.
Balances video quality, frames-per-second, and file size.
Selects video bitrate for quality and file size.
Sets frames-per-second for regular recordings.
Sets frames-per-second for background recordings.
Sets video resolution for Channel 1.
Enables or disables continuous background recording.
Hides or shows the Background Record indicator.
Captures video before and after a recording session.
Configures number of cameras for Channel 2.
Manages VLP1, VLP2, and In-car microphone audio.
Controls record/keystroke beeps and microphone gain.
Controls audio inclusion for pre/post recordings.
Explains manual and automatic recording triggers.
Controls triggers for lights, siren, AUX1/2, speed, VLP mic.
Controls display of radar, lights, siren, brakes, AUX, speed, GPS, voltage, WLAN.
Sets metric units and speed display preferences.
Configuring wireless IP and subnet mask.
Configuring wireless gateway IP and DHCP options.
Configuring Ethernet IP and subnet mask.
Configuring Ethernet gateway IP and DHCP options.
Selecting gateway type and configuring DHCP server.
Configuring security mode and authentication type.
Configuring encryption type and network name (SSID).
Entering wireless password and SSL indicator settings.
Programming ignition timer and setting admin ID/password.
Managing USB login feature and other system settings.
Enters IP address of the DES storage server.
Manually enters officer name for video linking.
Assigns a name or number to the DVR.
Checks the currently installed firmware version.
Manually copies firmware file from USB to DVR.
Copies DVR settings to a USB drive.
Copies DVR settings from USB to the DVR.
Returns DVR to original factory settings.
Copies log files to USB for technical support.
Reformats the SD card for temporary video storage.
Displays the unique identification code for the DVR.
Displays MAC addresses for LAN, WiFi, and AP connections.
Adjusts monitor contrast and brightness levels.
Adjusts saturation, hue, and sharpness monitor settings.
Controls transparency of on-screen controls.
Displays monitor version and product ID for troubleshooting.
Steps to switch out Flashback2 for newer models.
Lists technical details of the DVR hardware.
Defines a device used to transmit DVR videos to the server.
Lists hardware and software components of the system.
Defines a file on USB drive containing user information.
Defines an event causing automatic recording.
Defines the temporary storage device for videos.
Defines the network computer hosting DES application.
Defines L3 Mobile-Vision representative for installation.
Provides phone, email, and address for support.
Describes video status colors on the Playlist screen.
| Brand | L3 Mobile-Vision |
|---|---|
| Model | Flashback3 |
| Category | DVR |
| Language | English |