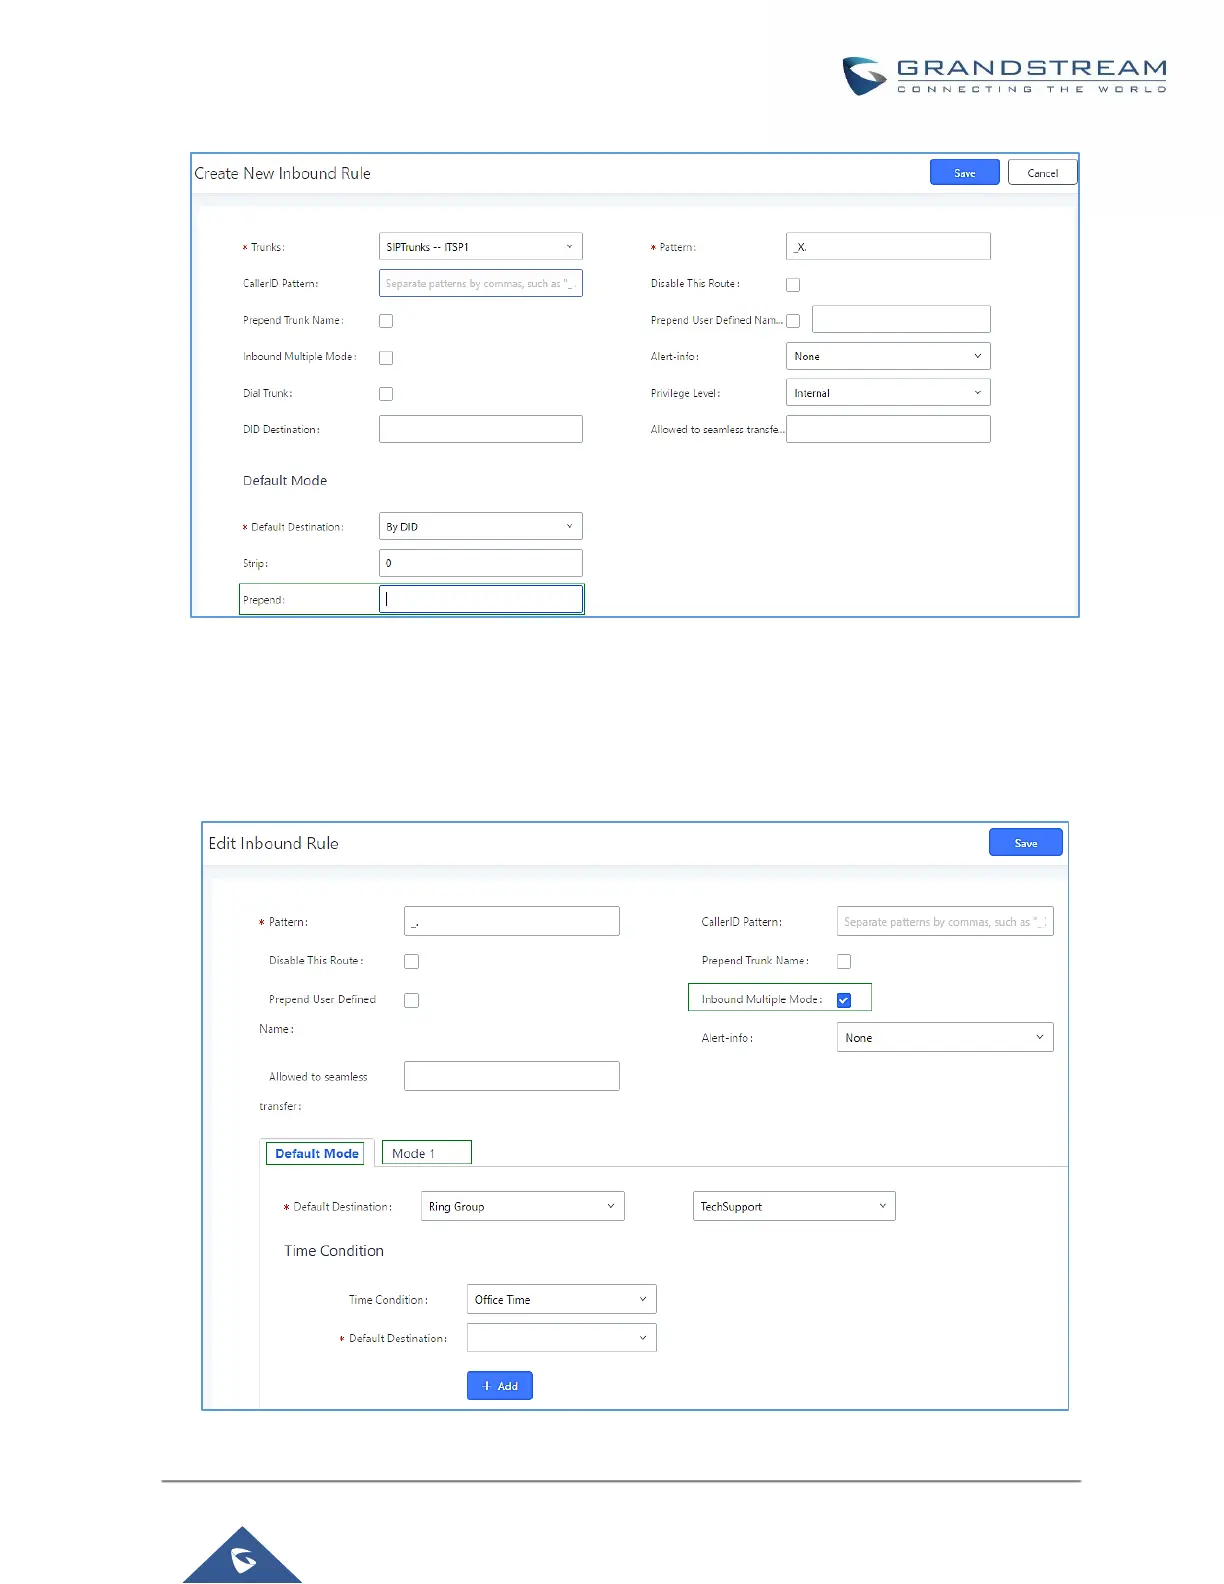
Home
Grandstream Networks
PBX
UCM6104
Grandstream Networks UCM6104 User Manual
5
of 1
of 1 rating
418 pages
Give review
Manual
Specs
To Next Page
To Next Page
To Previous Page
To Previous Page
Loading...
P
a
g
e
|
210
UCM6100 Series Us
er Manual
V
ersion 1.0.18.13
Figure 1
17: Inbound Route fe
ature: Prepend
Inbound Ro
ute: Mul
tiple Mode
I
n
the
UC
M6100
,
the
user
can
configure
inbound
route
to
enable
multiple
mode
to
s
witch
between
different
destinations. The inbound
multiple mode can
be enabled under I
nbound Route se
tting
s.
Figure 1
18: Inbound Route -
Multiple Mode
210
212
Table of Contents
Default Chapter
4
Table of Contents
4
Document Purpose
26
Change Log
27
Firmware Version 1.0.18.13
27
Firmware Version 1.0.18.12
27
Firmware Version 1.0.18.9
27
Firmware Version 1.0.17.16
27
Firmware Version 1.0.16.20
29
Firmware Version 1.0.16.18
29
Firmware Version 1.0.15.16
29
Firmware Version 1.0.14.24
30
Firmware Version 1.0.14.23
30
Firmware Version 1.0.14.21
30
Firmware Version 1.0.13.14
31
Firmware Version 1.0.12.19
31
Firmware Version 1.0.11.27
32
Firmware Version 1.0.10.44
33
Firmware Version 1.0.10.39
33
Firmware Version 1.0.9.26
34
Firmware Version 1.0.9.25
34
Firmware Version 1.0.9.23
34
Firmware Version 1.0.8.12
35
Firmware Version 1.0.7.11
36
Firmware Version 1.0.6.11
36
Firmware Version 1.0.6.10
36
Firmware Version 1.0.5.19
37
Firmware Version 1.0.5.14
37
Firmware Version 1.0.4.7
37
Firmware Version 1.0.3.13
38
Firmware Version 1.0.2.21
38
Firmware Version 1.0.1.22
39
Welcome
40
Product Overview
41
Technical Specifications
41
Table 1: Technical Specifications
41
Installation
44
Equipment Packaging
44
Connect Your UCM6100
44
Connect the UCM6102
44
Table 2: UCM6100 Equipment Packaging
44
Figure 1: UCM6102 Front View
44
Connect the UCM6104
45
Figure 2: UCM6102 Back View
45
Figure 3: UCM6104 Front View
45
Connect the UCM6108
46
Figure 4: UCM6104 Back View
46
Figure 5: UCM6108 Front View
46
Connect the UCM6116
47
Figure 6: UCM6108 Back View
47
Figure 7: UCM6116 Front View
47
Figure 8: UCM6116 Back View
47
Safety Compliances
48
Warranty
48
Getting Started
49
Use the LCD Menu
49
Table 3: LCD Menu Options
50
Use the LED Indicators
51
Table 4: UCM6102/UCM6104 LED Indicators
51
Use the Web GUI
52
Access Web GUI
52
Table 5: UCM6108/UCM6116 LED Indicators
52
Figure 9: UCM6102 Web GUI Login Page
53
Setup Wizard
54
Figure 10: UCM6100 Setup Wizard
54
Web GUI Configurations
55
Web GUI Languages
55
Figure 11: UCM6100 Web GUI Language
55
Save and Apply Changes
56
Make Your First Call
56
System Settings
57
HTTP Server
57
Table 6: HTTP Server Settings
57
Network Settings
58
Basic Settings
58
Table 7: UCM6102 Network Settings→Basic Settings
58
Table 8: UCM6104 Network Settings→Basic Settings
62
Table 9: UCM6108/UCM6116 Network Settings→Basic Settings
63
Figure 12: UCM6102 Network Interface Method: Route
65
Figure 13: UCM6102 Network Interface Method: Switch
66
DHCP Client List
67
Figure 14: UCM6102 Network Interface Method: Dual
67
Figure 15: DHCP Client List
67
Figure 16: Add MAC Address Bind
68
Figure 17: Batch Add MAC Address Bind
68
Figure 18: UCM6100 Using 802.1X as Client
69
Figure 19: UCM6100 Using 802.1X EAP-MD5
69
Static Routes
70
Table 10: UCM6100 Network Settings→802.1X
70
Table 11: UCM6100 Network Settings→Static Routes
70
Figure 20: UCM6104 Static Route Sample
71
Port Forwarding (UCM6102 Only)
72
Table 12: UCM6102 Network Settings→Port Forwarding
72
Figure 21: UCM6104 Static Route Configuration
72
Figure 22: Create New Port Forwarding
73
Openvpn
74
Table 13: UCM6100 System Settings→Openvpn
74
Figure 23: UCM6102 Port Forwarding Configuration
74
Figure 24: GXP2160 Web Access Using UCM6102 Port Forwarding
74
Figure 25: Openvpn Feature on the UCM6100
75
DDNS Settings
76
Figure 26: Register Domain Name on Noip.com
76
Figure 27: UCM6100 DDNS Setting
77
Figure 28: Using Domain Name to Connect to UCM6100
77
Security Settings
78
Static Defense
78
Table 14: UCM6100 Firewall→Static Defense→Current Service
78
Table 15: Typical Firewall Settings
79
Table 16: Firewall Rule Settings
80
Figure 29: Create New Firewall Rule
80
Dynamic Defense
81
Table 17: UCM6100 Firewall Dynamic Defense
81
Fail2Ban
82
Figure 30: Configure Dynamic Defense
82
Table 18: Fail2Ban Settings
83
Figure 31: Fail2Ban Settings
83
SSH Access
84
Figure 32: SSH Access
84
LDAP Server
85
LDAP Server Configurations
85
Figure 33: LDAP Server Configurations
86
Figure 34: Default LDAP Phonebook DN
86
LDAP Phonebook
87
Figure 35: Default LDAP Phonebook Attributes
87
Figure 36: LDAP Server→Ldap Phonebook
87
Figure 37: Add LDAP Phonebook
88
Figure 38: Edit LDAP Phonebook
88
Figure 39: Import Phonebook
88
Figure 40: Phonebook CSV File Format
89
Figure 41: LDAP Phonebook after Import
89
LDAP Client Configurations
90
Figure 42: Export Selected LDAP Phonebook
90
Figure 43: LDAP Client Configurations
91
Time Settings
92
Auto Time Updating
92
Figure 44: GXP2170 LDAP Phonebook Configuration
92
Table 19: Time Auto Updating
93
Set Time Manually
94
NTP Server
94
Figure 45: Set Time Manually
94
Office Time
95
Table 20: Create New Office Time
95
Figure 46: Create New Office Time
95
Holiday
96
Figure 47: Settings→Time Settings→Office Time
96
Figure 48: Create New Holiday
96
Table 21: Create New Holiday
97
Figure 49: Settings→Time Settings→Holiday
97
Email Settings
98
Table 22: Email Settings
98
Figure 50: UCM6100 Email Settings
99
Email Templates
100
Figure 51: Email Templates
100
Email Send Log
101
Figure 52: Conference Schedule Template
101
Figure 53: Email Send Log
102
Table 23: Email Log
102
Figure 54: Email Logs
103
Provisioning
104
Overview
104
Configuration Architecture for End Point Device
104
Auto Provisioning Settings
105
Figure 55: Zero Config Configuration Architecture for End Point Device
105
Figure 56: UCM6100 Zero Config
106
Table 24: Auto Provision Settings
107
Figure 57: Auto Provision Settings
107
Discovery
108
Figure 58: Auto Discover
109
Figure 59: Discovered Devices
109
Uploading Devices List
110
Managing Discovered Devices
110
Figure 60: Device List - CSV File Sample
110
Figure 61: Managing Discovered Devices
110
Global Configuration
111
Global Policy
111
Table 25: Global Policy Parameters - Localization
112
Figure 62: Global Policy Categories
112
Table 26: Global Policy Parameters - Phone Settings
113
Table 27: Global Policy Parameters - Contact List
113
Table 28: Global Policy Parameters - Maintenance
115
Table 29: Global Policy Parameters - Network Settings
117
Table 30: Global Policy Parameters - Customization
118
Table 31: Global Policy Parameters - Communication Settings
119
Global Templates
120
Table 32: Create New Template
120
Figure 63: Edit Global Template
121
Model Configuration
122
Model Templates
122
Table 33: Create New Model Template
122
Figure 64: Edit Model Template
123
Model Update
124
Figure 65: Template Management
124
Device Configuration
125
Create New Device
125
Figure 66: Upload Model Template Manually
125
Manage Devices
126
Figure 67: Create New Device
126
Figure 68: Manage Devices
126
Figure 69: Edit Device
127
Figure 70: Edit Customize Device Settings
129
Figure 71: Add P Value in Customize Device Settings
130
Figure 72: Modify Selected Devices - same Model
131
Figure 73: Modify Selected Devices - Different Models
132
Sample Application
133
Figure 74: Device List in Zero Config
133
Figure 75: Zero Config Sample - Global Policy
134
Figure 76: Zero Config Sample - Device Preview 1
135
Figure 77: Zero Config Sample - Device Preview 2
136
Figure 78: Zero Config Sample - Device Preview 3
137
Extensions
138
Create New User
138
Create New SIP Extension
138
Figure 79: Create New Device
138
Table 34: SIP Extension Configuration Parameters→Basic Settings
139
Table 35: SIP Extension Configuration Parameters→Media
140
Table 36: SIP Extension Configuration Parameters→Features
142
Create New IAX Extension
146
Table 37: SIP Extension Configuration Parameters→Specific Time
146
Table 38: IAX Extension Configuration Parameters→Basic Settings
146
Table 39: IAX Extension Configuration Parameters→Media
147
Table 40: IAX Extension Configuration Parameters→Features
148
Create New FXS Extension
150
Table 41: IAX Extension Configuration Parameters→Specific Time
150
Table 42: FXS Extension Configuration Parameters→Basic Settings
150
Table 43: FXS Extension Configuration Parameters→Media
152
Table 44: FXS Extension Configuration Parameters→Features
153
Batch Add Extensions
155
Batch Add SIP Extensions
155
Table 45: FXS Extension Configuration Parameters→Specific Time
155
Table 46: Batch Add SIP Extension Parameters
155
Batch Add IAX Extensions
158
Table 47: Batch Add IAX Extension Parameters
158
Batch Extension Resetting Functionality
161
Search and Edit Extension
161
Figure 80: Manage Extensions
161
Export Extensions
162
Import Extensions
162
Figure 81: Export Extensions
162
Table 48: SIP Extensions Imported File Example
163
Figure 82: Import Extensions
163
Figure 83: Import File
163
Table 49: IAX Extensions Imported File Example
166
Table 50: FXS Extensions Imported File Example
168
Figure 84: Import Error
169
Extension Details
170
E-Mail Notification
170
Figure 85 : Extension Details
170
Figure 86: E-Mail Notification - Prompt Information
171
Figure 87: Account Registration Information and QR Code
171
Multiple Registrations Per Extension
172
Figure 88: LDAP Client Information and QR Code
172
Figure 89: Multiple Registrations Per Extension
172
SMS Message Support
173
Figure 90: Extension - Concurrent Registration
173
Figure 91: SMS Message Support
173
Extension Groups
174
Configure Extension Groups
174
Figure 92: Edit Extension Group
174
Using Extension Groups
175
Figure 93: Select Extension Group in Outbound Route
175
Analog Trunks
176
Analog Trunk Configuration
176
Table 51: Analog Trunk Configuration Parameters
176
PSTN Detection
179
Figure 94: UCM6100 FXO Tone Settings
179
Figure 95: UCM6100 PSTN Detection
179
Figure 96: UCM6100 PSTN Detection: Auto Detect
180
Figure 97: UCM6100 PSTN Detection: Semi-Auto Detect
180
Table 52: PSTN Detection for Analog Trunk
181
Voip Trunks
182
Voip Trunk Configuration
182
Table 53: Create New SIP Trunk
182
Table 54: SIP Register Trunk Configuration Parameters
183
Table 55: SIP Peer Trunk Configuration Parameters
187
Table 56: Create New IAX Trunk
190
Table 57: IAX Register Trunk Configuration Parameters
190
Table 58: IAX Peer Trunk Configuration Parameters
191
Trunk Groups
192
Figure 98: Trunk Group
193
Figure 99: Trunk Group Configuration
193
Direct Outward Dialing (DOD)
194
Figure 100: DOD Extension Selection
194
Figure 101: Edit DOD
195
Sla Station
196
Create/Edit SLA Station
196
Table 59: SLA Station Configuration Parameters
196
Figure 102: SLA Station
196
Sample Configuration
197
Figure 103: Enable SLA Mode for Analog Trunk
197
Figure 104: Analog Trunk with SLA Mode Enabled
197
Figure 105: SLA Example - SLA Station
198
Figure 106: SLA Example - MPK Configuration
198
Call Routes
199
Outbound Routes
199
Configuring Outbound Routes
199
Table 60: Outbound Route Configuration Parameters
199
Outbound Blacklist
202
Figure 107: Country Codes
202
PIN Groups
203
Table 61: Outbound Routes/Pin Group
203
Figure 108: Blacklist Import/Export
203
Figure 109: Create New PIN Group
204
Figure 110: PIN Members
204
Figure 111: Outbound PIN
205
Figure 112: CDR Record
205
Figure 113: Importing PIN Groups from CSV Files
206
Figure 114: Incorrect CSV File
206
Inbound Routes
207
Figure 115: CSV File Format
207
Figure 116: CSV File Successful Upload
207
Inbound Rule Configurations
208
Table 62: Inbound Rule Configuration Parameters
208
Inbound Route: Prepend Example
210
Figure 117: Inbound Route Feature: Prepend
211
Figure 118: Inbound Route - Multiple Mode
211
Inbound Route: Multiple Mode
211
Figure 119: Inbound Route - Multiple Mode Feature Codes
212
Figure 120: Global Inbound Mode
213
Figure 121 : Inbound Mode - Default Mode
213
Figure 122 : Inbound Mode - Mode 1
213
Inbound Route: Inbound Mode BLF Monitoring
213
Figure 123: Import/Export Inbound Route
214
Inbound Route: Import/Export Inbound Route
214
Blacklist Configurations
215
FAX Intelligent Route
215
FAX with Two Media
215
Figure 124: Blacklist Configuration Parameters
215
Figure 125: Blacklist Csv File
216
Conference Room
217
Conference Room Configurations
217
Table 63: Conference Room Configuration Parameters
217
Join a Conference Call
219
Table 64: Conference Settings
219
Figure 126: Conference
219
Invite Other Parties to Join Conference
220
Figure 127: Conference Invitation from Web GUI
220
During the Conference
221
Table 65: Conference Caller IVR Menu
221
Conference Schedule Configuration
222
Table 66: Conference Schedule Parameters
222
Figure 128: Conference Schedule
225
Google Service Settings Support
226
Figure 129: Google Service Settings→Oauth2.0 Authentication
226
Figure 130: Google Service→New Project
227
Figure 131: Google Service→Create New Credential
227
Record Conference
228
Figure 132: Google Service→Oauth2.0 Login
228
Figure 133: Conference Recording
229
Ivr
230
Configure IVR
230
Figure 134: Create New IVR
230
Table 67: IVR Configuration Parameters
231
Black/White List in IVR
233
Figure 135: Key Pressing Events
233
Figure 136: Black/White List
234
Create Custom Prompt
235
Figure 137: Click on Prompt to Create IVR Prompt
235
Language Settings for Voice Prompt
236
Download and Install Voice Prompt Package
236
Figure 138: Language Settings for Voice Prompt
236
Figure 139: Voice Prompt Package List
237
Figure 140: New Voice Prompt Language Added
237
Customize Specific Prompt
238
Figure 141: Upload Single Voice Prompt for Entire Language Pack
238
Voicemail
239
Configure Voicemail
239
Figure 142: Voicemail Settings
239
Table 68: Voicemail Settings
240
Access Voicemail
241
Table 69: Voicemail IVR Menu
241
Leaving Voicemail
242
Extension Voicemail Count
243
Voicemail Email Settings
243
Table 70: Voicemail Email Settings
243
Figure 143: Voicemail Count
243
Configure Voicemail Group
244
Figure 144: Voicemail Email Settings
244
Table 71: Voicemail Group Settings
245
Figure 145: Voicemail Group
245
Ring Group
246
Configure Ring Group
246
Table 72: Ring Group Parameters
246
Figure 146: Ring Group
246
Figure 147: Ring Group Configuration
248
Remote Extension in Ring Group
249
Figure 148: Sync LDAP Server Option
250
Figure 149: Manually Sync LDAP Server
251
Figure 150: Ring Group Remote Extension
251
Paging and Intercom Group
252
Configure Paging/Intercom Group
252
Figure 151: Paging/Intercom Group
252
Table 73: Paging/Intercom Group Configuration Parameters
253
Figure 152: Page/Intercom Group Settings
253
Configure a Scheduled Paging / Intercom
254
Table 74: Schedule Paging / Intercom Settings
254
Figure 153: Schedule Paging/Intercom Page
254
Figure 154: Creating a Scheduled Paging/Intercom Call
255
Call Queue
256
Configure Call Queue
256
Table 75: Call Queue Configuration Parameters
256
Figure 155: Call Queue
256
Figure 156: Static Agents Limitation
259
Table 76: Static Agent Limitation
260
Figure 157: Agent Login Settings
260
Call Center Settings and Enhancements
261
Table 77: Call Center Parameters
261
Queue Statistics
262
Figure 158: Call Queue Statistics
263
Switchboard
264
Figure 159 : Automatic Download Settings - Queue Statistics
264
Figure 160 : Switchboard Summary
264
Table 78: Switchboard Parameters
265
Figure 161: Call Queue Switchboard
265
Pickup Groups
267
Configure Pickup Groups
267
Configure Pickup Feature Code
267
Figure 162: Edit Pickup Group
267
Figure 163: Edit Pickup Feature Code
268
Music on Hold
269
Figure 164: Music on Hold Default Class
269
Figure 165: Play Custom Prompt
270
Figure 166: Information Prompt
270
Figure 167: Record Custom Prompt
271
Fax Server
272
Configure Fax/T.38
272
Table 79: FAX/T.38 Settings
272
Figure 168: Fax Settings
272
Receiving Fax
274
Sample Configuration to Receive Fax from PSTN Line
274
Figure 169: Configure Analog Trunk Without Fax Detection
274
Figure 170: Configure Extension for Fax Machine: FXS Extension
275
Figure 171: Configure Extension for Fax Machine: Analog Settings
275
Sample Configuration for Fax-To-Email
276
Figure 172: Configure Inbound Rule for Fax
276
Figure 173: Create Fax Extension
276
Figure 174: Inbound Route to Fax Extension
277
Figure 175: List of Fax Files
277
FAX Sending
278
Figure 176: Fax Sending in Web GUI
278
Figure 177: Fax Send Progress
278
Busy Camp-On
279
Presence
280
Figure 178: SIP Presence Configuration
280
Table 80: SIP Presence Status
281
Figure 179: SIP Presence Feature Code
281
Figure 180: Presence Status CDR
282
Follow Me
283
Figure 181: Edit Follow Me
283
Table 81: Follow Me Settings
284
Table 82: Follow Me Options
284
Speed Dial
285
Figure 182: Speed Dial Destinations
285
Figure 183: List of Speed Dial
285
Disa
286
Figure 184: Create New DISA
286
Table 83: DISA Settings
287
Emergency
288
Figure 185: Emergency Number Configuration
288
Table 84: Emergency Numbers Parameters
289
Figure 186: 911 Emergency Sample
289
Callback
290
Table 85: Callback Configuration Parameters
290
Blf and Event List
291
Blf
291
Event List
291
Table 86: Event List Settings
291
Figure 187: Create New Event List
292
Dial by Name
294
Dial by Name Configuration
294
Figure 188: Create Dial by Name Group
294
Figure 189: Configure Extension First Name and Last Name
295
Figure 190: Dial by Name Group in IVR Key Pressing Events
296
Figure 191: Dial by Name Group in Inbound Rule
296
User Name Prompt Customization
297
Upload User Name Prompt File from Web GUI
297
Record User Name Via Voicemail Menu
297
Active Calls and Monitor
298
Active Calls Status
298
Figure 192: Status→Pbx Status→Active Calls - Ringing
298
Figure 193: Status→Pbx Status→Active Calls - Call Established
298
Figure 194: Call Connection Less than Half Hour
299
Figure 195: Call Connection between Half an Hour and One Hour
299
Hang up Active Calls
300
Call Monitor
300
Figure 196: Call Connection more than One Hour
300
Figure 197: Configure to Monitor an Active Call
300
Call Features
302
Feature Codes
302
Table 87: UCM6100 Feature Codes
302
Parking Lot
307
Figure 198: Enable/Disable Feature Codes
307
Figure 199 : Parking Lot
307
Table 88 : Parking Lot
308
Figure 200 : New Parking Lot
308
Call Park
309
Park a Call
309
Retrieve Parked Call
309
Monitor Call Park CID Name Information (Gxp21Xx Phones Only)
309
Call Recording
309
Figure 201 : Monitored Call Park CID Name
309
Enable Spy
310
Figure 202: Download Recording File from CDR Page
310
Figure 203: Download Recording File from Recording Files Page
310
Shared Call Appearance (SCA)
311
Figure 204: Enabling SCA Option under Extension's Settings
311
Figure 205: SCA Number Configuration
312
Figure 206: SCA Private Number Configuration
312
Figure 207: SCA Options
312
Table 89: Add SCA Private Number
313
Table 90: Editing the SCA Number
313
Pbx Settings
315
PBX Settings/General Settings
315
Table 91: Internal Options/General
315
PBX Settings/Rtp Settings
317
RTP Settings
317
Table 92: Internal Options/Rtp Settings
317
Payload
318
PBX Settings/Voice Prompt Customization
318
Record New Custom Prompt
318
Table 93: Internal Options/Payload
318
Figure 208: Record New Custom Prompt
318
Download All Custom Prompt
319
Figure 209: Upload Custom Prompt
319
PBX Settings/Call Failure Tone Settings
320
SIP Trunk Prompt Tone
320
Figure 210: Download All Custom Prompt
320
General Call Prompt Tone
321
Figure 211: SIP Trunk Prompt Tone
321
PBX Settings/Jitter Buffer
322
Table 94: Internal Options/Jitter Buffer
322
Figure 212: General Call Failure Prompts
322
PBX Settings/Recordings Storage
323
Figure 213: Settings→Recordings Storage
323
Figure 214: Recordings Storage Prompt Information
324
Figure 215: Recording Storage Category
324
PBX Settings/Nas
325
Table 95: NAS Settings
325
Sip Settings
326
SIP Settings/General
326
SIP Settings/Misc
326
Table 96: SIP Settings/General
326
Table 97: SIP Settings/Misc
326
SIP Settings/Session Timer
327
Table 98: SIP Settings/Session Timer
327
SIP Settings/Tcp and TLS
328
Table 99: SIP Settings/Tcp and TLS
328
SIP Settings/Nat
329
SIP Settings/Tos
329
Table 100: SIP Settings/Nat
329
Table 101: SIP Settings/Tos
329
Transparent Call-Info Header
331
Figure 216: Transparent Call-Info
331
Iax Settings
332
IAX Settings/General
332
IAX Settings/Registration
332
Table 102: IAX Settings/General
332
Table 103: IAX Settings/Registration
332
IAX Settings/Security
333
Table 104: IAX Settings/Static Defense
333
Interface Settings
334
Table 105: PBX Interface Settings
334
Figure 217: FXS Ports Signaling Preference
334
Figure 218: FXO Ports ACIM Settings
334
Figure 219: DAHDI Settings
336
API Configuration
337
API Configuration Parameters
337
Table 106: API Configuration Parameters
337
Upload Voice Prompt Via API
338
Figure 220: Upload Prompt User Configuration
339
Cti Server
340
Figure 221: CTI Server Listening Port
340
Asterisk Manager Interface (Restricted Access)
341
Crm Integration
342
Sugarcrm
342
Table 107: Sugarcrm Settings
342
Figure 222: Sugarcrm Basic Settings
342
Vtigercrm
343
Figure 223: CRM User Settings
343
Table 108: Vtigercrm Settings
344
Figure 224: Vtigercrm Basic Settings
344
Zohocrm
345
Figure 225: CRM User Settings
345
Figure 226: Zohocrm Basic Settings
345
Salesforce CRM
346
Table 109: Zohocrm Settings
346
Figure 227: CRM User Settings
346
Table 110: Salesforce Settings
347
Figure 228: Salesforce Basic Settings
347
Figure 229: Salesforce User Settings
348
Pms Integration
349
Hmobile PMS Connector
349
Table 111: PMS Supported Features
349
Hsc Pms
350
Figure 230: UCM & PMS Interaction
350
Mitel PMS
351
Figure 231: UCM & HSC PMS Interaction
351
Figure 232: UCM & Mitel PMS Interaction
351
Connecting to PMS
352
PMS Features
352
Room Status
352
Table 112: PMS Basic Settings
352
Figure 233: Create New Room
353
Figure 234: Room Status
353
Wake up Service
354
Table 113: PMS Wake up Service
354
Figure 235: Add Batch Rooms
354
Figure 236: Create New Wake up Service
354
Mini Bar
355
Table 114: Create New Mini Bar
355
Figure 237: Wakeup Call Executed
355
Figure 238: Create New Mini Bar
355
Table 115: Create New Maid
356
Figure 239: Create New Maid
356
Figure 240: Create New Consumer Goods
356
Figure 241: Mini Bar
357
Wakeup Service
358
Wakeup Service Using Admin Login
358
Figure 242: Create New Wakeup Service
358
Table 116: Wakeup Service
359
Table 117: Max Wakeup Members
359
Wakeup Service from User Portal
360
Wakeup Service Using Feature Code
360
Announcements Center
361
Figure 243: Announcements Center
361
Announcements Center Settings
362
Group Settings
362
Table 118: Announcements Center Settings
362
Table 119: Group Settings
362
Figure 244: Announcements Center Group Configuration
363
Figure 245: Announcements Center Code Configuration
363
Figure 246: Announcements Center Example
364
Status and Reporting
365
PBX Status
365
Figure 247: Status→Pbx Status
365
Figure 248: Trunk Status
366
Table 120: Trunk Status
366
Trunks
366
Extensions
367
Figure 249: Extension Status
367
Table 121: Extension Status
367
Figure 250: UCM6104 Interfaces Status
368
Interfaces Status
368
Table 122: Interface Status Indicators
368
System Status
369
General
369
Network
369
Table 123: System Status→General
369
Storage Usage
370
Table 124: System Status→Network
370
Resource Usage
371
Figure 251: System Status→Storage Usage
371
Figure 252: System Status→Resource Usage
371
System Events
372
Alert Events List
372
Figure 253: System Events→Alert Events Lists: Disk Usage
372
Figure 254: System Events→Alert Events Lists: External Disk Usage
373
Figure 255: System Events→Alert Events Lists: Memory Usage
373
Alert Log
374
Figure 256: System Events→Alert Events Lists: System Crash
374
Figure 257: System Events→Alert Log
374
Alert Contact
375
Cdr
375
Figure 258: Filter for Alert Log
375
Figure 259: CDR Filter
376
Table 125: CDR Filter Criteria
376
Figure 260: Call Report
378
CDR Improvement
380
Figure 261: Call Report Entry with Audio Recording File
380
Figure 262: Automatic Download Settings
380
Figure 263: CDR Report
380
Downloaded CDR File
381
Figure 264: Detailed CDR Information
381
Figure 265: Downloaded CDR File Sample
381
Figure 266: Downloaded CDR File Sample - Source Channel and Dest Channel 1
381
CDR Export Customization
382
Figure 267: Downloaded CDR File Sample - Source Channel and Dest Channel 2
382
Figure 268 : CDR Export File Data
382
Figure 269: CDR Statistics
383
Statistics
383
Table 126: CDR Statistics Filter Criteria
383
Figure 270: Cdr→Recording Files
384
Recording Files
384
User Portal
385
Figure 271: Edit User Information by Super Admin
385
Figure 272: User Portal Login
386
Basic Information
387
Figure 273: User Portal Layout
387
Personal Data
387
Value-Added Features
387
Maintenance
389
User Management
389
User Information
389
Figure 274: User Management Page Display
389
Figure 275: Create New User
389
Custom Privilege
390
Table 127: User Management→Create New User
390
Figure 276: User Management - New Users
390
Figure 277: Assign Bakcup Permoission to "Admin" Users
391
Figure 278: General User
392
Concurrent Multi-User Login
393
Change Password
393
Figure 279: Create New Custom Privilege
393
Figure 280: Multiple User Operation Error Prompt
393
Change Binding Email
394
Figure 281 : Change Password
394
Login Settings
395
Table 128: Change Binding Email Option
395
Figure 282: Change Binding Email
395
Operation Log
396
Figure 283: Login Timeout Settings
396
Table 129: Operation Log Column Header
397
Figure 284: Operation Logs
397
Upgrading
398
Upgrading Via Network
398
Figure 285: Operation Logs Filter
398
Table 130: Network Upgrade Configuration
399
Figure 286: Network Upgrade
399
Upgrading Via Local Upload
400
Figure 287: Local Upgrade
400
Figure 288: Upgrading Firmware Files
400
No Local Firmware Servers
401
Figure 289: Reboot UCM6100
401
Backup
402
Backup/Restore
402
Figure 290: Create New Backup
402
Figure 291: Restore Warning
403
Figure 292: Backup / Restore
403
Data Sync
404
Figure 293: Local Backup
404
Table 131: Data Sync Configuration
405
Figure 294: Data Sync
405
Restore Configuration from Backup File
406
Figure 295: Restore UCM6100 from Backup File
406
System Cleanup/Reset
407
Reset and Reboot
407
Cleaner
407
Figure 296: Reset and Reboot
407
Table 132: Cleaner Configuration
408
Figure 297: Cleaner
408
USB/SD Card Files Cleanup
409
System Recovery
410
Table 133: USB/SD Card Files Cleanup
410
Figure 298: USB/SD Card Files Cleanup
410
Figure 299: UCM6102 Recovery Web Page
411
Figure 300: Recovery Mode
411
Syslog
412
Network Troubleshooting
412
Ethernet Capture
412
IP Ping
413
Table 134: Ethernet Capture
413
Figure 301: Ethernet Capture
413
Traceroute
414
Signaling Troubleshooting
414
Analog Record Trace
414
Figure 302: Ping
414
Figure 303: Traceroute
414
Figure 304: Troubleshooting Analog Trunks
415
Service Check
416
Figure 305: a Key Dial-Up FXO
416
Network Status
417
Figure 306: Service Check
417
Figure 307: Network Status
417
Experiencing the Ucm6100 Series Ip Pbx
418
Other manuals for Grandstream Networks UCM6104
Configuring
13 pages
Guide
31 pages
Quick Installation Guide
16 pages
Buyer's Guide
15 pages
5
Based on 1 rating
Ask a question
Give review
Questions and Answers:
Need help?
Do you have a question about the Grandstream Networks UCM6104 and is the answer not in the manual?
Ask a question
Grandstream Networks UCM6104 Specifications
General
Brand
Grandstream Networks
Model
UCM6104
Category
PBX
Language
English
Related product manuals
Grandstream Networks UCM6102
308 pages
Grandstream Networks UCM6108
160 pages
UCM6100 Series
418 pages
Grandstream Networks UCM6302
423 pages
Grandstream Networks UCM6510
483 pages
Grandstream Networks UCM6202
355 pages
Grandstream Networks UCM6304
423 pages
Grandstream Networks UCM6300A
34 pages
Grandstream Networks UCM6302A
200 pages
Grandstream Networks UCM6308A
200 pages
Grandstream Networks UCM6 series
15 pages
UCM63 Series
423 pages