66
1.6 System Conguration and Part Name
1.6.8 List of Optional Items
The following options are available for this system.
• All optional items could be installed by your service representative.
• For purchasing optional items, please contact your service representative.
• Please disconnect all external USB devices "Barcode Reader, USB Printer, and so on" from the system while the
system is operating battery-powered operation.
z
Equipment
No. Name Notes
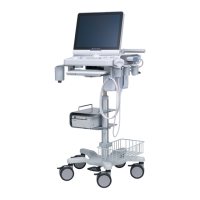
(1) Pole Cart2
It allows easy installation / movement of the system.
Refer to "Pole Cart2" of the "Operation Manual: Applications".
(2) Pole Cart Basket With basket tightener (included in No.1)
(3) Power Extension Unit2
*
1
100 V to 240 V supported
Fuse (A user is not allowed to replace the fuse.)
Fuse size of F1 and F2 :
φ
5.2 × 20 mm
(4) Three-Port Probe Unit
*
1
It makes switching between up to three transducers possible.
Refer to "Three-Port Probe Unit" of the "Operation Manual: Applications".
(5) Reference Signal Unit
It makes an ECG display possible.
Refer to "4.7 ECG Mode".
(6) Foot Switch (Dual)
IPX8
Functions can be assigned to the foot switch.
Refer to "Foot Switch Screen" of the "Operation Manual: Applications".
(7) Foot Switch (Triple)
IPX8
Refer to "Foot Switch Screen" of the "Operation Manual: Applications".
Functions can be assigned to the foot switch.
(8) Cable Hanger
*
1
A hanger that fastens a transducer cable securely.
(9) Keyboard Kit
*
1
It makes the entry of patient information, etc. with a USB keyboard possible.
Refer to "Keyboard" of the "Operation Manual: Applications".
(10) VESA Attachment
It allows VESA-compliant installation.
Refer to "VESA Attachment" of the "Operation Manual: Applications".
(11) Barcode Reader
It makes the entry of patient information with a barcode reader possible.
Refer to "Reader Device Link" of the "Operation Manual: Applications".
(12) CW Kit It makes the use of CW-mode possible, and is built into the system.
(13) Black-and-white printer
*
1
*
2
It allows black-and-white printing on VCP paper.
Only the items authorized by Konica Minolta.
For details, refer to the operation manual of the USB printer.
(14) Clear Ball
The Clear Ball can be illuminated only after it is replaced with the trackball
installed as the standard accessory.
Refer to "Clear Ball" of the "Operation Manual: Applications".
(15) Acoustic Stando
It increases adhesion of the transducer to the body surface.
Refer to "8.3 Acoustic Stando".
*
1: An optional "Pole Cart2" is required.
*
2: An optional "Power Extension Unit2" is required.