EasyManua.ls Logo

Konica Minolta SONIMAGE HS2 - User Manual

Konica Minolta SONIMAGE HS2
308 pages
Print Icon
To Next Page IconTo Next Page
Loading...
EN
01

Table of Contents

Questions and Answers

  • M
    Mrs. Stephanie RogersAug 12, 2025
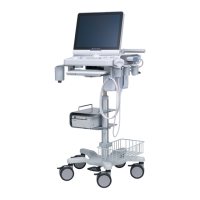
    How to fix Konica Minolta SONIMAGE HS2 Diagnostic Equipment when it cannot be turned on?
    • M
      Matthew HooperAug 12, 2025
      If the Konica Minolta Diagnostic Equipment system does not turn on, verify the following: * The battery status indicator LED on the mini console is lit or blinking. * The power switch LED is lit. * The AC adapter LED is lit. * The power cord and AC adapter are correctly connected. * The power supply cord is correctly connected to a wall-mounted AC socket outlet. If the issue persists, remove the AC adapter and battery, wait for at least 10 seconds, reinsert them, and then press the power switch.
  • T
    Thomas ParkerAug 16, 2025
    What to do if characters are displayed but no images are displayed on Konica Minolta SONIMAGE HS2?
    • J
      Jeffrey MitchellAug 16, 2025
      If you see characters displayed but no images on your Konica Minolta Diagnostic Equipment, take these steps: * Ensure the transducer is correctly connected to the transducer connector and securely locked in place. * Check the Tx Level setting.
  • W
    William TylerAug 20, 2025
    How to resolve error code "CA00017" on Konica Minolta Diagnostic Equipment?
    • A
      Angela ThompsonAug 20, 2025
      If the Konica Minolta Diagnostic Equipment displays error code "CA00017", power off the system and detach the transducer from the transducer connector. Use a spray-type air duster to remove any foreign objects from the transducer connector pin. Reattach the transducer and restart the system. If the error persists, contact your service representative.
  • C
    Courtney BrownAug 25, 2025
    What to do if Konica Minolta Diagnostic Equipment doesn't recognize an SD memory card?
    • J
      Jodi BullockAug 25, 2025
      If your Konica Minolta Diagnostic Equipment doesn't recognize the SD memory card, keep in mind that the first-time registration may take a while. If it still fails, follow these steps: 1. Shut down the system. 2. Disconnect all external storage media and peripheral devices. 3. Insert the SD memory card into the SD memory card slot. 4. Start up the system.
  • C
    Christopher WattsAug 27, 2025
    Why transducers connected to the Three-Port Probe Unit cannot be switched on Konica Minolta SONIMAGE HS2?
    • N
      Nancy SaundersAug 27, 2025
      To resolve issues with transducers not switching on the Three-Port Probe Unit of your Konica Minolta Diagnostic Equipment, ensure the following: * The transducer is correctly connected to the transducer connector and locked in place. * The Three-Port Probe Unit is correctly connected to the transducer connector of the system and locked in place.
  • D
    Daniel ConleyAug 31, 2025
    What to do if a printer cannot be recognized by Konica Minolta SONIMAGE HS2 Diagnostic Equipment?
    • J
      jamesbarberAug 31, 2025
      To connect a printer to the Konica Minolta Diagnostic Equipment, follow these steps: 1. Shut down the system. 2. Disconnect all external storage media and peripheral devices. 3. Connect the printer to the connector using a USB cable. 4. Turn on the printer and wait for it to complete initialization. 5. Start up the system.
  • J
    Jessica MitchellSep 3, 2025
    What to do if touch reaction occurs in a different area than where you touch on Konica Minolta Diagnostic Equipment?
    • L
      Laura TorresSep 3, 2025
      If the touch reaction occurs in a different area than where you touch on the Konica Minolta Diagnostic Equipment, check for any protective sheet, debris, or dirt on the LCD monitor. If the issue persists, ensure the power plug of the power cable is directly connected to the mains plug (hospital grade).
  • H
    Hannah SalazarSep 7, 2025
    What to do if connection is cut due to low signal strength of wireless LAN on Konica Minolta Diagnostic Equipment?
    • M
      Maurice HuntSep 7, 2025
      To address a cut connection due to low wireless LAN signal strength on your Konica Minolta Diagnostic Equipment: 1. Move to a location with a stronger wireless LAN signal. 2. If the connection doesn't recover, switch to a wired network if available.

Summary

Safety Precautions & Warnings

Notice relating to information security

Provides warnings and guidelines for preventing cyber attacks and malware infection.

Cyber-security Measures

Details essential cyber-security measures for protecting the system and data.

Important Information

Network Environment, Wireless LAN, and Cyber Security

Details network security, wireless LAN usage, and cyber security control measures.

Chapter 1 Product Overview

Chapter 2 Before Examination

2.1.2 Connecting the Transducer

Provides step-by-step instructions for connecting a transducer to the system.

2.2 Power Supply Cord and Battery Connection

Details how to connect the power supply cord and battery for system operation.

2.3 Power ON;OFF

Covers the procedures for turning the system ON and OFF, including standby mode.

2.3.4 Security Functions

Describes security features like account management, login, logout, and screen lock.

Chapter 3 Starting Examination

3.2 Examination Flow

Outlines the general workflow for conducting an ultrasound examination.

3.3 Registering Patient Information

Explains how to register and manage patient information using the system.

3.3.3 Entering Patient Information

Details the input fields for basic patient information like ID, name, birth date, and gender.

3.4 Exam Type Selection

Describes how to select exam types and presets for starting examinations.

3.5 Patient Search

Explains how to search for and retrieve existing patient information.

3.6 Edit and Delete Patient Information

Covers procedures for editing and deleting patient and study information.

3.6.2 Deleting Patient Information and Study Data

Explains how to delete patient information and study data, with important precautions.

3.7 Data Backup

Provides instructions on backing up system settings, patient, and study data.

Backup, Restore, Export, and Import Functions

Details the functions for backing up, restoring, exporting, and importing data.

Backing Up Patient;Study Data and Exporting

Explains how to back up patient/study data and export it, including data deletion options.

Restoring Patient;Study Data and Export

Guides on restoring patient/study data and exporting data in CSV format.

3.8 Resuming Examination

Explains how to resume a previously conducted examination within 24 hours.

3.9 Emergency Examination

Covers procedures for starting an emergency examination using Auto ID.

Chapter 4 Diagnosis Mode

4.1 Basic Operation

Introduces basic system operations using the touch panel and mini console.

4.1.2 Operation Buttons

Details the functions of various operation buttons on the screen and mini console.

4.2 Changing Exam Type or Preset

Explains how to change exam types and presets during an examination.

4.2.2 Registering User Preset

Explains how to save custom image parameter settings as user presets.

4.3 Diagnosis Mode Types

Introduces the three main diagnosis modes: basic scanning, mixed, and multi-image.

4.4 Basic Scanning Mode

Details the fundamental scanning mode, B-mode, and its parameters.

B-mode Parameter List

Lists and explains the adjustable parameters for B-mode imaging.

TGC (Transmission Gain Control)

Explains the TGC function for adjusting receive gain relative to depth.

4.4.2 M-mode

Describes the M-mode for observing time-based changes, suitable for heart valve studies.

4.4.3 Color Flow-mode

Describes Color Flow-mode for visualizing blood flow patterns within a Region of Interest (ROI).

4.4.4 Power Doppler-mode

Details Power Doppler-mode for studying blood flow character and volume.

4.4.5 2 D-TDI-mode

Describes 2D-TDI-mode for information on tissue movements, suitable for heart wall studies.

4.4.7 Elastography-mode

Explains Elastography-mode for assessing tissue stiffness, requiring specific transducers and license.

Elastography-mode Parameter List

Lists and explains adjustable parameters for Elastography-mode.

Elastography Safety and Navigation

Covers safety precautions and navigation types for Elastography-mode.

4.4.8 PW Doppler-mode

Describes PW Doppler-mode for observing blood flow direction and velocity.

4.4.9 PW-TDI-mode

Details PW-TDI-mode for observing heart wall tissue movements.

4.4.10 CW Doppler-mode

Describes CW Doppler-mode for observing high-velocity blood flow.

4.5 Mixed Mode

Explains how to combine and display multiple modes simultaneously.

4.6 Multi-image Mode

Introduces modes for comparing images side-by-side or one above the other.

4.7 ECG Mode

Explains how to overlay ECG waveforms on ultrasound images for synchronization.

4.7.1 Connecting the Reference Signal Unit

Provides instructions for connecting the optional Reference Signal Unit for ECG.

4.7.3 Starting the ECG Display

Guides on how to start and display ECG waveforms on the ultrasound image.

4.8 Panoramic View

Introduces the panoramic view function for creating wide field-of-view images.

Panoramic Image Capture Procedure

Guides on placing the transducer and starting the capture of panoramic images.

Chapter 5 Common Function in Ultrasound Images

5.1 Cine Playback and Operation

Explains how to play back and operate recorded Cine images.

Cine Playback Control and Editing

Covers playback control, alignment, playback area editing, and cine clip storage.

5.2 Body Mark Menu and Operation

Explains how to use the Body Mark function to annotate scan positions.

5.3 Text (Annotation)

Covers the Text function for adding annotations like text and arrow marks to images.

5.4 Measurement

Introduces the measurement functions available for quantitative analysis.

5.4 Measurement Basic Operation

Covers the basic steps for starting and ending measurements, including image freezing.

Measurement Tools and Operation

Guides on selecting measurement tools, moving cursors, and confirming measurements.

5.4.2 Basic Measurement Items List

Lists basic measurement items available for B-mode, including distance, area, and volume.

5.6 Common Functions

Introduces common functions that enhance ease of use and image acquisition.

5.6.1 Operation Items

Details easy-to-use functions manipulated via trackball or touch screen.

5.6.2 Direct Touch and Drag

Explains how to change parameters by dragging areas on the ultrasound image.

5.6.3 Full display mode

Explains how to expand the image and information area to fill the entire screen.

5.6.4 Touch invalidation mode

Describes how to block touch operations to prevent accidental input.

5.6.9 Hypoechoic Region Characterization

Explains the function for superimposing colors on hypoechoic regions for enhanced visualization.

Chapter 6 Reviewing, Printing, and Transferring Images

6.1 Storing Images

Provides information on storing acquired images and clips in the system.

6.1.1 Storing Still Images

Guides on how to store still images after freezing the ultrasound scan.

6.1.2 Storing Clips

Explains methods for generating and storing clips from live or Cine images.

6.2 Thumbnail Function

Describes how to display and manage stored images using thumbnails.

6.2.2 Browsing and Editing Images

Guides on browsing past-stored images and performing operations like text, body mark, and measurement.

6.2.3 Deleting or Transferring Images

Covers procedures for deleting unnecessary images or transferring them to external media.

Chapter 7 Maintenance; Inspection

7.1 Maintenance Checks Before and After Use

Outlines essential checks to perform before and after using the system.

7.2 Maintenance Check and Cleaning

Covers routine maintenance checks and cleaning procedures for the system.

Chapter 8 Transducer and Biopsy

8.1 Transducer

Introduces the transducer, its functions, and safety precautions.

Transducer Usage and Precautions

Covers essential usage guidelines, safety warnings, and handling of transducers.

8.1.4 Daily Inspection of Transducer

Outlines daily inspection procedures to ensure transducer safety and functionality.

8.1.6 Cleaning and Disinfection

Provides detailed instructions and precautions for cleaning and disinfecting transducers.

8.2 Biopsy Safety and Precautions

Covers safety precautions and warnings specifically for performing biopsy procedures.

8.2.6 Simple Needle Visualization (SNV)

Explains the SNV feature for enhancing biopsy needle visibility.

Chapter 9 MI;TI

9.1 Basic Knowledge of MI;TI

Explains Mechanical Index (MI) and Thermal Index (TI) and their relation to bioeffects.

MI;TI Limits and ALARA Principle

Covers FDA limits for MI/TI and the ALARA principle for controlling ultrasound exposure.

9.7 Caution: ALARA and Acoustic Output

Reiterates the importance of practicing ALARA and cautions regarding ultrasound procedures.

Chapter 10 Acoustic Output

Chapter 11 Others

11.1 Troubleshooting

Provides guidance on troubleshooting common system problems and error messages.

11.2 Error Code List (CA00001-CA00014)

Lists error codes related to system shutdown, battery, display, and disk space.

Error Code List (CA00015-CA07051)

Continues the error code list covering system errors, firmware, probe ports, and CPU/battery temperature.

Error Code List (CA07012-CA07030)

Lists boot system errors and their corresponding error codes and solutions.

Error Code List (CA07031-CA07051)

Continues the error code list for boot system errors and application busy states.

Error Code List (CA0 A001-CA62003)

Lists error codes related to export failures, device readiness, storage space, and internal errors.

Error Code List (CA62004-CA62011)

Details error codes related to printer failures, connectivity, and response issues.

11.3 Accuracy of Measurement

Discusses factors affecting measurement accuracy and potential sources of error.

11.7 Check List for Maintenance Check

Provides a checklist for performing system maintenance inspections before and after use.

Konica Minolta SONIMAGE HS2 Specifications

General IconGeneral
TypePortable Ultrasound System
Operating SystemProprietary
Display15-in LCD
Transducer Frequency Range1 MHz to 18 MHz
Image ModesB-mode, M-mode, Color Doppler, Power Doppler
Transducer Ports2
ApplicationsMusculoskeletal, General Imaging, Vascular
StorageSSD
PortsUSB, LAN
Supported ProbesLinear, Convex, Phased Array