Actions Yes No
Step 6
Remove the ADF rear cover and inspect the ADF cover closed sensor for
dirt and debris.
Is there dirt and debris present?
Go to step 7. Go to step 8.
Step 7
Clean the dirt and debris from the sensor.
Does this fix the issue?
The problem is solved. Go to step 8.
Step 8
Inspect the connections on the ADF relay card in the ADF.
Are all the connections properly connected?
Go to step 9. Secure all the
connections.
Step 9
Check the ADF cable for continuity.
Is there continuity?
Go to step 10. Replace the ADF cable.
See “ADF cable
removal” on page
339.
Step 10
Check for signals or voltages from JADF1 on the controller board. Pin 14
and 16 should measure +24VDC. Pins 15 and 22 should measure +3.3VDC.
Are there signals or voltages present?
Replace the ADF. See
“ADF unit removal” on
page 333.
Replace the controller
board. See “Controller
board removal” on
page 257.
45y paper jams
[x]-page jam, remove all pages from the output bin. Leave paper in bin. [45y.xx]
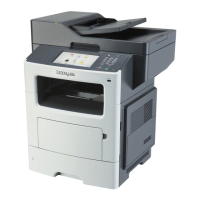
Paper jam in the finisher bin
1 Empty the standard bin.
7016
Diagnostic information
81